Posting to accounts
If you are posting multiple transactions (principal, interest, and so on) for one account, the system asks for deposit information only for the first transaction. If the system does not display these prompt, your agency does not use this feature. You can still access them, however, by entering D in either the Source or Rec'd From fields. The cursor moves to the bottom of the screen beside the prompt Check Amt.
If you are using the Victim Restitution or Account Distribution Proration modules, see "Posting a Payment" or "Posting an NSF or Cancel Payment" in the Victim Restitution User's Guide or the Account Distribution Proration User's Guide. Both guides are available at Menu 12: Special Routines.
To post to an account:
- Before posting transactions, run the applicable payment report to determine which transactions are ready to post. For more information, see Menu 4.20 - Plan Transactions Reports.
-
From the Master menu, navigate to Trust Activity > Post (menu 4.1).
-
If your agency has set up a forwarding strategy in Account Flow Manager (see Menu 10.3 - Work Strategies), the Run Strategy Forwarding Report prompt may display when you enter the Posting screen immediately after logging into the system. If you are not sure what option to choose, contact your manager.
Do one of the following:
- To run the report, click Yes. To complete the steps for this report, see Running the Strategy Forwarding report.
- To skip running the report, click No.
- If The Collector System is in a preliminary Month-End process, the Preliminary Month End in Progress. Use Old or New Month? prompt displays. Do one of the following:
- To post transactions in the old month, select Old.
- To post transactions in the new month, select New.
- To return to the Trust Activity menu, select Cancel.
- At the To Continue. Press <CR> prompt, press Enter.
-
If your agency has set up The Collector System for batch processing, the Batch Number to Update window displays. Do one of the following:
 Post a transaction to a new batch
- Select New Batch Number, and press Enter or click Ok.
- At the At the Your New Batch is number prompt, press Enter or click Ok.
Post a transaction to an existing batch
- Select Use Existing Batch, and press Enter or click Ok.
- In the Open Batches window, select the batch to post the account to, and press Enter or click Ok.
- In the Batch number was Last Update date window, click Ok.
Not post a transaction in a batch
- Select Go to Account Prompt, and press Enter or click Ok.
- Click Cancel.
-
At the Enter Account# (?, /) prompt, type the account number, and press Enter.
You may see an alert that a record is locked. This indicates that another user has the account open. The system displays a prompt with the user's initials.
-
If you are posting a payment to a secondary Responsible Persons account, at the This acct is a Secondary to RP# account number. Post to Primary?, type Y to post the payment to the primary Responsible Persons account, and press Enter.
For more information, see Managing responsible persons.
-
In the Amount field, do one of the following:
Enter a transaction
Type the amount, and press Enter.
For more information, see Entering posting amounts in Amount fields.
Use an option
Do one of the following:
-
Type an option code, and press Enter.
For a list of options and descriptions, see Using options in the Amount field or Spread Amt field.
- To choose from a list of option, type ?, and press Enter.
- In the Help window, select an option, and press Enter or click Ok.
-
-
In the Trans Code field, do one of the following:
- Type the transaction code for this posting, and press Enter.
- To use the default transaction code, press Enter.
- To choose from a list of transaction codes, type ?, and press Enter.
- In the Account Trans Codes window, select a transaction code, and press Enter or click Ok.
For more information, see Entering transaction codes in the Trans Code field.
- In the Trans Date field, do one of the following:
- Type the transaction date in MM-DD-YY format, and press Enter.
To use the default date (displayed from the last transaction), press Enter.
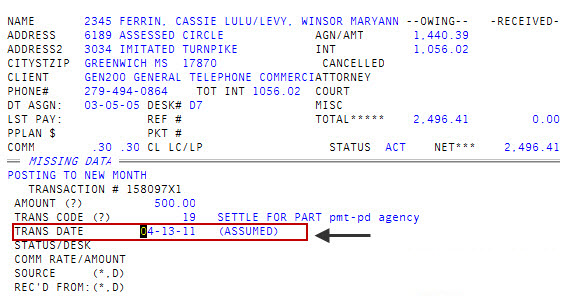
When the last transaction date is used, the notation "(Assumed)" displays to the right of the field. For more information, see Entering dates in the Trans Date or Spread Date fields.
-
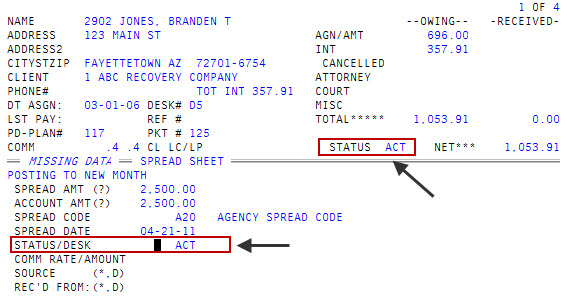
In the Status/Desk field, do one of the following, and press Enter:
If changing a desk number, make sure to do it before changing or accepting the current status code.
Temporarily or permanently change a desk number
Do one of the following:
- If a commission is to be split between two collectors, or if desk assignments were changed and a commission earned by the collector formerly assigned to the desk needs to be posted, enter a temporary desk change by typing T, a period (.), and the temporary desk number. For example, T.1. The message Temp Desk# For This Transaction Only displays.
- To permanently change the desk number, type D, a period (.), and the new desk number. For example, D.3. The message Desk# Updated displays.
Change the status code
Do one of the following:
- Type a new status code, and press Enter.
- To use the current status code, press Enter.
The new status code displays in the Status field on the top half of the screen.
-
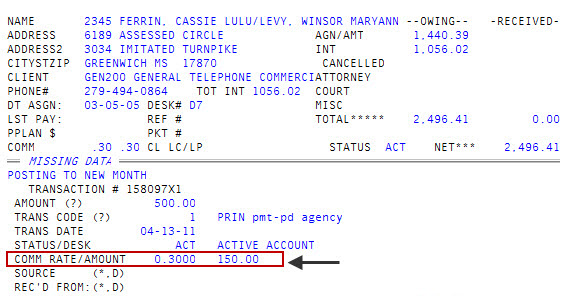
In the Comm Rate/Amount field, do one of the following:
Accept the displayed rate
Press Enter.
The Collector System automatically enters the commission rate and amount. The commission rate is entered from one of the following places: The account record for commissions on distributed items, the client distribution setup, the account Comm field, or the client Comm Rate field.
Change the rate
Do one of the following, and press Enter:
Entering a commission rate here does not update the commission rate in the account record. This new rate only applies to this transaction.
-
Type the new rate as either a decimal or a fraction.
You can enter up to four digits after the decimal point.
- To post a specific commission amount for this transaction only, type the dollar sign ($) and the amount.
The Collector System computes the percentage of the transaction that this amount represents and displays both it and the actual amount.
-
-
If the transaction is a payment to the agency, the Check Amount window displays. Do one of the following:
Enter a check
If you received a check for the amount displayed in the window, press Enter or click Ok.
Enter a check with a different amount
If you received a check for a different amount, type the amount (do not use a dollar sign), and press Enter or click Ok.
Enter cash
- Type 0, and press Enter or click Ok.
- In the Currency Amount window, type the amount of paper money received (do not use a dollar sign), and press Enter or click Ok.
- In the Coin Amount window, type the amount coin money received (do not use a dollar sign), and press Enter or click Ok.
- In the Bank Number window, do one of the following:
- For checks, type the bank number, and press Enter or click Ok.
- For cash, to keep track of the written receipt number used for cash transactions, type / and the receipt number, and then press Enter or click Ok.
- If your agency uses the holdover feature, the Holdovr field displays to the right of the Comm Rate/Amount field. Do one of the following:
- If your agency does not use holdovers, proceed to Step 14.
- If your agency is using the holdover feature, complete posting the transaction using the instructions in Posting transactions for agencies using holdover periods.
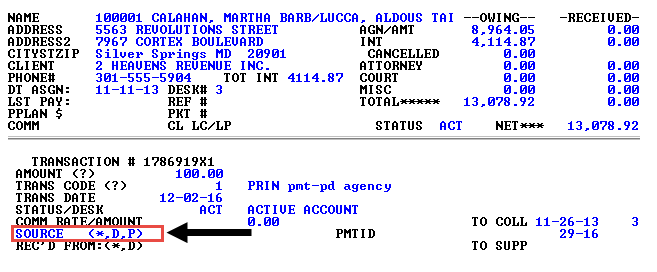
- In the Source field, do one or more of the following to enter optional payment information:
- To enter a payment ID for a SPA, type P, and press Enter.
In the PMTID field, type the payment ID, and press Enter.
The payment ID displays in the PMTID column on the printed SPA Electronic Payment Report. Due to the width of the report, viewing the screen report does not display the PMTID column.
- To enter the manner in which the payment was made, type the payment method (such as check, MasterCard, Visa, or cash), and press Enter.
- To enter a statement comment, type an asterisk (*), and press Enter.
- In the Comment field at the bottom of the screen, type a comment, and press Enter. For more information, see Entering transaction comments.
If the deposit prompts do not automatically display after entering information in the Comm Rate/Amount field or to add additional deposit information, type D, and press Enter. Use the instructions in Step 12-13.
- To enter a payment ID for a SPA, type P, and press Enter.
-
In the Rec'd From field, do one or all of the following to enter optional information about the person making the payment:
Enter the name or relationship to the account of the person making the payment
- Type the name, and press Enter.
- To cross-reference the name in this field, type XF, a colon (:) and a space before the name. For example, XF: SMITH, WILLIAM. This allows the account to be located through Inquiry using this name. The XF is removed from the payment transaction comment.
Enter alternate payer information
- Type AP, and press Enter.
- In the Enter Alternate Payer Name window, type the name (last name and then first name), and press Enter or click Ok.
- In the Enter Alternate Payer Address window, type the street address, and press Enter or click Ok.
- In the Enter Alternate Payer City window, type the city, and press Enter or click Ok.
- In the Enter Alternate Payer State window, type the state initial, and press Enter or click Ok.
- In the Enter Alternate Payer Zip Code window, type the zip code, and press Enter or click Ok.
Enter a statement comment
- Type an asterisk (*), and press Enter.
- In the Comment field at the bottom of the screen, type a comment, and press Enter. For more information, see Entering transaction comments.
Add additional deposit information
- Type D, and press Enter.
- Use the instructions in Step 12-13.
-
At the OK to file? prompt, do one of the following:
File the transaction
Press Enter.
Exit the screen without filing the transaction
Type N, and press Enter.
Display the account balance
Type a period (.), and press Enter.
Instead of showing the Owing and Received columns in the upper right-hand corner of the screen, entering a period displays Owing and Balance. To go back to showing Owing and Received, type a period again, and press Enter.
Display the Assigned Amounts window
Type A, and press Enter.
The Owing and Received columns in the upper right-hand corner of the screen are replaced by the Assigned Amounts window. For more information, see Viewing distribution windows.
Display the Miscellaneous Amounts window
Type M, and press Enter.
The Owing and Received columns in the upper right-hand corner of the screen are replaced by the Miscellaneous Amounts window. For more information, see Viewing distribution windows.
Use the calculator
Type CA, and press Enter.
For more information, see Using the calculator
Continue making changes to the transaction screen
Type /, and press Enter.
If you try to file a transaction with a date prior to the last Month-End, The Collector System displays the prompt Transaction Date Is Prior To The Last Close Ok (CR=Y/N). This message displays to make sure you do not inadvertently post an adjustment to a previous month's transaction in the current month's transaction record.
After a transaction is filed, the cursor returns to either the Amount field or the Account# prompt, depending on how your agency has set up the Posting screen. For more information, see Returning the cursor to the Amount field or Account# prompt in the Posting screen.