Configure notice series
Use this option to set up a notice series. For more information, see Working with notice series.
- In the Master menu, navigate to Management Strategy > Correspondence > Letters/Notices (menu 10.7.80).
- In the Letters/Notices Setup window, select Series, and press Enter or click Ok.
- In the Enter Series Name window, do one of the following, and press Enter or click Ok.
- If you do not know the name of the notice series, to see a list of series names, type ?.
- In the Series Help Function Options window, select List Current Valid Series, and press Enter or click Ok.
- In the Valid Notice Series Are screen, view the list of notice series, and press Enter.
- In the Series Help Function Options window, click Cancel.
- If you know the series name to update, type it. Proceed to Step 5.
- To add a new series, type the name of the new series.
- If you do not know the name of the notice series, to see a list of series names, type ?.
- At the series name Not in Series file. Add? prompt, do one of the following:
- To create the notice series, click Yes.
- To not create the notice series, click No.
- In the Series Options window, do one of the following, and press Enter or click Ok.
- To set up a notice series to send to accounts on a pre-determined time schedule, select Trust.
- To set up a notice series to send to accounts that are set up on a payment plan, select Payment Plan.
To set up a notice series that tell a responsible party that a payment is due, select Precollect.
For more information on pre-collect, see Menu 11: Precollect.
- To set up a notice series to send to an account who is on a post-dated check plan, select Post Dated Check.
-
In the Series namescreen, in the Description field, type a description for the notice series, and press Enter.
The description displays on the Help screen to identify the contents of the series.
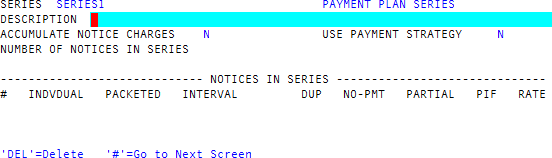
- In the Accumulate Notice Charges field, to accumulate notice charges if you have a pre-notice series or a regular notice series on a transfer logon, type Y; otherwise, leave the field as N.
- In the Number Of Notices In Series field, type the total number of notices in the series.
-
In the Use Payment Strategy field, if you want to control a series type based on whether or not a payment has been made, type Y to control the flow of a series.
You can use this option only when sending notices to Trust accounts.
-
For each notice in the notice series, in the Notices In Series section of the screen, do the following.
 Specify the letter to send to an unpacketed account
In the Individual field, type the name of the letter to generate, and press Enter.
Specify the letter to send to a packeted account
In the Packeted field, type the name of the letter to generate, and press Enter.
Set the interval between when letters are sent
In the Interval, type the number of days, and press Enter.
Send a duplicate letter to an alternate payer
In the DUP field, type Y, and press Enter.
Specify the letter to send based on payment status
- In the Use Payment Strategy field, type Y, and press Enter.
- In the No-Pmt, Partial, and PIF fields, do the following:
- To send the notice, leave the field blank.
To send another notice instead of this one, enter the number of that notice, which is shown in the # column, and press Enter.
If you send another notice, it must have a larger line number (be on a lower line) than the current line number.
- To stop the notice series, type X, and press Enter.
Charge a fee to the client for each notice sent
- In the Accumulate Notice Charges field, type Y, and press Enter.
- In the Rate field for each notice, type the amount to charge the client for sending this notice, and press Enter.
This supersedes the rate per letter entered in the Preclient Update screen.
- In any field, to go to the second screen, type #, and press Enter.
-
In the Series name Screen #2 screen, use the following instructions to fill out each field.
Only specific fields are available, depending on what kind of notice series you are configuring.
 Print Only 1 First Notice
To combine all first notices for a packet scheduled to print the same day, type Y, and press Enter.
Only one of these notices is printed as a representative of the packet. If this or any other option is taken to combine notices, ensure that you set up that notice for packet totals and detail. For more information, see Configuring print formats for @W codes and Configuring letter/notice definitions. Also, this only applies to clients who are using the same notice series.
Print Only 1 Of Others
To combine the packet members on all subsequent notices, regardless of whether they were combined on the first notice or not, type Y, and press Enter.
If first notices are combined, the system combines all subsequent notices, and this field will be filled in for you.
Restart On New Packet Member
To delete the existing notice series and start the series over with the new first notice if a new account is added to a packet, type Y, and press Enter.
If you entered Y in both previous fields, the cursor automatically moves to this field.
Cancel First If Others
To include a new account added to a packet in the remaining notices in the series, type Y, and press Enter.
This field is the opposite of the previous one.
Incl Only Same Client In Pkt
Do one of the following, and press Enter:
- If packet details and totals print on the notice, to ensure new packet members from different clients get separate notices for each client, type Y.
- To allow packet members from separate clients to be combined in a single series, type N.
The only debts included on any notice are those with the same client number as the account being printed.
Restrict Pkt When Combined
To apply the notice series to only a subset of members of a packet and their corresponding accounts, type Y, and press Enter.
For more information, see Understanding notice series groups.
Continue series for Pkt/Grp
To continue the notice series when the account that represents the notice series group is PIF or canceled, type Y, and press Enter.
For more information, see Understanding notice series groups.
The Collector System enables this field only when:
- You enter Y in either the Restrict Pkt When Combined or the Print Only 1 of Others field.
And
- You enter Y in either the Restart on New Packet Member or the Cancel First If Others field.
Days To Designate As New
Type the number of days after a new account is added to The Collector System that the asterisk shall continue to display on notices with packet details, and press Enter.
When an account that has just been added to The Collector System is added to a packet, an asterisk (*) displays beside packet information on notices containing packet detail (by use of an @W or @V code). Day "1" is the day the account is added. So, if the account is packeted overnight, the asterisk displays the next day if "2" is entered, the day after that if "3" is entered, and so on.
Days House Delay
This field displays when you are setting up a trust series. It allows you to specify a house delay period for accounts receiving this notice series. These accounts will not be turned over to a collector until this number of days have passed. This overrides the agency default delay.
Past Due Ntc Threshold Pct
To establish a threshold based on a percentage a payer can underpay on a payment plan and not have a past due notice sent to them, type the percentage, and press Enter.
For example, if you enter 10% in this field, and the account owes a $100 payment, if the customer sends a $90 payment ($100 - $10), the system does not send a past due notice. But, the next month, if the customer sends a $90 payment without first paying the $10 in arrears from the previous month, the system sends a past due notice because the customer has now underpaid 20% on the payment plan.
You can establish a threshold using a percentage, an amount, or both. If you use both, The Collector System uses the lower of the two as the threshold.
Past Due Ntc Threshold Amt
To establish a threshold based on an actual amount a payer can underpay on a payment plan and not have a past due notice sent to them, type the dollar amount, and press Enter.
Track Payments Per Notice
Do one of the following:
- To track payments per notice, type Y.
- To not track payments per notice, type N.
To determine the effectiveness of notices, you can track or follow the payments that come in during a reasonable time after you send a notice.
Days To Track Last Payment
Type the number of days to track the last notice in this series, and press Enter.
The number of days to track payments per notice is the interval between notices.
- At the OK to File prompt, do one of the following:
- To save your changes, press Enter or type Y.
- To discard your changes, type N.
- To go back and make changes, type /.