Configuring or changing the CU·Documents directory paths and print order
Use this option to set the paths where you store CU·Document letters/notices, the order to print them in, and whether to include or exclude trailing spaces.
To configure or change the CU·Documents directory paths and print order:
- From the Master menu, navigate to Management Strategy > Correspondence > CU·Documents Setup (menu 10.7.85).
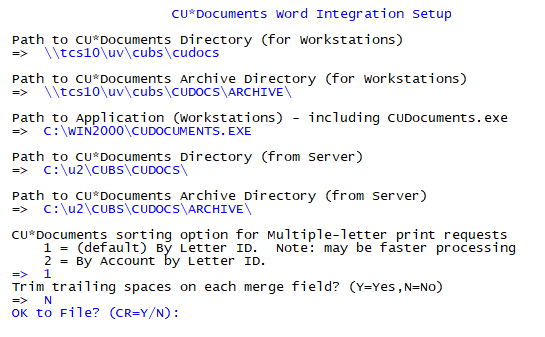
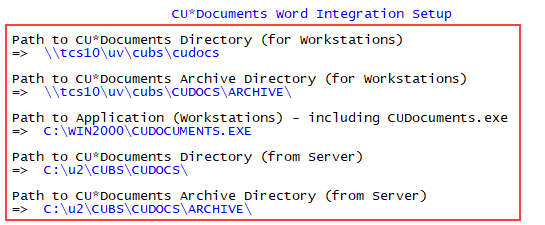
- In the CU·Documents Word Integration Setup screen, under the Path to CU*Documents Directory (for Workstations), type, or change, the path to the workstation root directory, and press Enter.
- Under the Path to CU*Documents Archive Directory (for Workstations), type the path to the workstation archive directory, and press Enter.
- Under the Path to Application (for Workstations), type the path to the workstation application, and press Enter.
- Under the Path to CU*Documents Directory (from Server), type the path to the root directory from the server, and press Enter.
-
Under the Path to CU*Documents Archive Directory (from Server), type the path to the archive directory from the server, and press Enter.
- At the CU*Documents sorting option for Multiple-letter print requests prompt, do one of the following:
- To sort and print the letters/notices by letter ID and then by customer, press Enter.
To sort and print the letters/notices by customer and then by letter ID, type 2, and press Enter.

- At the Trim trailing spaces on each merge field prompt, do one of the following:
- To delete any trailing spaces located at the end of a merge field, type Y, then press Enter.
To keep the trailing spaces at the end of a merge field, type N, and press Enter.

- At the OK to File? prompt, do one of the following:
- To save the screen, press Enter.
- To exit the screen without saving, type N, and press Enter.