Posting transactions for packeted accounts using spread codes
The instructions for posting transactions for packeted accounts is almost the same as those for unpacketed accounts, there are just a few extra steps.
If you are using the Packet Posting module, see the Packet Posting User's Guide for more information on posting across accounts within a packet. You can download the guide from the RevQ Client Center website.
To post transactions for a packeted account using spread codes:
- Follow Steps 1-6 in Posting transactions using spread codes.
-
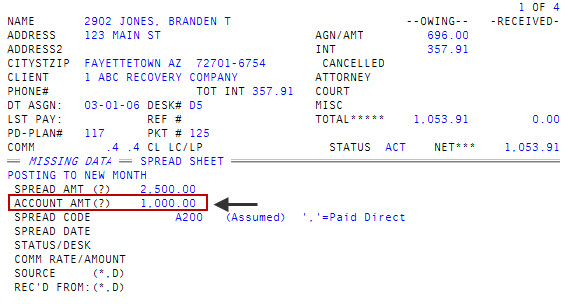
In the Spread Amt (?) field, type the amount, and press Enter.
After you press Enter, The Collector System automatically enters the cursor in the Spread Code field. The system assumes you want to perform a spreadsheet post for the entire payment so it automatically enters the amount entered in the Spread Amt (?) field into the Account Amt (?) field. You can go back to the Account Amt (?) field and change the amount.
- In the Spread Code field, do one of the following:
- To change the amount to post using this spread code, type /, and press Enter to go back to the Account Amt (?) field.
- To assign a spread code, type the code, and press Enter. Proceed to Step 5.
- In the Account Amt (?) field, do one of the following:
- To accept the default amount automatically entered by the system from the Spread Amt (?) field, press Enter.
- To use an option, do one of the following:
Type an option code, and press Enter.
For a list of options and descriptions, see Using options in the Account Amt field or Spread Amt field.
To choose from a list of options, type ?, and press Enter. In the Help window, select an option, and press Enter or click Ok.
- Complete the process of posting and saving this transaction by following Steps 9-16 in Posting transactions using spread codes. After you save the transaction, the system displays the message Spread Balance Not Zero.
- In the Account Amt (?) field, do one of the following to continue posting transactions to packet members, and press Enter:
- To display the next account in the packet, type J.
- To display the prior account in the packet, type JJ.
- To display the primary account in the packet, type JX.
- To choose a packet member from a list packet members for this packet, type H1.
- At the Account# (P, <CR>) prompt, type the account number, and press Enter.
- Complete the process of posting and saving transactions for all the appropriate packet members.