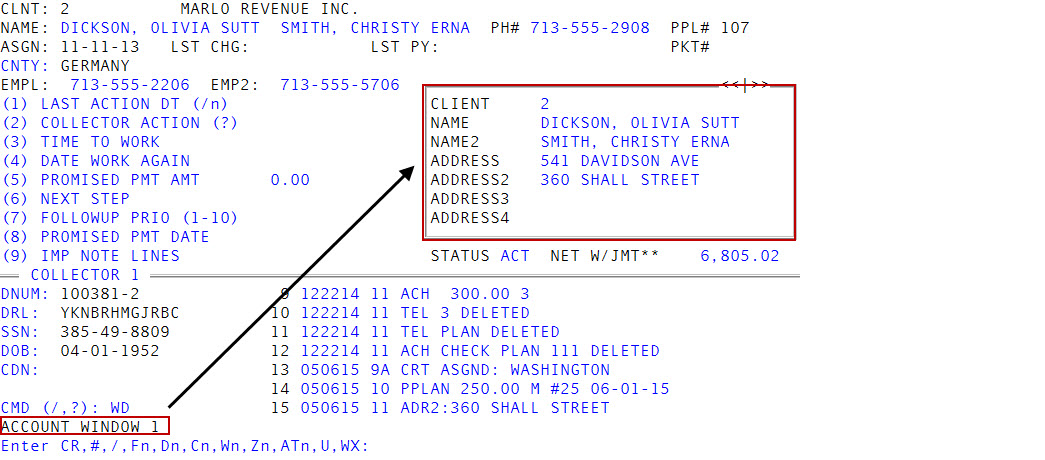
Displaying the Account windows
Use command WD or WDn to access the Account windows, which display information about the account.
There are six Account windows, which include the following fields:
- D1 - Displays the client, customer name, and address for the account.
- D2 - Displays the zip code, date of birth (DOB), the desk number the account is assigned to, social security number, the packet number (if applicable), and the DRL field.
- D3- Displays the client reference number, forward client name (if applicable), the date is was assigned to the agency, the last charge and payment date, and the last activity date.
- D4 - Displays the interest effective date, patient name (if applicable), special fields, and credit report.
- D5 - Displays the status of the account, the interest rate, principal adjustment, the date the account was set up at the agency, and the commission rate.
- D6 - Displays the email address for the account.
|
Field |
Description |
|
Client |
The client ID. |
|
Name |
The customer's name. |
|
Name2 |
The name of an additional responsible person for the account. |
|
Address |
The customer's address. |
|
Address2 |
The additional address for the account. |
|
City |
The customer's city. |
|
S |
The customer's state. |
|
Zip |
The customer's zip code. |
|
Phone |
The customer's phone number. |
|
DOB |
The customer's date of birth. |
|
Desk |
The desk the account is assigned to. |
|
SSN |
The customer's social security number. |
|
Packet |
The packet number the account belongs to. |
|
DRL# |
The Data Reference Line number. |
|
Cli Ref# |
The number the client uses to identify the account. |
|
Fwd Cli |
The name of the original client the account was forwarded from. |
|
Asgn Date |
The date the account was assigned to your agency. |
|
Lst Chg Dt |
The date of the last charge to the account |
|
Lst Pay Dt |
The date of the last payment on the account. |
|
L/Activity |
The date of the last activity on the account. |
|
CL LC/LP |
The date the client last charged the account or last received a payment from the customer before the account was assigned to your agency. |
|
Intr Eff |
The interest effective date. |
|
Spc Fld2 - Fld5 |
Custom fields that store information your agency sets up and enters. |
|
Credit Rpt |
The date your agency ran the last credit report for this account. |
|
Status |
The status code that describes the status of the account in the collection process. |
|
Int Rate |
The interest rate that applies to the account. |
|
Prin Adj |
The principal adjustment that applies to the account. |
|
CR Can Flg |
The flag for canceling credit reporting for the account. |
|
Can Date |
The date your agency canceled the account. |
|
Setup Dt |
The date your agency set up the account. |
|
Comm |
The commission rate that applies to the account. |
|
|
The customer's email address. |
To display the Account windows:
- Open an account in the Collector screen.
- At the CMD (/, ?) prompt, do one of the following, and press Enter.
- To open the Account Window 1, type WD.
- To open a specific Account window, type WD and the number of the window to display. For example, type WD2 to display Account Window 2.
-
At the Enter CR, #, /, Fn, Dn, Cn, Wn, Zn, ATn, U, WX prompt, do one of the following:
 Go to the next window or return to the CMD prompt
In each window, press Enter.
Save your changes and return to the CMD prompt
Type #, and press Enter.
Go back to the previous window
In each window, type /, and press Enter.
Go to a Financial Profile window
Type F and the window number, and then press Enter.
Go to an Account window
Type D and the window number, and then press Enter.
Go to a Client or Client2 window
Type C and the window number, and then press Enter. For more information, see Displaying the Client windows.
Go to a Employee Collector window
Type W, and the window number, and then press Enter. For more information, see Working with the Desk Collector and Employee Collector windows.
Go to a Desk Collector window
Type Z and the window number, and then press Enter. For more information, see Working with the Desk Collector and Employee Collector windows.
Go to a Contact Attempts window
Type AT and the window number, and then press Enter. For more information, see Displaying the Contact Attempts window.
To update a field in the Client, Account, or Financial Profile window
Type U, and press Enter. For more information, see Working with the Desk Collector and Employee Collector windows.
Return to the Collector screen
Type WX, and press Enter.