Change the consent status for an account contact
Consent allowing a collector to use a specific account contact to communicate with a debtor is set in the CNST (consent) field of the Personal Contacts (PC) screen. For example, a responsible party may grant consent to receive text messages or be called manually by a representative, but not give consent to be called by an automated dialer. These consent authorizations are maintained in the CNST field so that contacts can be limited to only those that have been authorized.
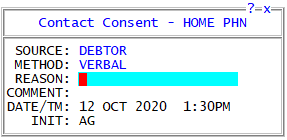
When a change is made to the consent status of an account contact, The Collector System will prompt you to enter who authorized the consent change for the responsible party (for example, the source could be the debtor, a guardian, or an attorney) and the method used for the consent update (such as verbal, letter, email, or text).
See Menu 10.5.58 - Contact Codes for more details.
To add, update, or remove the consent status for an account contact:
- Open an account in the Collector screen.
- At the CMD prompt, type PC, and press Enter.
-
In the Personal Contacts screen, do the following:
 Allow consent to an account contact
- Navigate to the CNST field of the account contact you are updating. For more information, see The Personal Contacts screen.
- Type /A, and press Enter.
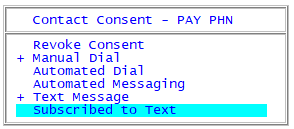
- In the Contact Consent window, select the type of consent to be granted:
The types of consent available to select vary based on the contact being updated, For instance, cell phones have a variety of consent types (texting, manual dialing, auto dialing or messaging) while a street address has only one (normal delivery).
- Input the Source and Method regarding how consent was granted. For instance, if a debtor called into the agency and granted consent to be contacted, the collector would enter DEBTOR as the Source and Verbal as the Method. The Reason and Comment fields allow collectors to add additional information pertinent to the updated contact consent.
- When full contact consent is granted for an account contact, the status in the CNST field is set to a full (FULL) status.
You can update multiple account contact consents at once by selecting all the consent types (Automated Dial, Manual Dial, Text Message) for which consent is granted. However, if the Source or Method of a consent differs from any of the other consents, you should update each consent individually.
Revoke consent of specific types of account contact
- Navigate to the CNST field of the account contact which will have consent revoked. For more information, see The Personal Contacts screen.
- Type /A, and press Enter.
- In the Contact Consent window, deselect the consent type you wish to revoke and press Enter.
- Input the Source and Method regarding how consent was revoked. For instance, if the responsible party called the agency requesting they not be called by an automated dialer, but texting or an agent manual calling them was ok. the collector would enter DEBTOR as the Source and Verbal as the Method. The Reason and Comment fields allow the collector to add additional notes regarding changes to contact consent based on the phone call.
- When partial contact consent is granted for an account contact, the status in the CNST field is set to a partial (PART) status.
Revoke ALL consent from an account contact
- Navigate to the CNST field of the account contact that will have all contact consent revoked. For more information, see The Personal Contacts screen.
- Type /A, and press Enter.
- Input the Source and Method regarding how consent was revoked. For instance, if a debtor called the agency and made a request not to be contacted at all by the agency, the collector would enter DEBTOR as the Source and Verbal as the Method. The Reason and Comment fields allow collectors to add additional information pertaining to the revoked contact consent.
- When all contact consent is revoked for an account contact, the status in the CNST field is set to a Do Not Contact (DNC) status.
Manually subscribe to texting
- Navigate to the Value field containing the phone number the consumer wishes to subscribe to texting.
- Type /OPTIN, and then press Enter.
-
The consumer's cell will be sent a message similar to the one below, indicating that the texting "Opt In" process has been initiated:
- The consumer needs to respond with "YES" to this initial message to complete the text subscription process. If a consumer fails to do this, they will not receive future text notifications regarding their account.
The phone number does not need to be identified as 'CELL' for this to work. The /OPTIN command will update a phone's sub-type. However, if the number is not a cell phone, an "Optin Unsuccessful" message will display to inform you the process did not complete.
Reply YES to approve txt msgs from ArtCo Recovery. For info call 1-888-555-INFO.
This is a comm from a debt clctr. Msg&Data rates may apply.Manually unsubscribe from texting
- Navigate to the CNST field of the account contact that will have all contact consent revoked. For more information, see The Personal Contacts screen.
- Type /A, and press Enter.
- Deselect Subscribed to Text and press Enter.
- Input the Source and Method regarding how consent was revoked. For instance, if a debtor called the agency and made a request not receive text messages from the agency, the collector would enter DEBTOR as the Source and Verbal as the Method. The Reason and Comment fields allow collectors to add additional information pertaining to the revoked contact consent.
-
When unsubscribing from texting, no confirmation text is sent to the consumer .
- To save your changes to the Personal Contacts screen, type # in any field, and press Enter.
- At the OK to file? prompt, do one of the following:
- To save your changes, press Enter or click Yes.
If the account is part of a packet, at the Apply These Updates to Packet Members prompt, do one of the following:
Apply the changes to all of the members of the packetType Y, and press Enter.
Apply the changes to only this accountPress Enter, or type N and press Enter.
Select the accounts to apply the changes to- Type S, and press Enter.
- The Ok To Update prompt displays for each member of the packet. To update the packet member, type Y, and press Enter; otherwise, press Enter, or type N and press Enter. Repeat for each member of the packet.
- To exit without saving your changes, click No.
- To discard your changes and return to the Personal Contacts screen, click Cancel.
- To save your changes, press Enter or click Yes.