Creating or changing data service profiles
Use this option to create a data service profile for specific job functions and/or create a default data service profile for your agency.
To create or change a data service profile:
-
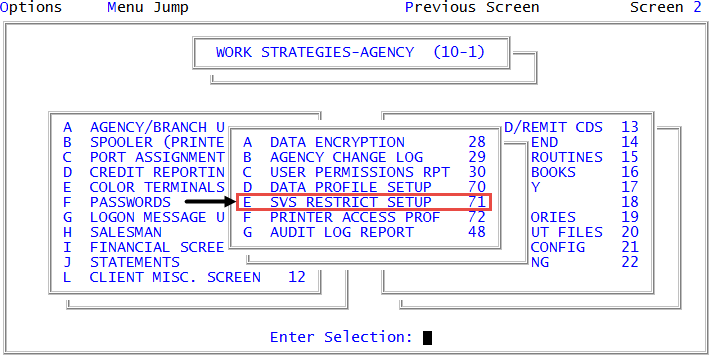
From the Master menu, navigate to
 Management Strategy > Agency > Svs Restrict Setup (menu 10.1.71).
 - In the Data Service Restrict Profile ID (?) window, do one of the following, and press Enter or click Ok:
To create a new data service profile, type a name for the profile.
The name cannot exceed 16 characters.
- To update an existing profile, do one of the following:
- If you know the name of the profile, type it.
- To choose from a list of profiles, type ?.
- In the Data Restrict Profiles window, select the profile to use, and press Enter or click Ok.
- In the Report List window, select the data service report to create restrictions for, and press Enter or click Ok.
-
In the Data Service Restrictions window, do any or all of the following:
Restrict the selection of this report by state
- Select Update State Restriction, and press Enter or click Ok.
- If your agency uses a default profile, in the Add Default State Restrictions window, click Yes to include the default states, or click No to omit them.
- In the States to Restrict List window, select one or more states, and press Enter or click Ok.
Restrict the selection of this report by client
- Select Update Client Restriction, and press Enter or click Ok.
- If your agency uses a default profile, in the Add Default Client Restrictions window, click Yes to include the default clients, or click No to omit them.
- In the Enter Client Number(s) Separated by a Semicolon or '?' window, type one or more client numbers, separating each with a semicolon, and press Enter or click Ok. You can also type ALL to include all clients.
-
Instead of client numbers, you can enter a question mark to choose from a list or type a Get-List or Select statement in the window. For more information, see Working with Recall.
Restrict the selection of this report by status code
- Select Update Status Code Restrictions, and press Enter or click Ok.
- In the Add Default Status Code Restrictions window, click Yes to include the default status codes, or click No to omit them.
- In the Status Codes List, select one or more status codes, and press Enter or click Ok.
Restrict selection of this report by business class
- Select Update Business Class Restrictions, and press Enter or click Ok.
- In the Add Default Business Class Restrictions window, click Yes to include the default business classes, or click No to omit them.
- In the Default Business Class List, select one or more business classes, and press Enter or click Ok.
Restrict the selection of this report by specific parameters your agency sets
- Select Update Custom Restrictions, and press Enter or click Ok.
- In the Custom Data Service Restrictions screen, type "filename,attribute#" in the Filename,Attr field, and press Enter. For example, to restrict requests based on the city the customer resides in, type DEBTOR,4.
- In the Operator field, type a logical operator, and press Enter. The following are logical operators:
- = Equal to
- # Not equal to
- > Greater than
- < Less than
- >= or => Greater than or equal to
- <= or =< Less than or equal to
- In the Datatype field, type one of the following to describe the type of data you are comparing against and press Enter:
- Literal
- Date
- Today
- filename,attribute#
- In the Value field, type the data to compare against, and press Enter.
- Repeat Steps a-e, as needed.
- To exit the screen, type #, and press Enter in any field.
- At the Enter Option (U, /) prompt, to exit the screen, type / and press Enter, or to make changes to the screen, type U and press Enter.
- At the OK to File? (CR=Y, N) prompt, do one of the following:
- To save the profile, press Enter.
- To exit the screen without saving, type N, and press Enter.
- In the Data Service Restrictions window, do one of the following:
- To add more restrictions to this report, repeat Step 4.
- To add more reports to this profile, do the following:
- Click Cancel.
- At the Ok to Update Profile? prompt, click Yes.
- Repeat Steps 3-4.
- When you are finished adding reports and restrictions, click Cancel in the Data Service Restrictions window.
-
At the Ok to Update Profile? prompt, click Yes.
Even though the system does not display a confirmation message, the data service profile is saved.