Logging credit reporting history
Select this option to set the number of years to keep credit reporting history data that appears on the Credit Report History report. The report includes the following:
- Account number
- Account name
- Client number
- The date the account reported to the credit reporting agency (Report date or RPT date)
- The name of the credit reporting agency (also known as a credit reporting agency in The Collector System that the ccount reported to.
- The status of the account, whether or not the account will report. This is indicated by a "yes" or "no."
- The account balance reporting to the credit reporting agency (RPTD balance)
- The account type code that reported to the credit reporting agency. Accounts that did not report, do not have a code.
- The reason the account reported or did not report to the credit reporting agency.
The following is an example of a credit reporting history report:

The first time you select Log Credit Reporting History the setting is turned on and set to track statistics for one year. You can change the settings to track credit reporting history for up to seven years. After the number of years that you set, the history is retained or deleted depending on the option you choose.
To enable or disable the Log Credit Reporting History setting:
-
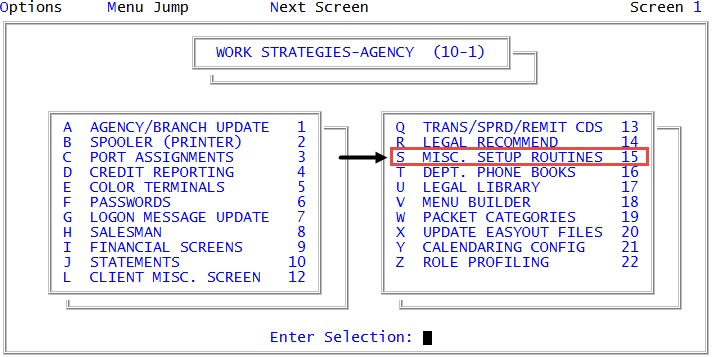
From the Master menu, navigate to
 Management Strategy > Agency > Misc. Setup Routines (menu 10.1.15).
 - In the Miscellaneous Setup Routines window, select Log Credit Reporting History, and press Enter or click Ok.
-
Do one of the following:
Enable credit reporting history tracking
- At the Track Credit Reporting History Off. Turn on? prompt, click Yes.
- At the prompt that warns you to be aware of disk space when selecting the number of year to retain credit reporting history, click Ok.
- In the Years before deleting Credit Reporting entry window, select the number of years before deleting the credit reporting file, and press Enter or click Ok.
- At the You have chosen to turn CR History on with number years retention. OK to file? prompt, click Yes.
Enable credit reporting history tracking if a previous CR History file has been retained
- At the Track Credit Reporting History Off & file retained. Turn on? prompt, click Yes.
- At the prompt that warns you to be aware of disk space when selecting the number of year to retain credit reporting history, click Ok.
- In the Years before deleting Credit Reporting entry window, select the number of years before deleting the credit reporting file, and press Enter or click Ok.
- At the You have chosen to turn CR History on with number years retention. OK to file? prompt, click Yes.
Disable credit reporting history tracking and delete the CR History file
- At the Track Credit Reporting History On. Turn off? prompt, click Yes.
- In the CR History File to be window, select Delete, and press Enter or click Ok.
- At the You have chosen to turn CR History logging off and clear CR History file. OK to file? prompt, click Yes.
Disable credit reporting history tracking and retain the CR History file
- At the Track Credit Reporting History On. Turn off? prompt, click Yes.
- In the CR History File to be window, select Retain, and press Enter or click Ok.
- At the You have chosen to turn CR History logging off and Retain CR History file. OK to file? prompt, click Yes.