Setting Future Transaction Plan parameters
A Future Transaction Plan is a series of one or more payment transactions scheduled for future dates that can be created using command ACH, BC, PK, or QC. You can create a future transaction using a recurring bank card, ACH, or a post-dated check. For example, a collector calls to collect a $200 debt from Jane Doe. Unfortunately, Jane cannot pay until next week, so the collector offers to set up a future transaction in The Collector System in the form of a $200 debit card payment to be charged next Friday.
Before you start creating future transactions for your accounts, you first need to configure certain default parameters, which include:
- Designating status codes for when an account is added to a Future Transaction Plan, when a transaction is returned or fails to process, and when the future transaction plan is complete
- Specifying how to handle an account when a future transaction is returned
- Specifying the number of days after a future transaction is complete before deleting the payment details from The Collector System.
To help protect customer payment information and keep your agency compliant with consumer laws and regulations, such as Payment Card Industry (PCI) compliance standards, we highly recommend that you set up The Collector System to purge the payment details for the account as soon as possible after the Future Transaction Plan is complete. The default Future Transaction Plan parameters allow you to set up a "buffer" time period between when the plan is completed and when it is purged from the system. You can use this buffer to take into account any NSFs or declined payments that may occur after the transactions are posted. In some cases, it can take up to 15 days to receive notice that a transaction is NSF.
If an account has a payment returned or declined after the buffer period elapses, you need to manually move the account back on to a collector's WIP to collect the remaining balance.
When a Future Transaction Plan is complete and meets the minimum age requirement to be purged from The Collector System, the transaction type determines how the transactions are purged. The Collector System automatically removes post-dated check data as part of Day-End. You will need to manually purge bank card and credit data, including ACH transactions, from the Utility menu. For more information, see Menu 9.54 - Purge Exp Ftr Trns.
After the payment data is purged, the system adds a note to the account indicating that the payment data was removed.
To set Future Transaction Plan parameters:
-
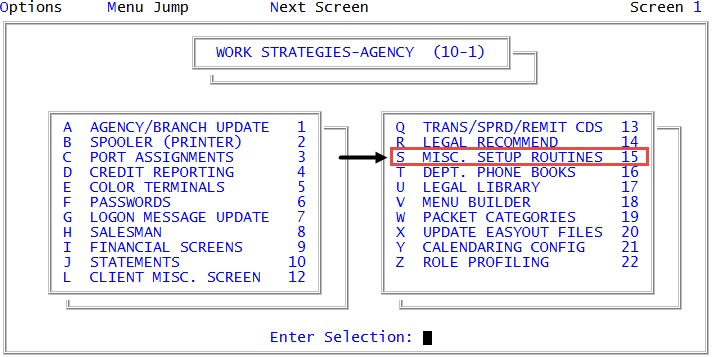
From the Master menu, navigate to
 Management Strategy > Agency > Misc Setup Routines (menu 10.1.15).
 - In the Miscellaneous Setup Routines window, select FutureTransaction Plan Setup, and press Enter or click Ok.
- In the Priority for tickler when sent back to collector window, type the priority number to assign to an account when it is automatically sent back to the collector, and press Enter or click Ok.
- In the NSF check or failure to secure funds will immediately send to collector Y/N prompt, do one of the following:
- To send the account back to the collector if the transaction is returned NSF or the bank card is declined, click Yes.
- To keep the account in its current location, click No.
- In the Mail Returns return Account to Collector Y/N window, do one of the following:
- To send the account back to the collector if mail is returned, click Yes.
- To keep the account in its current location, click No.
- In the Status code to change to when debtor is added to plan (?) window, do one of the following, and press Enter or click Ok:
- If you know the status code to use, type it.
- To choose from a list of status codes, type ?.
- In the Status Codes window, select the status code, and press Enter or click Ok.
-
In the # days after completion to send to collector & remove data window, to designate the number of days after the Future Transaction Plan is completed before removing the ACH or bank card information from The Collector System, type a number between 0 and 999, and press Enter or click Ok. The default is 15 days.
A setting of 0 equals a strict compliance with PCI compliance standards. A higher setting allows you to attempt to recover any returned or declined transactions, but it also means your agency may be at risk for non-compliance with specific consumer financial information protection standards.
-
In the Status when plan successfully completes & debt not paid off (?) window, to designate a status code to indicate that the future transaction for the account is complete but the account has not yet been paid in full, do one of the following, and press Enter or click Ok:
- If you know the status code, type it.
- To choose from a list of status codes, type ?.
- In the Status Codes window, select the status code, and press Enter or click Ok.
A complete Future Transaction Plan means that all of the money has been collected and posted to the account.
-
In the If transaction plan has NSF or funds not secured window, do one of the following, and press Enter or click Ok:
Continue using the status code currently assigned to the account
Select Do not change the status code.
Assign the previous status code
Select Change the account back to prior status code.
Assign a different status code
- Select Change the account to another status code.
- In the Status code if future transaction plan is Deleted (?) window, do one of the following, and press Enter or click Ok:
- If you know the status code, type it.
- To choose from a list of status codes, type ?.
- In the Status Codes window, select the status code, and press Enter or click Ok.
-
In the If transaction plan is Deleted window, do one of the following, and press Enter or click Ok:
Continue using the status code currently assigned to the account
Select Do not change the status code.
Assign the previous status code
Select Change the account back to prior status code.
- Select Change the account to another status code.
- In the Status code if future transaction plan is Deleted (?) window, do one of the following, and press Enter or click Ok:
- If you know the status code, type it.
- To choose from a list of status codes, type ?.
- In the Status Codes window, select the status code, and press Enter or click Ok.
- In the OK to file? window, do one of the following:
- To save your settings, click Yes.
- To discard your changes, click No.
- To discard your changes and return to the first future transactions parameter prompt in Step 6, click Cancel.