Using menus
The menu structure in The Collector System is organized in a logical top-down hierarchical structure with a Master menu and submenus. While you may not work with all of these menus, you should know their purpose. Depending on how The Collector System is configured, you may not have the proper permissions to view or access all of the menu options.
The Master menu allows you to view all available menus in The Collector System. In addition, each menu contains options that allow for a variety of actions including working with accounts, generating reports, or modifying agency settings.

The following list describes each of the items on the Master menu:
- Data Entry—Routines in this menu are designed to add, change, match, or cancel account records, and to add or change client records.
- Correspondence—Routines in this menu are designed to print all daily correspondence, including letters, notices, and coupon books. There are also several routines which allow you to change printer parameters.
- Inquiry—Allows users to look up information on accounts, packets, payments, and clients in view-only mode. Employees may have access to this menu when they need to know information but do not have the authority to make updates.
- Trust Activity—Routines in this menu are designed to enable the agency to post trust accounting transactions, obtain reports from the financial institution, and send statements to each client.
- Collector—Routines in this menu are designed to access accounts and manage daily workloads.
- Collector Management—Routines and reports in this menu allow collections management to analyze collector methods, use of time, goal performance, and scheduling of follow-ups.
- General Reports—Routines in the menu allow the agency to print reports and graphs containing information about the agency as a whole. These can be run at any time during the month.
- Month-End—Routines in this menu are used to close out the calendar or fiscal month.
- Utility—Routines in this menu allow for the setup of agency processes, and the change and deletion of important information.
- Management Strategy—Routines in this menu contain agency information, system defaults, codes, AFM, and other parameters.
- Special Routines—Routines in this menu are available only when they have been specifically created for your agency.
- Precollect—Precollect amounts (accounts that are held by the agency for a determined amount of time before being worked by a collector) are maintained in entirely separate files from trust collections accounts. Routines in this menu allow for entering precollect clients or accounts, posting payments, or transferring of account to trust.
- Legal—Routines in this menu are designed to handle legal accounts. Accounts can be updated, posted to, and worked by collectors from this menu. In addition, you can request several legal reports.
- Easy Out—Easy Out reports are custom built by a member of your agency. Reports can be created, updated, printed, and displayed from this menu, as well as from the Easy Out option contained in all other menus.
- UltimateConnect—Routines in this menu help you setup, maintain, and monitor the exchange of data between The Collector System and third-party vendors, such as letter outsourcing and data services vendors.
From the Master menu, you can choose a menu item by typing the letter or number that corresponds to it. When you press a letter, The Collector System automatically executes the command to go to the menu. When you press a number, you must then press Enter. This process is slightly different than when you are on a screen. On a screen, you enter your command and then press Enter.
To access a menu from the Master menu:
-
Access the Master menus or submenus in any of the following ways:
- Type the corresponding alphabetical code. For example, type A.
- Type the corresponding numerical code, and press Enter. For example, type 1 and then press Enter.
- Type M and the number menu option, and then press Enter. For example, type M1.
- Type M, the number of the menu option, a period, the number of the submenu, and press Enter. For example, type M1.4, and press Enter.
For example, to go to the Data Entry menu, from the Master menu, type A. The Data Entry menu displays, as shown below.
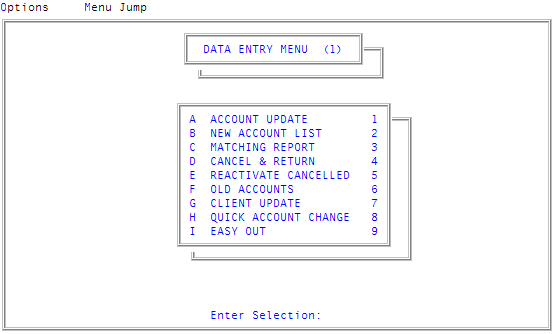
From the Data Entry menu, you can choose another menu or go back to the Master menu.
To go back to the previous menu in the menu hierarchy:
- At the Enter Selection prompt, type /. The previous menu displays.