Creating or adding Responsible Persons accounts
When creating a Responsible Persons (RP) account, you must first create a primary account to record the amount of debt owed by the parties. The system generates a RP packet number. You then create the secondary accounts with an assigned amount of zero and assign each of them to the RP packet.
The person or company listed on the primary RP account is not any more responsible for the debt than the other parties. It is merely the master account that holds all the financial information for the debt.
To create or add Responsible Persons accounts:
- From the Master menu, navigate to
 Data Entry > Account Update (menu 1.1).
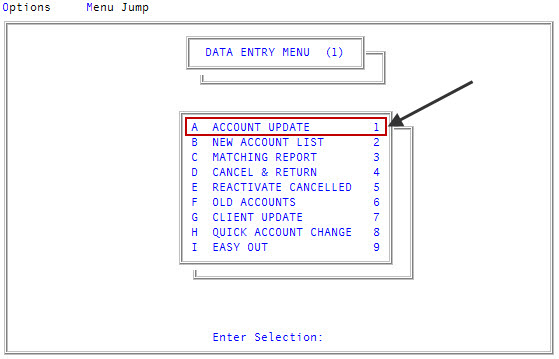
- If the Batch Number to Update window displays, select one of the following, and press Enter or click Ok:
- Use Existing Batch
- New Batch Number
- Last Batch Number
Go to Account Prompt
For more information, see Selecting batch options.
- At the Enter Account # prompt, do one of the following:
- To create a new account, type the new account number for the primary responsible person, and press Enter.
To select an existing account, type the account number, and press Enter. Proceed to Step 5.
You may see an alert that a record is locked. This indicates that another user has the account open. The system displays a prompt with the user's initials. For a full list of the commands available at this prompt, see Working the Account# prompt options.
- Complete the appropriate fields in the Account Update screen, including typing the amounts owing. For instructions on entering information in these fields, complete Steps 4-46 of Working with Account records.
- To exit the screen, any field, type #, and press Enter.
- At the OK to File? (CR=Y, N, /, PP, RP) prompt, type RP, and press Enter.
-
At the This account is designated as the primary RP (CR=Y, N) prompt, to designate the account as the primary RP account, press Enter.
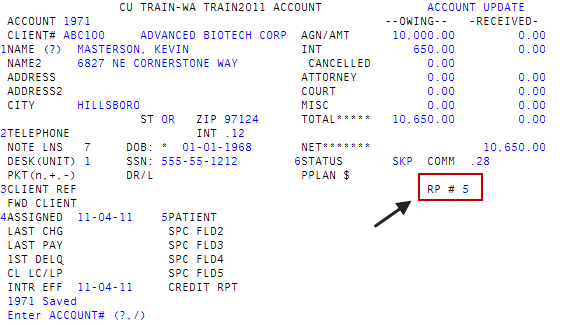
A message displays that the RP packet is created. The
RP packet number displays in the RP # field on the right side of the Account Update screen. Record the packet number because you will need it when you enter the secondary accounts.
- At the OK to File? (CR=Y, N, /, PP, RP) prompt, to save the account as an RP account, press Enter.
- To add another account to the RP packet, create or choose an account with an assigned amount of zero using the Account Update screen. For instructions on creating or choosing an account, see Working with Account records.
- In the Agn/Amt field, type 0.00, and press Enter.
- To exit the screen, in any field, type #, and press Enter.
- At the Is this an RP account? (Y,CR=N) prompt, type Y, and press Enter.
- At the Enter RP# (?, /) prompt, do one of the following, and press Enter:
- If you know the RP packet number, type it.
- To choose from a list of RP packet numbers, type ?.
- In the RP Packets window, select the RP packet number to add this account to, and press Enter or click Ok.
- At the Is this an RP for primary RP packet member name? (Y, CR=N) prompt, to add the account to this RP packet, type Y, and press Enter.
- At the OK to File? (CR=Y, N, /, PP, RP) prompt, do one of the following:
- To save your changes, press Enter.
- To exit the screen without saving your changes, type N, and press Enter.
- To return to the Account Update screen to continue making changes, type /, and press Enter.
- To set up this account on a payment plan, type PP, and press Enter. For further instructions, see Creating a payment plan.
- To change the RP packet this account is assigned to or remove the account from the RP packet, type RP, and press Enter.
A message displays that the account is saved and the RP number displays on the right-hand side of the Account Update screen.