Creating a payment plan
There are two ways to set up a payment plan. The one you select affects the way the system calculates the amounts and the duration of payments. It does not determine how the posting person may actually post the payments.
The two payment-plan methods include:
- Pay off all assigned amounts, whether interest-bearing or not, then interest and other.
- Pay off interest first before the assigned amount or other costs.
The following table compares the two payment-plan options:
|
All Assigned Amounts First |
Interest First |
|
For single accounts, the system calculates payments to pay off the assigned amount first, then interest, and then to other charges last. |
For single accounts, the payment is applied to the interest first. If the amount of the payment exceeds the amount of interest, it is applied to the principal and then to any other charges. |
|
If there are several accounts on the plan, the payments are calculated proportionately to each account's total principal. Interest is accrued during the time that the principal is paid off. After the principal is paid off, the remaining payments are applied to interest and then to all other charges. |
If there are several accounts on the plan, the payments are applied first to interest and then proportionately to the principal of each account on the plan. After all interest and principal have been paid off, then all other charges are paid. |
|
If an account is on a judgment, the assigned amount corresponds to the judgment amount plus add-on costs. |
If an account is on a judgment, you cannot use an interest-first payment plan. |
If your agency always uses the same type of payment application, your Finvi Support representative can set your system to automatically enter the correct code.
In some cases, you may want to finish a plan using a balloon payment. If you select this option, the system calculates the payment amount and number of payments. If the balance will not be paid off with the last regularly scheduled payment amount, the system creates a balloon payment consisting of the final balance.
You have two options when configuring when payments are due: a first payment due date (1st Pmt Due Dt field) and an alternate first payment due date (Alt 1st Pmt Due Dt field). The 1st Pmt Due Dt field determines the first regularly scheduled payment. The system uses this date and the payment frequency to determine if a payment is past due. For example, if the first payment is due on May 17 and the payment is to be paid monthly, the payment is due on the 17th of each month.
Depending on the payment methods your agency accepts, you can offer customers the option of using ACH, bank cards, or mailing in a check to pay the scheduled payments. You can only use one payment method at a time for a payment plan. For example, you cannot use a credit card for one scheduled payment and use a check for another scheduled payment.
You can use the Alt 1st Pmt Due Dt field if the first payment is not due on the same schedule as the other payments. For example, if the regular payments are due on the first of the month, but the first payment is due in three days, you can enter 3 or the date the first payment is due.
Setting up a payment plan also includes selecting a correspondence type. A series of payment plan letters is automatically sent to the account just prior to each payment date and after a payment has been missed. You must set up the letter series before designating it in the Payment Plan Setup screen. To create a letter series, see Menu 10.7.80 - Letters/Notices.
You also have the option of printing coupon books for accounts on payment plans. A coupon serves as a printed reminder that a customer attaches to their payment when they sent it to your agency. There are two types of coupons: default and custom. The default coupon type prints three coupons per page. Custom coupon books are set up by your System Administrator with the help of your Finvi Support representative. For further information on changing the default, refer to Menu 10.1.15 - Misc. Setup Routine.
The Print Coupon Bk field in the Payment Plan Setup screen is accessible only when a plan is first set up. When working with coupon books for payment plans, remember the following:
- The amount printed on each coupon is determined when the payment plan is set up. To change the amount on the coupons, start another payment plan.
- Coupons are requested automatically as long as the plan is active. If the plan becomes inactive and is reactivated later, any coupons that should have been printed during the inactive period are printed.
- You need not print all coupons at one time. On the due date of the last coupon, another set prints. When the last set of coupons prints, if the total is within 25 percent of the maximum, all of the remaining coupons print.
In most cases, a collector does not work payment plan accounts on a daily basis, but you may not want to add payment plans to the collector's WIP periodically for the following reasons:
- To readjust payment amounts.
- To contact the customer on the payment due date (in which case a scheduled letter is not sent).
- To go to the collector at the end of the payment plan.
If your agency does not receive a payment, the payment plan automatically moves to the collector's WIP a certain number of days after the payment was due. You specify the number of days in the Days Til Delinquent field in the Payment Plan Setup screen.
When creating a payment plan for packeted accounts, the financial information for each account in the packet displays on the left side of the screen. The right side of the screen contains the total of the individual account in the packet and the total amount of the payment plan. The account's balance displays on the Amount On Plan field to help you decide if the account should be included.
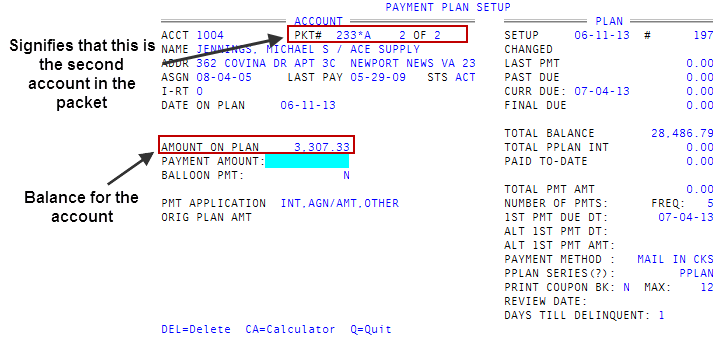
When your agency receives payments, it does not matter if the primary account or other accounts in the packet receive credit for the payment. As long as a packet member is included in the payment plan, any payments made by a packet member credit the entire plan.
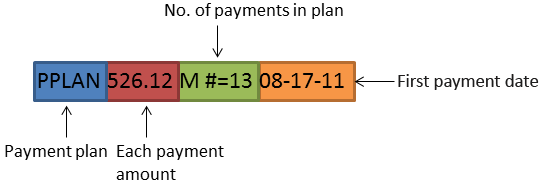
Whenever you establish a payment plan, the system creates a note that lists the payment plan creation date and time, the amount of each payment, the frequency of payments, the number of payments, and the first payment due date, as seen in the following example:
To create a payment plan:
-
Do one of the following:
 From the Collector screen
- Open an account in the Collector screen.
- At the CMD prompt, type H, and press Enter.
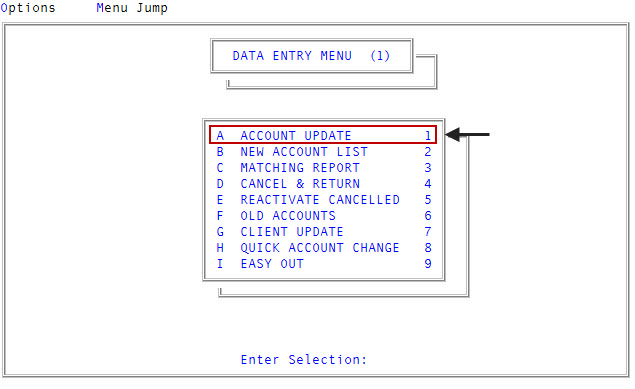
From the Account Update screen
-
From the Main menu, select
Data Entry > Account Update menu 1.1). -
If the Batch Number to Update window displays, select one of the following, and press Enter or click Ok:
- Use Existing Batch
- New Batch Number
- Last Batch Number
- Go to Account Prompt
For more information, see Selecting batch options.
-
At the Enter Account # prompt, type the account number, and press Enter.
You may see an alert that a record is locked. This indicates that another user has the account open. The system displays a prompt with the user's initials. For a full list of the commands available at this prompt, see Working the Account# prompt options.
- In the Name field, type #, and press Enter.
- At the OK to File? prompt, type PP, and press Enter.
- At the Enter Plan # prompt, type A, and press Enter.
- At the Pmt Application: (A)gn/Amt, Interest, Other or (I)nterest, Agn/Amt, Other prompt, do one of the following, and press Enter:
- To first pay off all assigned amounts, whether interest-bearing or not, type A.
- To first pay off interest before the assigned amount or other costs, type I.
- In the Payment Amount field, type the amount of each payment, and press Enter.
-
In the Balloon Pmt field, do one of the following:
- To use a balloon payment, type Y.
In the Number of Payments field, type the number of payments included in the plan, and press Enter.
If needed, you can open the calculator by typing CA in this field. For more information, see Using the calculator.
- To not use a balloon payment, type N.
- To use a balloon payment, type Y.
- In the Freq field, type one of the following to specify the payment frequency, and press Enter.
- For monthly payments, type M.
- For semi-monthly payments, type S.
- To create a custom number of days between payments, type the number. For example, to create weekly payments, type 7.
-
In the 1st Pmt Due Dt field, type the date or the number of days from the current date the first payment is due, and press Enter.
If the due date is after the 28th of the month, the payment will be due on the last day of months that have fewer days than the date entered.
- In the Alt 1st Pmt Due Dt field, type the date or the number of days from the current date that an alternate first payment is due, and press Enter.
- In the Alt 1st Pmt Amt field, type the alternate first payment amount, and press Enter.
- In the Payment Method field, do one of the following, and press Enter:
- To use ACH, type A.
- To use a bank card, type B.
- If the customer is mailing a check, type M.
- In the PPlan Series field, do one of the following, and press Enter:
- To use the default standard letter series for your agency, press Enter.
To specify a different series, do one of the following, and press Enter.
- If you know the payment plan series code, type it.
- To choose from a list of series codes, type ?.
- In the Select PD Plan Series, select the payment plan type, and press Enter or click Ok.
If needed, you can open the calculator by typing CA in this field. For more information, see Using the calculator.
- In the Print Coupon Bk field, do one of the following, and press Enter:
- To print a coupon book when an account is first set up on a payment plan, type Y.
- In the Max field, type the number of payment coupons to print at one time, and press Enter.
- To skip printing a coupon book, type N.
- To print a coupon book when an account is first set up on a payment plan, type Y.
- In the Review Date field, do one of the following to remove the account(s) from the payment plan and add it to the collector's WIP.
- Type the current due date or greater than the current due date, but less than the final due date using the MM-DD-YY format, and press Enter
- Type a number of days from the current date, and press Enter
- To not have the collector review the account while it is on the payment plan, leave the field blank, and press Enter.
-
In the Days Til Delinquent field, do one of the following, and press Enter.
- Type the number of days to pass after a payment is due before the account is automatically added to a collector's WIP to be worked as a delinquent payment plan, and press Enter.
- If you wish to use the number of days until delinquent specified in the series code or the agency default, leave the field blank, and press Enter.
This field overrides the number of days until delinquent specified in the payment plan letter series code or the agency default.
-
If the payment plan uses ACH or a bank card for payments, do one of the following:
ACH
- For the Name, Address, and CSZ fields of the Electronic Bank Input/Validation Screen, do one of the following:
- If the payer information (located on the check) matches that of the account information displayed on the left-hand side of the screen, press Enter for each field.
- If the payer information is different than the account address, make the appropriate change(s) in each field, and press Enter.
- If the payer resides in a state in which your agency charges a transaction fee for the payment, a transaction fee window displays. The transaction fee options that display depend on how your agency has set them up. For more information, see Charging transaction fees.
-
In the Route field, type the routing number, and press Enter.
If your agency has uploaded bank data to The Collector System, the screen displays the bank name associated with the routing number. It is important to understand that even though the bank that is listed may not be the location of the payer's branch, this is the bank that will receive the transaction.
- In the Acct field, type the account number, and press Enter.
- In the Funds From window, select the account type the payment will draw from, and press Enter or click Ok.
- At the Is Bank Information Correct? prompt, do one of the following:
- If the bank information is correct, click Yes.
- To change the bank or payer information, click No to return to the Electronic Bank Input/Validation Screen.
- To exit the Electronic Bank Input/Validation Screen, click Cancel.
-
At the Load Electronic data into Financial Fields? prompt, to load the financial data, click Yes; otherwise, click No.
Financial fields are synonymous with Fiscal Fields.
Bank card
- For the Name, Address, and CSZ fields of the Bank Card Input Screen, do one of the following:
- If the payer information matches that of the account information displayed on the left-hand side of the screen, press Enter for each field.
- If the payer information is different than the account address, make the appropriate change(s) in each field, and press Enter.
- If the payer resides in a state in which your agency charges a transaction fee for the payment, a transaction fee window displays. The transaction fee options that display depend on how your agency has set them up. For more information, see Charging transaction fees.
- In the Card Type window, select the type of payment method the payer is using, and press Enter or click Ok.
-
In the Card # number field, type the card number, and press Enter.
If you get an error, make sure you have selected the correct card type.
- In the Security Code field, type the three-digit number located on the back of the card, and press Enter.
- In the Expiration Date field, type the expiration date located on the front of the card using the MMYY format, and press Enter.
- At the Is Bank Information Correct? prompt, do one of the following:
- If the bank information is correct, click Yes.
- To continue making changes to the bank or payer information, click No to return to the Bank Card Input screen.
- To exit the Bank Card Input screen, click Cancel.
- At the AddCustomerResponse number date <CR> prompt, press Enter.
- At the Update Fiscal Fields? window, to update the Fiscal fields, click Yes; otherwise, click No.
- For the Name, Address, and CSZ fields of the Electronic Bank Input/Validation Screen, do one of the following:
-
If the account is part of a packet, do any of the following:
Add all the accounts from a packet to the payment plan
- At the Add Other Accounts from Packet? prompt, press Enter.
- Proceed with Steps 6-16 for all the accounts in the packet.
Only include the specified account in the payment plan
At the Add Other Accounts from Packet? prompt, type N, and press Enter.
Select the accounts to include in the payment plan
- At the Add Other Accounts from Packet? prompt, type S, and press Enter.
- At the Add this account from packet prompt, do one of the following:
- To include the account in the payment plan, press Enter. Proceed with Steps 6-16 for all the accounts in the packet.
- To exclude the account from the payment plan, type N, and press Enter.
- If the cellnumwarning prompt Note: Diff Interest Rates Exist for Accts on this PPlan. Press <CR> displays, press Enter.
- At the OK to File? prompt, do one of the following:
- To save your changes, press Enter.
- To change or delete the plan, add other accounts to the plan, or discard your changes, type N, and press Enter.
- At the Change, Delete, Add, or Quit Unchanged? prompt, do one of the following, and press Enter:
- To change the plan, type C. For more information, see Changing a payment plan.
- To delete the payment plan, type DEL. For more information, see Deleting a payment plan.
- To add another account, type A. For more information, see Adding accounts to payment plans.
To leave the payment plan without saving it, type Q.
If you are setting up a record for the first time versus viewing an existing record, this option deletes the payment plan.
- At the Change, Delete, Add, or Quit Unchanged? prompt, do one of the following, and press Enter:
- To make changes to the payment method, type ACH or BC, and press Enter.
- To continue making changes to the Payment Plan Setup screen, type /, and press Enter.