Address corrections
Use this option to make address corrections.
For international addresses, address information from the International Address window nulls any data that would normally exist in the City, St, and Zip fields.
- From the Master menu, navigate to Correspondence > Mail Return/Locate (menu 2.4).
-
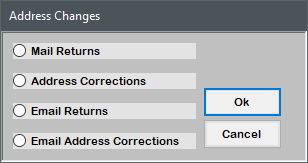
In the Address Changes window, select Address Corrections, and press Enter or click Ok.
-
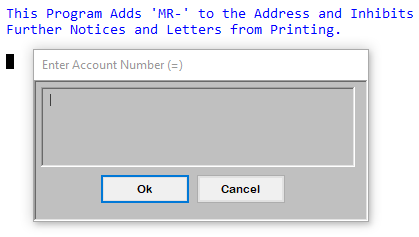
In the Enter Account Number window, type the account number, and press Enter or click Ok.
- In the Address Corrections screen, do one of the following:
- To change a domestic address, type the new address, pressing Enter to move from one line to the next.
- In any field, type #, and press Enter. Proceed to Step 7.
- To change an international address, in any field, type /IA, and press Enter.
- To change a domestic address, type the new address, pressing Enter to move from one line to the next.
-
In the International Address window, do the following:
- On the first line, the name of the recipient displays. On the following lines, type the address, pressing Enter to move from one line to the next.
- On the last line, type the country in all capital letters, and press Enter.
- At the OK to File prompt, do one of the following:
- To save your changes, press Enter, or type Y, and press Enter. Proceed to Step 7.
- To discard your changes, type N, and press Enter. Repeat Step 3.
- To re-enter the address in the Address Corrections screen, type DEL. Repeat Steps 4-5.
If you use an international address, the International Address screen is the default from that time on. To change the address back to a domestic address, you must type DEL in the International Address screen. After you do, the Address Corrections screen reverts to default.
- At the OK to File prompt, do one of the following:
- To save your changes, press Enter, or type Y, and press Enter.
To discard your changes, type N, and press Enter.
Not filed displays.
- To go back to the Address Corrections screen, type /, and press Enter. Repeat Step 4.
- If the address is packeted, at the Apply updates to all packet members prompt, do one of the following:
- To apply the address change to all packet members, click Yes.
- To apply the address change to the current account only, click No.
- To select which accounts to apply the address change to, click Select.
- The first account in the packet displays. At the number of total packet members Ok prompt, type Y, and press Enter to change the packet member's address; otherwise, to not change the packet member's address, type N, and press Enter.
- In the Request Letter / Restart Series window, do one of the following, and press Enter or click Ok.
- To restart a notice series, select Restart Notice Series. For more information on restarting a notice series, see Restart or cancel letter/notice series.
- To request a letter, select Request Letters. For more information on requesting letters, see Request or cancel individual letters/notices.