Creating or changing collector or support desks
Before creating collector desks, it is import to consider many of the factors that may affect how you set up a desk in The Collector System, such as size, the collector's experience, and the type of accounts the desk will handle. For example, you might want to consider the average number of accounts a collector can work in a day before deciding how many accounts to place in their WIP.
When you create a collector desk, you assign it a number using up to three characters, which include a combination of uppercase letters and/or numbers. If a desk number is more than one character long, it cannot use L, M, S, T, or W in the last position.
To create or change a collector or support desk:
-
From the Master menu, navigate to Management Strategy > Work Strategies > Collector Strategy (menu 10.3.26).
When configuring collector strategies for legal accounts, you can also access the same WIP controls from Legal > Setup > Collector Strategy (menu 13.1.1).
- In the Enter Collector number window, do one of the following, and press Enter or click Ok:
- If you know the collector number, type it.
- To choose from a list of collector numbers, type ?.
- In the Select Desk to Work window, select the collector desk, and press Enter or click Ok.
- If you are creating a new desk number, at the Collector number does Not exist. Add? prompt, click Yes.
-
In the
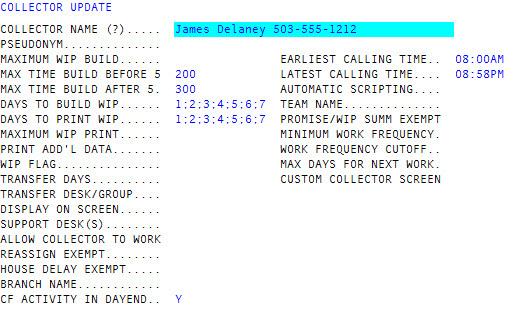
 Collector Update screen, enter information into the following fields:Collector Name
Type the collector's true name, and press Enter.
If needed, you can enter a telephone number with the name. You can access the information in this field by using special code @S24 for letters and notices. To learn more, see @Codes.
This field also allows you to access options related to configuring WIPs for this desk. For more information, see Configuring collector or support desks.
Pseudonym
Type a fictional name used by the collector to protect their identity, if applicable, and press Enter.
You can also use the collector's direct telephone number as part of or in place of the pseudonym. This feature allows collectors to include their telephone numbers as part of letters and notices, making it easier for customers to contact them directly. You can access the information in this field by using special code @S24 for letters and notices. To learn more about @codes, see @Codes.
Maximum WIP Build
Type the maximum number of accounts to include in this collector's WIP, and then press Enter. The maximum is 99,999.
Max Time Build Before 5
Type the maximum number of accounts to include in the collector's time list to be worked before 5 p.m., and then press Enter.
This information allows the agency to control the number of timelist items inserted into a collector's WIP by the Day-End process.
Max Time Build After 5
Type the maximum number of accounts to include in the collector's timelist to be worked after 5 p.m., and then press Enter.
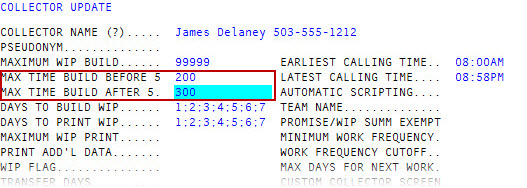
This information allows the agency to control the number of timelist items inserted into a collector's WIP by the Day-End process.
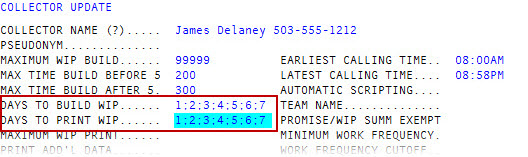
Days On Which To Build WIP
Use the following table to type the number of each day (separating each number with a semicolon) for the system to create a WIP, and then press Enter.
1 = Monday
2 = Tuesday
3 = Wednesday
4 = Thursday
5 = Friday
6 = Saturday
7 = Sunday
Use this option to create WIPs for desks that are not worked every day or do not need to be rebuilt each day. The system creates the WIP the night before, and is ready to work on the day specified. Strategies are only processed on the days that WIPs are built (by running Day-End).
This prompt does not override a WIP flag if X was entered in the WIP Flag field when the desk was originally set up. If this field is blank, a WIP is created every time a Day-End is run.
Days to Print WIP
Use the following table to type the number of each day (separating each number with a semicolon) for the system to print a WIP, and then press Enter.
If you set up this field to print, but do not set the Days On Which To Build WIP field to create the WIP, the WIP is not printed. If you leave this field blank, the system does not print the WIP.
1 = Monday
2 = Tuesday
3 = Wednesday
4 = Thursday
5 = Friday
6 = Saturday
7 = Sunday
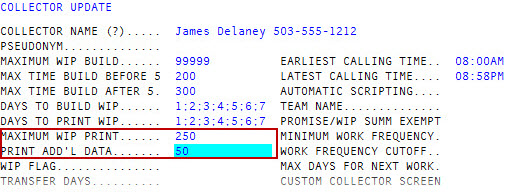
 Maximum WIP Print
Do one of the following:
- To print the upper portion of the list, type the maximum number of items to print, and press Enter.
- To print the lower portion of the list, type L and the maximum number of items to print (example: L250 to print the last 250 items), and press Enter.
You can print all or part of the WIP as a backup in case the system goes down or if the system is taken offline for maintenance.
Print Add'l Data
Do one of the following:
- To print additional data from the upper portion of accounts on the list, type the number of accounts to include the additional WIP print lines to, and press Enter.
- To print additional data from the lower portion of accounts on the list, type L and the number of accounts to include additional WIP list print lines to and (example: L50 to print the last 50 items), and then press Enter.
To set up the content of the additional lines, see Formatting WIP print lines to indicate if additional data is to print from the top or bottom of the printed list.
 WIP Flag
Do one of the following:
- To create a WIP during Day-End, type Y, and press Enter. At the Collector File "file name" created prompt, press Enter or click Ok.
- To create a WIP, but not print it during Day-End, type B, and press Enter. At the Collector File "file name" created prompt, press Enter or click Ok.
- To prevent the system from creating a WIP, type X, and press Enter.
The system does not create a file.
Transfer Days
Do one of the following:
- To transfer an account to another desk after a specific number of days (typically 30 days), type the number, and press Enter.
- If you do not transfer account to other desks regularly, type 0, and press Enter.
When creating supports desks, there are no prompts for transfer information because supports desks do not use this feature. The cursor goes immediately to the Supported Desk(s) field.
Transfer Desk/Group
Type the desk number or assignment group code where you want to transfer the account after the number in the Transfer Days field is exceeded, and then press Enter.
If planned carefully, you can rotate assignments throughout the entire agency. For example, if there are 4 collectors, collector 1's assignments can be transferred to collector 2, 2's assignments go to collector 3, 3's assignments go to collector 4 and 4's assignments go to collector 1, completing the cycle. This does not apply to support desks.
If necessary, set up status codes to inhibit the transfer of accounts from one desk or assignment group to another. For more information, see Designating status codes to inhibit auto desk transfer.
For assignment group codes, see Creating or changing collector or support desks.
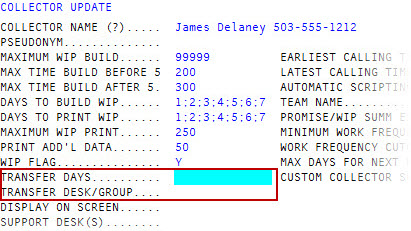 Display On Screen
To display (in the Collector screen) the number of days an account will remain in the collector's file before being transferred, type Y, and press Enter.
This option does not apply to support desks.
Support Desk(s)
Do one of the following:
- To allow the collector to send accounts to a support desk, type the support desk number (for example, *S1), and press Enter.
- To allow the collector choose which support desk to send their accounts to, type the support desk number, separating each with a semicolon (for example, *S1;*SK), and then press Enter.
- To allow the collector to use all the support desks, type ALL, and press Enter.
- Support desks can send accounts from one desk to another desk if set up for it. The collector or support person currently working an account can only send the account to one of its support desks, even if the desk number listed in the account has access to different (or same) support desks.
Allow Collector To Work
This field only becomes available if you entered a support desk in the Support Desk(s) field.
- To display an account on the WIP of both the collector and the support desk, type Y, and then press Enter.
-
To not allow a collector to work accounts on the support desk, type N or leave the field empty (<NULL>), and then press Enter.
A value of N or <NULL> in this field suspends standard (not parallel or side-action) strategies for accounts on this support desk.
Reassign Exempt
To exempt a desk from mass desk reassignments, type Y, and press Enter.
This field does not apply to support desks. Use this option for legal desks, forwards desks, or high-balance desks.
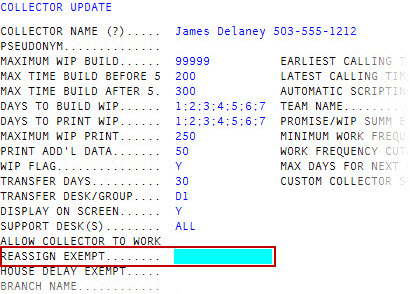 House Delay Exempt
To exempt the desk from the house delay (if used), type Y, and then press Enter.
This field does not apply to support desks. Be sure to set up the desk assignment criteria so that assignments exempted from house delay are sent to a desk with the House Delay Exempt field set to Y.
Branch Name
If your agency has multiple branches, type the branch to which this desk is assigned, and then press Enter.
This allows an agency to run a number of reports, yet print them separately at each branch (printing only those desks assigned to the branch).
CF Activity In DayEnd
To allow reports to be printed on the collector's activity, type Y, and press Enter.
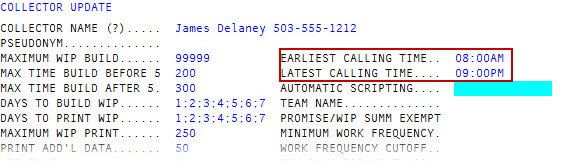
Earliest Calling Time
Type the earliest time of day in the account's time zone the collector is allowed to call, and press Enter.
This entry does not restrict any functions, but displays a warning message if an account is brought up on the Collector screen before this time. To have no message display, as for support desks, leave the field blank.
Certain ZIP codes may span multiple time zones. In these cases, The Collector System assumes the more restrictive option.
Latest Calling Time
Type the latest time of day in the account's time zone the collector is allowed to call, and press Enter.
This entry does not restrict any functions, but displays a warning message if an account is brought up on the Collector screen before this time. To have no message display, as for support desks, leave the field blank.
Certain ZIP codes may span multiple time zones. In these cases, The Collector System assumes the more restrictive option.
Automatic Scripting
To automatically display scripts on the Collector screen, type Y, and press Enter.
Team Name
Type a team name if your agency groups collectors into teams for reporting purposes, and then press Enter. This field is optional.
Promise/WIP Summ Exempt
To exclude this desk from the promise summary and agency WIP summary, type Y, and then press Enter.
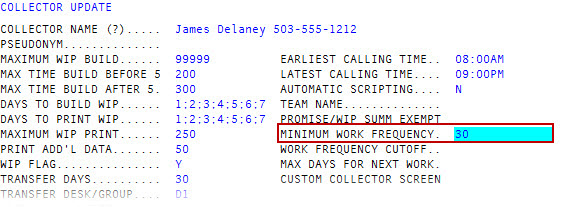
Minimum Work Frequency
Type the maximum number of days that can elapse between the times an account is worked, and then press Enter.
An account is considered "worked" when the Tickler is updated. When you use this feature, an account is placed into the required work categories on the day the work frequency is due. This category can display at the top of WIP if desired.
 Work Frequency Cutoff
Type the number of days the Work Frequency field is in effect, and press Enter. The cutoff does not expire unless all cutoffs expire for the client, desk, and agency.
Max Days for Next Work
Type the maximum number of days allowed to elapse between the times an account is worked, and then press Enter.
Collectors frequently schedule an account to be worked again on a future date specified in the Tickler field Date Work Again. The collector cannot schedule accounts to be worked on a date that exceeds the number of days entered in the Max Days for Next Work field. For example, if you enter 10 in this field and a collector works an account on November 1st, they would not be able to schedule an account to be worked after November 11th.
The maximum number of days for the next work date can be established for every collector, selected collectors, or the entire agency. The maximum number of days may vary between collectors depending on the type of desk. For example, a collector working a legal desk may need more days than would a collector working a low-balance desk.
Custom Collector Screen
Type the screen ID of the custom screen this collector will use, and press Enter.
- At the OK to File? prompt, do one of the following:
- To save your changes, type Y, and press Enter.
- To discard your changes and return to the Enter Collector Number window, type N, and press Enter.
- To continue making changes to the Collector Update screen, type /, and press Enter.