Creating new statement formats
Use this option to create a new statement format.
To create a new statement format:
-
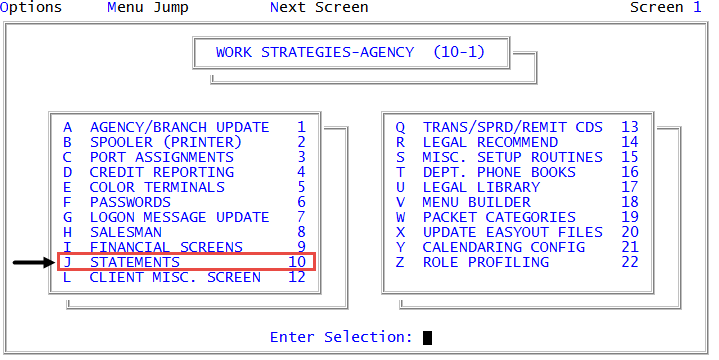
From the Master menu, navigate to
 Management Strategy > Agency > Statements (menu 10.1.10).
 - Select Additional Statement Formats, and press Enter or click Ok.
- In the Enter Statement Format # to Update window, type an ID for the statement format, and press Enter or click Ok. You can enter up to 10 letters and/or numbers for a statement ID.
- In the "Statement name" does not exist. Create it? prompt, click Yes to add the format name.
- In Enter Format Description, type a description to help users identify this format in your agency, and press Enter or click Ok.
-
The Current Statement Format Controls screen displays displaying the settings your agency default statement uses. At the Change Format? prompt, type Y, and press Enter to set the criteria for this statement.
If you type N, a new format is still created with the default settings in place.
-
The system prompts that you need to answer a series of format criteria questions; click Yes to continue.
As you move through each question, the current default highlights automatically, allowing you to simply press Enter to quickly move through a question settings that you are not changing. To change a setting, select the preferred option, and press Enter.
-
In the Is your agency name preprinted on the statement paper? window, do one of the following:
- If your agency is using preprinted statement forms with your agency name or letterhead on it, click Yes.
- If your agency is using statement forms that do not include your agency name or letterhead, click No.
- To return to the Are you using preprinted statement paper? window, click Cancel.
Selecting Yes limits your options for free-form text message placement. For more information, see Creating a statement free-form message.
-
In the Pitch Size for First Line of Agency Name window, select the size of print to use for the company name on statements, and press Enter or click Ok.
This prompt only displays if you select No in the Is your agency name preprinted on the statement paper? prompt in Step 8.
-
In the Print Payment Codes/Remaining Balance Column window, do one of the following:
- To print the payment codes column only, select Print Payment Codes Column, and press Enter or click Ok.
- To print the remaining balance column only, select Print Remaining Balance Column, and press Enter or click Ok.
- To print both the payment codes column and the remaining balance column, select Both, and press Enter or click Ok.
If you set up your strategies to display the remaining balance, and the NSF for the statement is omitted, the remaining balance might be incorrect.
- In the 'Paid' Column Order window, select the order in which the Paid Us and Paid You columns print on the statement, and press Enter or click Ok.
-
In the Salesman's Name window, select one of the following:
- To omit the name of the salesperson from the statement, select Do Not Print Salesman's Name, and press Enter or click Ok.
- To print the name entered at the Short Name prompt of the Menu 10.1.8 - Salesman, select Print Short Name, and press Enter or click Ok. When you use this option, the salesperson's name prints in the upper right corner of the statement date block. For more information, see Menu 10.1.8 - Salesman.
- To print the name entered at the Long Name prompt of the Menu 10.1.8 - Salesman, select Print Long Name, and press Enter or click Ok. When you use this option, the client number and salesperson name fields change places on the statement. For more information, see Menu 10.1.8 - Salesman.
If you select the long name and your agency uses preprinted forms, you need to change the column headings before printing statements.
-
In the Double space the date block? window, do one of the following:
- To double-space the date block, click Yes.
- To single-space the date block, click No.
- To return to the Salesman's Name prompt, click Cancel.
This prompt only displays if you select No at the Are you using pre-printed statement paper? prompt.
- In the Double space the body of the statement? window, do one of the following:
- To double-space the statement text, click Yes.
- To single-space the statement text, click No.
- To return to the previous prompt, click Cancel.
- In the Client Field to Print window, do one of the following:
- To print the text from the Title field of the Client Update screen, select Title, and press Enter or click Ok.
- To print the text from the Contact field of the Client Update screen, select Contact, and press Enter or click Ok.
- To omit a client field, click Neither, and press Enter or click Ok.
- In the Printing of Remit Code Description window, do one of the following:
- To print a complete description of the remit code, click Print Full Description, and press Enter or click Ok.
- To print only the first digit of the remit code on the same line as the client number, click Print First Digit Only, and press Enter or click Ok.
- In the Date Format for Account Transactions window, do one of the following:
- To print account transaction dates in month, day, year format, select MM-DD-YY, and press Enter or click Ok.
- To print account transaction dates in month, year format, select MM-YY, and press Enter or click Ok.
- To omit account transaction dates, select Do Not Print Date, and press Enter or click Ok.
- In the Date Format for Client Transactions window, do one of the following:
- To print client transaction dates in month, day, year format, select MM-DD-YY, and press Enter or click Ok.
- To print client transaction dates in month, year format, select MM-YY, and press Enter or click Ok.
- To omit client transaction dates, select Do Not Print Date, and press Enter or click Ok.
-
In the Enter Template Name window, do one of the following:
- If your agency uses templates, type the name of the template, and press Enter or click Ok.
- If your agency does not use templates, leave the field blank, and press Enter or click Ok.
To see a list of templates your agency uses, type a ?, and press Enter or click Ok. You can then select a template from a list.
-
After you answer all the format criteria questions, the Current Statement Format Controls screen displays. At the OK to File? prompt, do one of the following:
- To save your changes, press Enter or type Y, and press Enter.
- To exit without saving your changes, type N, and press Enter.
- To make changes before saving, type /, and press Enter to return to the series of question prompts.
They system displays a message informing you that you are using a customized format and then returns to the Work Strategy - Agency menu.