The Personal Contacts screen
With land lines, cell phones, email, and texting, today's customers have multiple ways you can reach them. The Personal Contacts (PC) screen allows you to store and manage the different contact methods for a customer and to track the result of contacting a customer.
The PC screen stores all of the contact data for an account. This includes, but is not limited to:
- Addresses
- Phone numbers
- Text numbers
- Pager numbers
- Email addresses
- Web URLs
Your agency sets up and configures the different contact types you can store for an account, so what you see on your screen may be different than what is described in the topics in this section.
This screen also allows you to record the result of each contact attempt for the account. This information is important because it helps you decide the best way to contact the customer, and it helps your agency meet compliance requirements. You can also record an account contact attempt using command 1 when updating the Tickler. For more information, see Updating the Tickler.
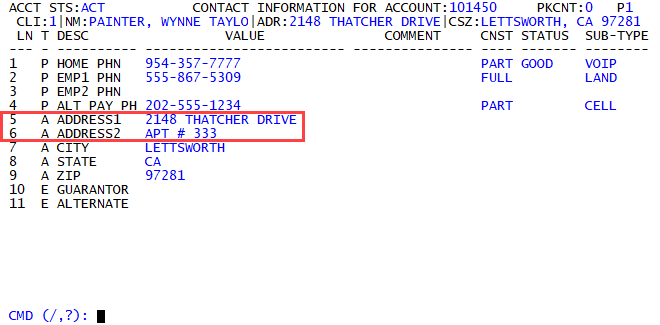
The PC screen displays all of the different contact types for the account in a table format. Each line represents a single contact type. For addresses, each part of the address has its own line on the screen. In the following example, the first line of the primary home address is line 5, the second line of the address, which includes the apartment number, is line 6, and so on for the entire address.
|
Field |
Description |
||||||||
|
Ln |
The line number of the contact type. |
||||||||
|
T |
The type of contact (for example, Phone, Address, Email). |
||||||||
|
Desc |
The description of the contact type. |
||||||||
|
Value |
The specific information you use to contact the account. |
||||||||
|
CNST |
Indicates the following for the contact consent type:
|
||||||||
|
Status |
Indicates the validity of the contact type (for example, Good, Bad, Blocked). |
||||||||
|
Sub-Type |
The subtype of contact (for example, Land Line, Cell Phone, Home Address). |
There are several ways to navigate the data fields in the Personal Contacts screen:
- At the CMD prompt, type U and the line number or just the line number.
- In any field, type / and the line number. For example, /4 to go to the first field in the fourth line.
- In any field, press the arrow keys to move from field to field.
- Use your mouse to click any field in the line.
-
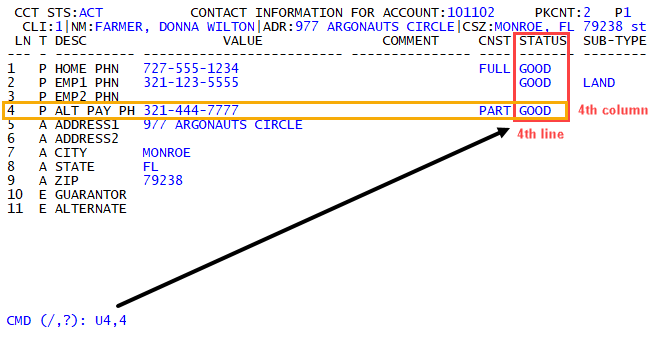
At the CMD prompt, type U, the line number, a comma, and the column number. For example, to go to the Status field of the fourth line, type U4,4.
When counting the column numbers, the Value column is 1, the Comment column is 2, the CNST column is 3, the Status column is 4, and the Sub-Type column is 5.
-
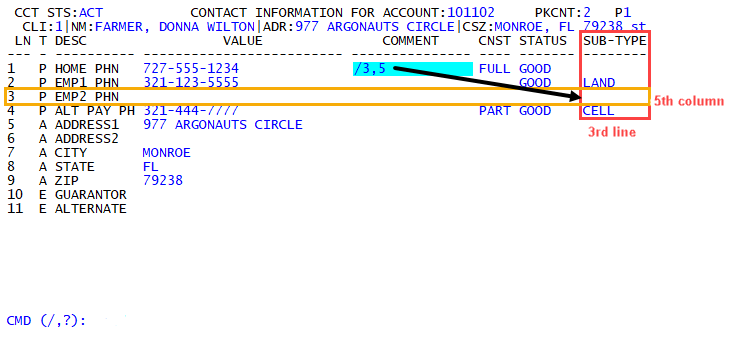
In any field, type /, the line number, a comma, and the field number. For example, type /3,5 to go to the Sub-Type field of line 3.
When counting the column numbers, the Value column is 1, the Comment column is 2, the CNST column is 3, the Status column is 4, and the Sub-Type column is 5.
- In any field, press the arrow keys to move from field to field.
- In any field, press Enter to move to the next field or type / to tab back to previous field.
- Use your mouse to click the field.
- At the CMD prompt, do the following:
- To go to the next page, type S.
- To go to a specific page, type S and the page number. For example, type S4 to go to page 4.
- To go back a previous page, type S/.
- Click >> to move forward a page or click << to go back a page.
- Type # in any field.
- Click the CMD line.