Updating the Tickler
The Tickler includes nine fields, each influential in the handling of an account. Each field is designed to guide you towards the next step in working the account.
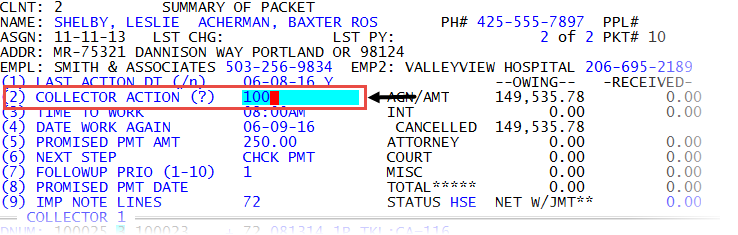
You must update the Tickler to advance to the next account on your WIP. If your agency requires it, you may need to record the result of each contact attempt you make. You do this by entering a contact action code for each contact type you use to contact the customer. Contact types usually include phone numbers and addresses, but can also include email addresses, pagers, and so on.
For example, a collector at a fictitious agency, Lake Assets, attempts to contact an account by calling the customer's home phone. The collector does not receive an answer, so in the Collector Action (?) field, the collector enters the contact action code of 100 Tel Res/No Answer to record the result.
The Collector System then prompts the collector to select which phone number the contact action code applies to.
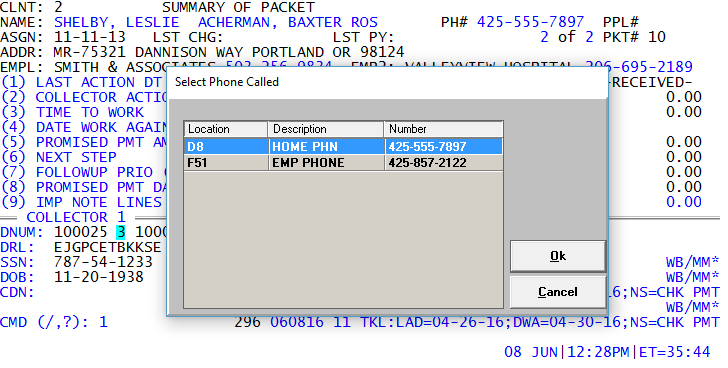
The collector then calls the customer's employer phone, where the collector talks to the customer. In the Collector Action (?) field, the collector enters the contact action code 216 Tel POE/Talked to Debtor to record the result of the call. The collector then selects the customer's employer phone number to apply the action code to. Or as a shortcut, the collector can simply type the action code, a forward slash (/), and the Fiscal field number where the contact value resides (for example, 206/F36). By entering the result this way, the Select Phone Called window does not display, and you can move on to the next step in working the account.
Your agency creates the contact action codes you use to record the result of trying to contact an account. The contact action codes are classified as one of the following types: success, reach, and fail. Your agency defines what constitutes a successful, reached, or failed contact attempt. For example, your agency may consider talking to anyone at the customer's home phone a success, but another agency may consider it a reach because the collector did not actually talk to the customer. You can also record an account contact attempt in the Personal Contacts screen. Depending on how The Collector System is set up at your agency, you may see the phone number along with the contact action code recorded in the account notes. For more information, see Record a contact attempt for an account.
After you update the Tickler, the system automatically updates the Last Action Date field so that the account is scheduled to appear on the WIP at a later date and time. The Time To Work field allows you to specify a time in which the account displays on the WIP. This is a useful feature if you know when the customer comes home from work or if you encounter a busy signal earlier in the day.
Use command 1 to access the fields in the Tickler. When you use this command, the cursor displays in the Date Work Again field, by default. You can configure the settings so that the cursor displays in another Tickler field. For more information, see Setting the command 1 cursor position.
To update the Tickler:
- Open an account in the Collector screen.
- At the CMD prompt, type 1, and press Enter.
-
In the Date Work Again field, do one of the following:
 Navigate to the Time to Work field
- Type /, and press Enter.
- In the Time to Work field, type a specific time to display the account in the WIP, and press Enter.
Navigate to the Collector Action (?) field
- Type /, and press Enter.
- In the Time to Work field, type /, and press Enter.
- In the Collector Action (?) field, do one of the following, and press Enter:
Type the action code.
- In the Select Phone Called window, select the phone number you used to contact the customer, and press Enter or click Ok.
To select an action code, type ?.
In the Action Codes (X=Deactivated) window, select the action code, and press Enter or click Ok.
In the Select Phone Called window, select the phone number you used to contact the customer, and press Enter or click Ok.
Type the action code, a forward slash, and the Fiscal field number of the phone number you used to contact the customer resides. For example, 104/D8.
Instead of typing the Fiscal field where the phone number, you can type a shortcut for the following contact types:
- For Home (D8), type /H.
- For Employer1 (F36), type /E or /E1.
- For Employer2 (F40), type /E2.
For Alternate Payer (F45), type /AP.
For example, instead of entering 104/D8, you can enter 104/H.
Schedule when the account should appear in the WIP to work again
- To set a specific date, type a date using the MM-DD-YY format, and press Enter. For example, type 10-01-14.
- To set a specific number of days in the future, type the number of days, and press Enter. For example, to work the account three days from the current date, type 3.
- To work the account later the same day, type 0, and press Enter.
- If the customer agrees to pay a specified amount by a certain date, in the Promised Pmt Amt field, type the amount (without the dollar sign), and press Enter; otherwise, to skip this field, press Enter.
-
In the Next Step field, type a brief explanation of what action you should take next on the account, and press Enter. You can only use a maximum of 12 characters.
Common next steps include entering TEL (call account), SND LTR (send a letter), and CHK PMT (check for a payment on the account).If you are using an action code, this field may automatically include the next step information.
-
In the Followup Prio (1-10) field, type a number 1 through 10 to designate the priority level of this account, and press Enter.
For example, if an account is listed as a high priority (Priority 1), the system sorts the account into a separate category in the WIP that takes precedence over other accounts.
We recommend that you only assign Priority 1 status to accounts with promised payments. If you overuse this feature, it can cause accounts from other categories (such as New Business, Required Work, and so on) to display on your WIP.
- If the customer agrees to pay a specified amount by a certain date, in the Promised Pmt Date field, type the date the customer has agreed to pay using the MM-DD-YY format, and press Enter.
-
In the Imp Note Lines field, type the numbers of the note lines that contain urgent information about the account, separating each with a semicolon, and press Enter.
By designating a note line as important, the system flags the note with an asterisk (*), and displays it at the top of the notes area of the screen.
-
To save your changes, do one of the following:
- At the Imp Note Line field, press Enter.
- In any Tickler field, type #, and press Enter.
After you exit the Tickler, the cursor displays at the CMD prompt.