Cloud Phantom settings
Cloud Phantom settings are populated at the time of installation. Changes to any Cloud Phantom settings should only be made after consulting with Finvi Support. Whenever a phantom setting is changed, you must restart the phantom.
To change the Cloud Phantom settings:
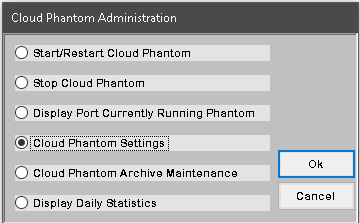
- From the Master menu, navigate to Utility > Cloud Services > Cloud Phantom (menu 9.58.1).
-
In the Cloud Phantom Administration window, select Cloud Phantom Settings, and press Enter or click Ok.
-
In the Cloud Phantom Settings window, select a setting to change, and press Enter or click Ok:
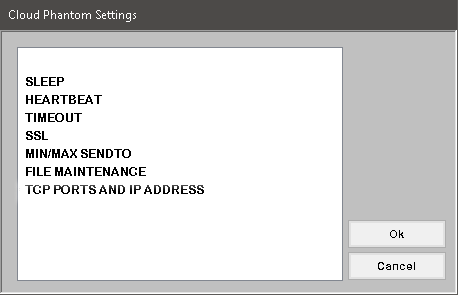
 Sleep
Sleep
Controls how many seconds the phantoms sleep between communication intervals.
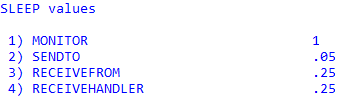
In the each field of the SLEEP values screen, type the number of seconds, and press Enter or click Ok.
Heartbeat
Controls intervals related to heartbeat communication.
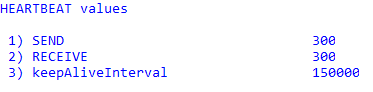
In the each field of the HEARTBEAT values screen, type the number of seconds or milliseconds, and press Enter or click Ok.
Timeout
Timeout values for various communication; protects against hung or unresponsive communication.
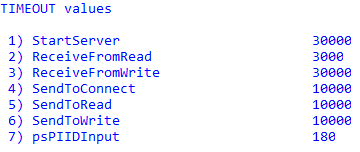
In the each field of the TIMEOUT values screen, type the number of seconds or milliseconds, and press Enter or click Ok.
SSL
Whether or not to use SSL communication.
Updating this setting requires changes to the Windows service.

On jBASE systems, in the Use SSL? field, do one of the following:
- To use SSL communication, type Y, and press Enter or click Ok.
- To not use SSL communication, type N, and press Enter or click Ok.
If SSL is used on a UniVerse systems, additional fields will be populated with information from the UniVerse SSL Certificate which was created at the time of installation. Do not change these values without first consulting with Finvi Support.
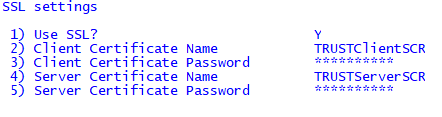
On UniVerse systems, in the Use SSL? field, do one of the following:
- To use SSL communication, type Y. SSL requires the Client and Server Certificate Name and Password fields be populated with settings from the Windows service. Press Enter to navigate through these fields. When done, click Ok.
- To not use SSL communication, type N, and press Enter or click Ok.
Min/Max Sendto
The minimum and maximum number of SendTo phantoms.
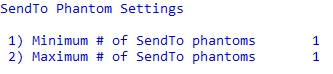
In the each field of the SendTo Phantom Settings screen, type the number of phantoms, and press Enter or click Ok.
File Maintenance
The archive file keeps a history of Cloud Phantom activity. This file is useful mainly for support issues. You can manually clear the archive file or set the number of days to keep history items before automatic deletion. The default value is 90.
The &PH& file keeps a log of everything that would have printed to the screen if a process had not been run in the background. You can set the number of days to keep items before automatic deletion. The default value is 7.

- In the Days to keep archive field, type the number of days, and press Enter or click Ok.
- In the Days to keep &PH& field, type the number of days, and press Enter or click Ok.
TCP Ports and IP Address
Set the IP address and ports used by the Cloud Phantom server.
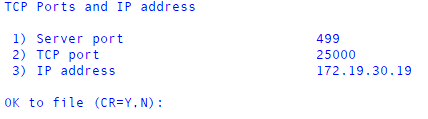
- In the Server port field, type the port, and press Enter.
- In the TCP port field, type the port, and press Enter.
- In the IP Address field, type the IP Address of the TCS system, and press Enter.
- At the Ok to file changes? prompt, press Enter.
- Click Cancel.
-
At the NOTE screen, press Enter.

- If you changed any settings, you must restart the Cloud Phantom.