Creating or changing contact attempt filters
A contact attempt filter searches for and filters accounts based on how your agency attempted to contact them over a specific time period. For example, you can create a filter to find accounts that your agency has contacted and reached successfully by phone over the lifetime of the account or those accounts that your agency has sent letters to but has not heard back from in the last three months.
You must enable the contact management feature, which was released in The Collector System 2014, to use contact attempt filters. For more information, see Setting up contact management.
Recording the contact attempts can help you in several ways. You can:
- Display a summary of contact attempt results during specified date and/or time frames. This shows collectors a history of the contact attempts to help them determine the best time and means by which to reach a customer. To display this information to collectors, see Menu 10.4.49 - Attempt Window Setup.
- Use the filtered information as a test condition in Account Flow Manager (AFM) to automate collection workflow. For example, a fictitious agency, Lake Assets, sets up The Collector System to automatically send accounts to their legal desk when they have attempted to contact the customer by letter or phone, five times without reaching them. Lake Assets creates a contact filter, which they can use as a condition in an AFM strategy, to automatically move those filtered accounts to their legal desk. For more information, see Creating or changing standard strategy conditions.
When creating a contact attempt filter, you can specify all or some of the following, depending on the accounts to locate. These parameters include:
- Dates and/or times: You can specify a wide or narrow time frame in which to search for accounts. For example, you can search for accounts over the lifetime of the account, the last year, a specific range of dates, or multiple days and/or times.
- Contact type: You can specify a single contact type or all contact types. The list of contact types may differ depending on those entered by your agency, but they will likely include some form of phone and letter communication.
- Contact field: When specifying a single contact field, you also need to specify the field for The Collector System to monitor. For example, the Phone contact type will likely include different types of phone numbers, such as home phone, cell phone, and so on.
To create or change contact attempt filters:
-
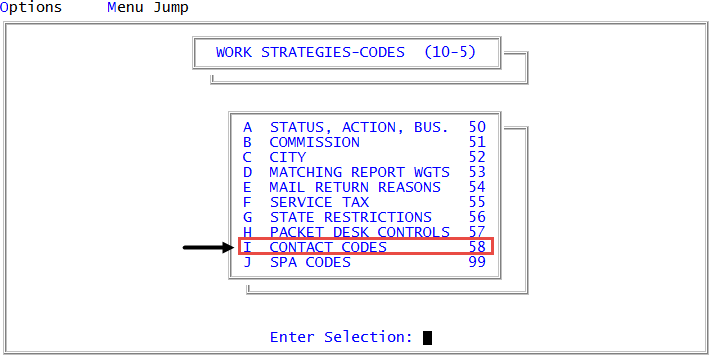
From the Master menu, navigate to
 Management Strategy > Codes > Contact Codes (menu 10.5.58).
 - In the Contact Management Configuration window, select Create/Update Contact Filters, and press Enter or click Ok.
-
Do one of the following:
Create a new contact attempt filter from scratch
- In the Select Filter window, select the Add filter ID, and press Enter or click Ok.
- In the Enter New Filter ID window, type a new ID number or name, and press Enter or click Ok.
- In the Enter Description for filter window, type information that describes the new filter, and press Enter or click Ok.
Create a new contact attempt filter by copying and changing an existing filter
- In the Select Filter window, select the ID of the filter to copy, and press Enter or click Ok.
- In the Select Action window, select Copy, and press Enter or click Ok.
- In the Enter New Filter ID window, type a new ID number or name, and press Enter or click Ok.
- In the Enter Description for filter window, type information that describes the new filter, and press Enter or click Ok.
Change an existing contact attempt filter
- In the Select Filter window, select the ID of the filter to change, and press Enter or click Ok.
- In the Select Action window, select Update (if it is not already selected), and press Enter or click Ok.
- Configure one or multiple fields to filter for specific contact types using the following table:
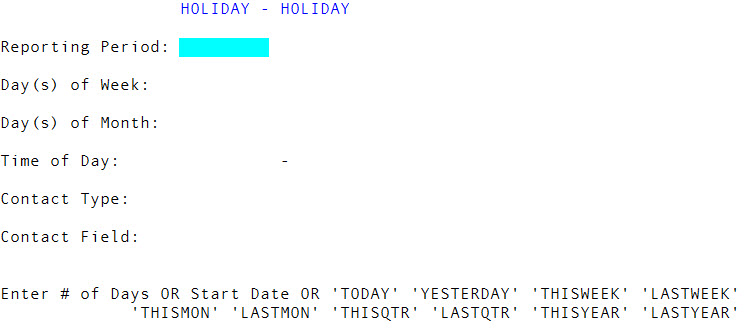
Specify the date range period to include in the filter by doing one of the following, and pressing Enter:
- For a specific number of days, type a number.
- For a single day, do the following:
- In the first field, type the date, and press Enter.
- In the second field, type the same date you entered in the first field, and press Enter.
- To start from a specific date, do the following:
- In the first field, type the date, and press Enter.
- In the second field, leave the field blank, and press Enter.
- To specify a date range, do the following:
- In the first field, type the beginning date, and press Enter.
- In the second field, type the end date, and press Enter.
- To return contacts prior to a date, do the following:
- In the first field, leave the field blank, and press Enter.
- In the second field, type the date, and press Enter.
- For today, type Today.
- For yesterday, type Yesterday.
- For this week, type Thisweek.
- For last week, type Lastweek.
- For this month, type Thismon.
- For last month, type Lastmon.
- For this quarter, type Thisqtr.
- For last quarter, type Lastqtr.
- For this year, type Thisyear.
- For last year, type Lastyear.
- To choose from a list of options, type ?.
- In the Select Reporting Period window, select the date range period to include, and press Enter or click Ok.
Specify the days of the week to include in the filter by doing one of the following, and pressing Enter:
- For Monday, type 1.
- For Tuesday, type 2.
- For Wednesday, type 3.
- For Thursday, type 4.
- For Friday, type 5.
- For Saturday, type 6.
- For Sunday, type 7.
- To choose one or more days from a list, type ?.
- In the Days of Week window, select one or more days to include, and press Enter or click Ok.
To include multiple days of the week in the filter, you can type the numbers representing the days separated by a semicolon.
Specify the date of the month to include in the filter by doing one of the following, and pressing Enter:
- Type the date.
- To choose one or more dates, type ?.
- In the Days of Month window, select one or more dates to include, and press Enter or click Ok.
To include multiple dates in the filter, you can type the numbers representing the dates separated by a semicolon. You can also use a hyphen to include multiple sequential dates. For example, to include the first through the fifth of the month, the eighth, as well as the 26th through the 30th, you can type 1-5; 8; 26-30.
Specify the time of day to include in the filter by doing one of the following:
- For a specific time range, do the following, and press Enter:
- In the first field, type the beginning time.
- In the second field, type the end time.
- To select from a list of time ranges, type ?, and press Enter.
- In the Time of Day window, select a time range, and press Enter or click Ok.
Specify the type of contact to include in the filter by doing one of the following and pressing Enter:
- If you know the contact type to include, type it.
A list of the available contact types displays at the bottom of the screen.
- To choose from a list of available contact types, type ?.
- In the Contact Type window, select a contact type, and press Enter or click Ok.
You can only specify one contact type or all contact types. If you enter or select All, the screen skips the Contact Field field since The Collector System assumes you want to include all the fields for all of the contact types.
If you enter a specific contact type in the Contact Type field, in the Contact Field field, you can specify the contact fields to include in the filter by doing one of the following and pressing Enter:
- If you know the contact field to include, type it.
A list of the available contact fields displays at the bottom of the screen.
- To choose from a list of contact fields, type ?.
- In the Contact Field for contact type window, select a single contact field to use, and press Enter or click Ok.
- To filter ALL contact fields for the selected contact type, leave the Contact Field field blank.
- In the Select Filter window, do one of the following:
- To create or change another filter, repeat Steps 3-4.
- To exit, click Cancel.