Creating or changing standard strategy conditions
For details on how the Strategy Condition screen works, see Menu 10.3.25 - Account Strategy.
To create or change standard strategy conditions:
-
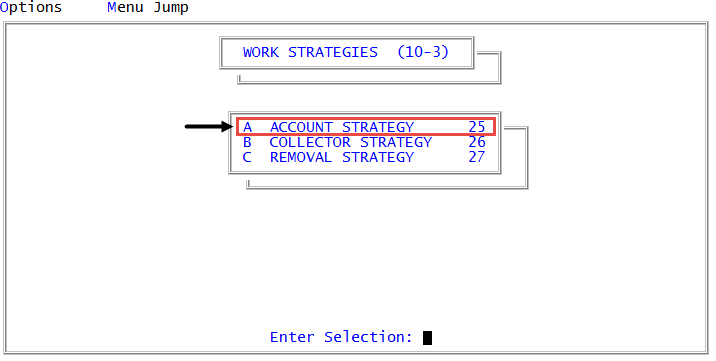
From the Master menu, navigate to
 Management Strategy > Work Strategies > Account Strategy (menu 10.3.25).
 - In the Account Flow Manager window, select Strategy Conditions, and press Enter or click Ok.
- If you have incomplete strategies, the Strategy Test Conditions window displays and includes a list of your incomplete strategies. Select Enter Strategy ID, and press Enter or click Ok.
-
In the Enter Strategy ID (?,/P) window, do one of the following, and press Enter or click Ok:
Create a new standard strategy
- Type the name for the new standard strategy, and press Enter.
- At the Ok to Add? prompt, do one of the following:
- To start with a blank strategy, click Yes.
- To copy an existing standard strategy and use it as the basis for the new strategy, click Copy.
- In the Enter Strategy ID to Copy (?) window, do one of the following, and press Enter or click Ok:
- If you know the strategy to copy, type the name.
- To choose from a list of strategies, type ?.
- To go back to the previous window, click No.
Create a new standard strategy based on an existing standard strategy
- Type the name of the standard strategy to copy.
- At the Ok to copy strategy to strategy prompt, click Yes.
Change an existing standard strategy
- If you know the standard strategy name, type it.
- To choose from a list of standard strategies, type ?.
- In the Available Strategy Tests window, select a standard strategy, and press Enter or click Ok.
When creating or renaming a strategy, we recommend that you name it with a meaningful title to help others understand what the strategy does. Also, we recommend that you do not use spaces in the name.
-
In Desc(?) field of the Strategy Conditions screen, type a descriptive name for the strategy, and press Enter.
The information in this field displays in other areas of AFM to describe what this strategy does. This field also allows you to set specific options for this strategy. For more information, see Configuring strategy options.

- In the Type field, do one of the following to indicate the type of accounts a strategy is designed to work with, and press Enter:
- For trust accounts, type T.
- For precollect accounts, type P.
-
In the Control field, do one of the following to specify how the system handles packeted accounts, and press Enter:
- To evaluate the new account according to its own record without regard to any other packet member, type I (for Independent).
- To start the account that the primary packet is on, type P (for primary packet).
- To start the account on the same strategy as the primary packet member, type A (for any packet member).
If there is no packet member on a strategy, then the system treats the account as if it has an "I" (for Independent) in the field.
-
In the Restrict field, to restrict specific user logins from starting or stopping this strategy, type Y, and press Enter.
Use this field as a flag rather than completely removing all strategies from a role profile.
-
In the Data Field, add one of the following for AFM to test:
Add a file attribute
If the file attribute is a designated contact field, you can append the data field with .C to select a specific contact field. Contact fields are also shown as separate items in the file name Fields window. For example, D8 vs. D8.C.
- Do one of the following:
- If you know the file attribute, type it, and press Enter.
- To choose from a list of file attribute categories, type ?, and press Enter.
- In the Available Files window, select the file, and press Enter or click Ok.
- In the file name Fields window, select the field name, and press Enter or click Ok.
-
If you entered a contacts field type (
The table below contains a list of possible contact fields to use:
Contact field
Description
CT1
Location code (Debtor/Fiscal fields: D8, F36, F40, etc.)
CT2
Comment
CT3
DNC - Do Not Contact flag
CT4
Status
CT5
Sub-Type (for phones this could be Cell, Land, etc.)
CT6
Extension
CT7
Contact type (phone, address, email, etc.)
CT9
Automated dialer authorization - No Longer Used
CT13
Priority (for contact values which are prioritized)
CT14
Consent source (debtor, guardian, other)
CT15
Time Zone
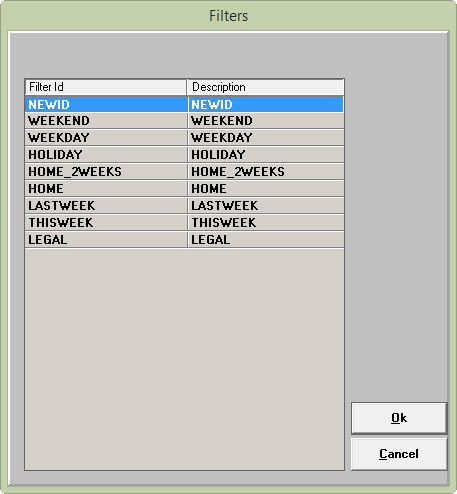
Add a contact attempt filter
Do one of the following:
- If you know the contact attempt filter ID, type it, and press Enter.
- To choose from a list of contact attempt filters, type ?, and press Enter.
- In the Available Files window, select Attempts, and press Enter or click Ok.
In the Filters window, select the filter, and press Enter or click Ok.
- At the Include Packet Totals? prompt, to include the attempts and results for all packet members, click Yes; otherwise click No.
- In the Results window, select one or more contact attempt results, and press Enter or click Ok.
Add a dollar category
Do one of the following:
- If you know the dollar category, type it, and press Enter. For a table of all the categories, see Dollar category codes.
- To choose from a list of dollar categories, type ?, and press Enter.
- In the Available Files window, select Dollars, and press Enter or click Ok.
- In the Dollar Categories window, select the category, and press Enter.
- In the Dollar Fields window, select the amounts available for consolidation within the category you selected, and press Enter or click Ok.
To select multiple items, either click the unhighlighted options to highlight them or click highlighted options to unhighlight them, and press Enter or click Ok.
Identify what actions to take when an account does not meet any of the conditions
Type X, and press Enter.
The X code is a special condition that has its own actions and events that The Collector System applies to any accounts that do not meet any of the conditions in the condition set. In the following example, this strategy assigns accounts to specific desks based on meeting certain conditions. The X code at the end of the strategy means that The Collector System will assign any accounts that fail to meet any of the tests to a review desk.
- Do one of the following:
-
In the Value/Field field, type the logical operator and the value or expression to compare to the item you entered in the Data Field field, and press Enter.
If the value to compare against is also a location value (i.e. D23, C16), the Value/Field must be enclosed in quotes. For example, to compare a desk that uses a reserved letter (i.e. C16), type "C16".
A logical operator indicates the type of comparison or test to make. If you do not type a logical operator, by default the system inserts the equal to (=) operator. The following table includes a list of operators to use:
Operator
Description
=
Equal to
#
Not equal to
>
Greater than
<
Less than
>= or =>
Greater than or equal to
<= or =<
Less than or equal to
For example, to select all accounts that have an assigned amount over $1000, in the Data Field, type $1, and in the Value/Field field, type >1000.

-
Before entering the strategy action in the 1st Action field, to add another test condition that the account must meet before the action is applied by the system, press Enter until the cursor moves to the Data Field field of the next line. Repeat Steps 9-11 until you add all of the AND conditions.
For example, to select all accounts that have an assigned amount of over $1000 and have an address in Arizona, in the Data Field field of the first test line, type $1, and in the Value/Field field, type >1000. Instead of entering an action in the 1st Action field, press Enter until the cursor moves to the second test line. Instead of displaying OR IF to designate another separate condition, the system displays AND to mean that both the conditions in the first and second line must be met for the action(s) to occur.

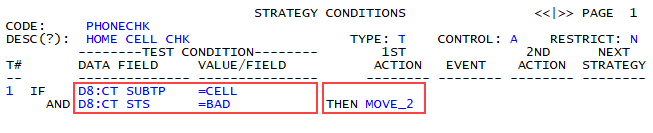
The example below selects accounts which have a cell phone as a home number that has been marked as "BAD". In the first line of the Data Field field, select the Debtor file and then D8.C to use contacts fields for the home phone. Select field CT5, which is the phone's sub-type. To check that this is a cell phone, in the Value/Field field, type =CELL. Press Enter until the cursor is on the next line of the Data Field. Select Debtor and then D8.C, and use contact field CT4 to test for a phone status that is =BAD. After setting the test conditions, an action can be assigned.
-
In the 1st Action field, do one of the following to enter the strategy action to take if the account meets the condition:
Enter a strategy action ID
Type it, and press Enter.
Choose from a list of strategy action IDs
- Type ?, and press Enter.
- In the Available Strategy Actions screen, select the strategy action, and press Enter or click Ok
Create a new action
- Type a new strategy action code, and press Enter.
- At the Action code Not on File. OK to Add? (Y, CR=N) prompt, type Y, and press Enter.
- Complete the fields in the Strategy Actions screen. For more information, see Creating or changing strategy actions.
-
In the Event field, do one of the following to specify the event that triggers an action:
 Enter a strategy event ID
Type it, and press Enter.
Choose from a list of strategy event IDs
- Type ?, and press Enter.
- In the Available Strategy Events screen, select the strategy event, and press Enter or click Ok
Create a new action
- Type a new strategy event code, and press Enter.
- At the Action event code Not on File. OK to Add? (Y, CR=N) prompt, type Y, and press Enter.
- Complete the fields in the Strategy Events screen. For more information, see Creating or changing strategy events.
-
In the 2nd Action field, do one of the following to indicate what, if any, secondary action should occur when the event listed in the Event field occurs:
 Enter a strategy action ID
Type it, and press Enter.
Choose from a list of strategy action IDs
- Type ?, and press Enter.
- In the Available Strategy Actions screen, select the strategy action, and press Enter or click Ok
Create a new action
- Type a new strategy action code, and press Enter.
- At the Action code Not on File. OK to Add? (Y, CR=N) prompt, type Y, and press Enter.
- Complete the fields in the Strategy Actions screen. For more information, see Creating or changing strategy actions.
-
In the Next Strategy field, do one of the following to indicate which, if any, strategies to run on an account after the current strategy is complete:
 Enter a strategy ID
Type it, and press Enter.
Choose from a list of strategies
- Type ?, and press Enter.
- In the Available Strategy Tests screen, select the strategy, and press Enter or click Ok
Create a new strategy
- Type a new strategy ID, and press Enter.
- At the Strategy code Not on File. OK to Add? (Y, CR=N) prompt, type Y, and press Enter.
- At the Enter Description for strategy code prompt, type a short description, and press Enter.
If you create a new strategy from this screen, you need to retrieve this new strategy later to complete it. Do not send the account to a strategy that could send it back to the original strategy. The account could be caught in an endless loop.
-
In the Data Field field of line 2, do one of the following:
- To add more conditions to the strategy, proceed with Step 9-15.
- To save the strategy, type #, and press Enter.
- At the OK to file strategy name? prompt, click Yes.
Though a message does not display, The Collector System saves your changes to the strategy.