Creating or changing the Address Validation table
Use this option to set up conditions for automatically designating a new account as a mail return. When a new account meets the conditions specified on this screen, the account is flagged as a mail return with the letters MR- at the beginning of the Address field.
In addition to entering a file name and attribute in the Address field, you can also enter the following options:
|
Option |
Use this option to... |
|
/ |
Back up one field. |
|
/number |
Jump to the field number. A large number will jump to the end of the table. |
|
/P |
Print the table. For more information, see Printing the Address Validation table. |
|
I |
Insert a line beneath the current line in the table. |
|
Del |
Delete the current line from the table. For more information, see Deleting a line from the Address Validation table. |
|
X |
Erase the table from the current location to the end of the table. |
|
? |
Select from a list of applicable entries for the field. This option is also available from the Requirement and Value fields. |
|
?? |
Select from a list of additional Address field options. |
|
# |
Exit the screen. |
The Invalid Address Conditions screen compares the entry in the Value field, in conjunction with the entry in the Requirement field, to the data in the field you set in the Address field column. If the values match, The Collector System flags the account as a mail return.
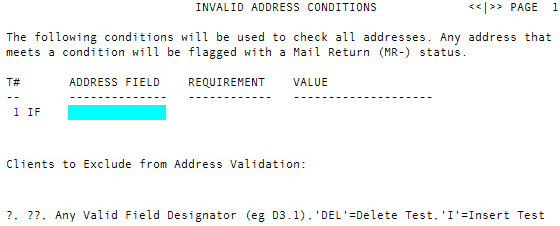
The number in the T# column indicates the test number. Each test can have several lines; when a number displays in the column, a new test starts in that line. Each test starts with "If" or "Or If". When a test has more than one line, subsequent lines are preceded by "And".
To create or change the Address Validation table:
-
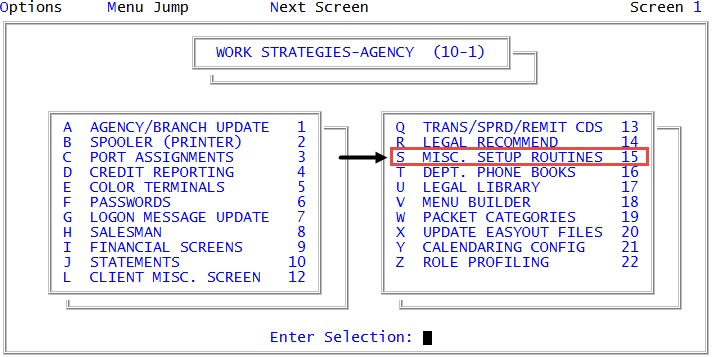
From the Master menu, navigate to
 Management Strategy > Agency > Misc. Setup Routines (menu 10.1.15).
 - In the Miscellaneous Setup Routines window, select Address Validation Table Update, and press Enter or click Ok.
- In the Address Field of the Invalid Address Conditions screen, do one of the following:
Type D and the attribute and sub-value of the field to test, and press Enter.
Your choices are limited to address, city, state, and zip code fields.
- To see a list of valid fields, type ?, and press Enter.
- In the Debtor Address Fields window, select a field, and press Enter or click Ok.
- To see a list of other options, type ??, and press Enter.
- In the Requirement field, do one of the following:
- To view a list of valid operators, type ?, and press Enter.
- Type one of the following valid operators, and press Enter:
- To indicate the value equals the data in the Address field, type =.
- To indicate the value is not equal to the data in the Address field, type <>.
- To indicate the value contains data from the Address field, type CONTAINS.
- To indicated the value does not contain data from the Address field, type NOT CONTAINS.
- In the Value field, do one of the following, and press Enter:
- Type one of the following:
- NULL
- ALL NUMBERS
- ALL LETTERS
Type a literal string, enclosed in quotation marks.
A literal string can be any data you want to compare against. For example, to exclude all addresses from Vancouver, WA. Enter D4 (City) in the Address Field column, = in the Requirement column, and "VANCOUVER" in the Value column.
- Type one of the following:
- In the IF column of the next row, do one of the following:
- To add further requirements to the same test condition, type AND, and press Enter. Repeat the procedure, starting at Step 3.
- To add another test condition to the screen, type OR, and press Enter. Repeat the procedure, starting at Step 3.
- If you have finished adding test conditions, press Enter.
- To save the conditions and exit the screen, type #, and press Enter. Proceed to Step 8.
- In the Clients to Exclude from Address Validation section of the screen, type the numbers of any clients to exclude from the address validation routine, separated by semicolons, and press Enter. Repeat Step 6.
- At the OK to save changes? prompt, do one of the following:
- To save the conditions and exit the screen, click Yes.
- To exit the screen without saving the conditions, click No.
- To make changes to the Invalid Address Conditions screen, click Cancel. Repeat Step 6.