Printing statements
Use this option to print Balance Forward statements and CU·Invoices.
The following print requirements apply to statements and invoices:
If your agency operates in a state that charges a service tax, you need to set up the tax information in each Client Control Record. The statement program then calculates the tax and prints it on the invoice or statement. If some clients have NSF or direct-pat transactions, each time the statement separates these transactions, a line is printed in the statement indicating the tax for that transaction group. For more information, see Creating or changing the Client Control Record.
Before printing, you should complete all postings for a statement period.
Print the statement summary before printing statements for a new week.
Print checks immediately after printing statements to ensure that you use the same check number for statements and checks. If you clear statement flags for selected clients, you need to print checks. There should be no gaps in the check register.
Statements
You can print statements by branch. Contact your Finvi Support representative to set this up.
A branch is a restricted logon that includes specific clients. When you log on with the branch name, only the clients assigned to that branch display. When printing statements by branch, you must print the statements on each branch logon. In addition, you must print the following reports by branch:
- Checks
- Check register
- Statement summary
- Tax report
- Statement log
- Balance Forward Aging report
- Overpayment report
Invoices
The following print requirements apply to CU·Invoices:
- When you print invoices, The Collector System generates an entry into the invoice file for the total charges listed on each invoice.
- The Collector System prints invoices first and then prints checks. After invoices are printed, you cannot print them again until checks are printed or the flags are cleared for all clients.
- Invoices look identical to balance forward statements. However, the system creates an invoice number for each invoice that is printed. The invoice number, which includes the client number, internal date number, and the sequence number is printed in the date-block section of the form. Invoices that have statement breaks and require additional pages have a different sequence number on each page.
To print a statement:
-
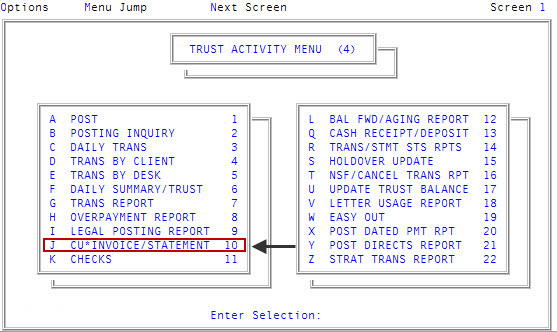
From the Master menu, navigate to Trust Activity > CU*Invoice/Statement (menu 4.10).
- In the Statements window, select Print Statements, and press Enter or click Ok.
- At the Select Individual Client(s)? prompt, do one of the following, and press Enter or click Ok.
- To print statements for individual clients or to reprint statements due to errors, click Yes.
- To print statements for all clients, click No. Proceed to Step 5.
- In the Enter Client Number(s) Separated by a Semicolon window, do one of the following:
- Type the client numbers, separating each with a semicolon.
- To include all clients, press Enter or click Ok to accept ALL.
- To use a Get-List or Select statement, type the statement. For more information, see Working with Recall.
-
In the Enter Week # window, type the number of the week for which to generate the statements, and press Enter or click Ok.
You cannot run statement weeks out of sequence and you cannot hold over unprinted balance forwards from the previous week. After you enter a week number, The Collector System searches for W, B, or M in each Client Control Record's Statement Frequency Fields. For more information, see Creating or changing the Client Control Record.
-
In the Enter Weekly From-Date window, type the starting date (using the MM-DD-YY format) for the weekly reports, statement, and so on run for this client, and press Enter or click Ok.
The from-date prompts do not determine what information is printed on the statement. This information prints on the statement for informational purposes only. The information printed depends on the week number and the statement frequency listed in the Client Control Record, not the dates entered here.
-
In the Enter To-Date window, type the ending date of the week, half-month, or month, and press Enter.
Transactions posted after this date do not print on the statement. However, if you are running week 4, all transactions are eligible to print on the statement unless they are excluded for Holdover or On Request.
- In the Select Printer to Use window, select the print and/or hold file to print to, and press Enter or click Ok.
- In the Enter Starting Check Number window, type the beginning check number, and press Enter or click Ok.
-
In the Enter Number of Test Lineups (0-10) window, type a number between 0 and 10 corresponding to the number of test checks to print, and press Enter or click Ok.
The system adds this number to the starting check number. The internal check register then records check numbers that are printed.
If aging information is printed on statements, the Make Sure No Posting Is Done Until Aging Report Is Printed prompt displays.
The Aging report uses information from the Client record. If the report reads the record, and then you post, which updates the record, the information on the report is no longer correct. Refrain from posting until after the report is run. For more information, see Menu 4.12 - Aging Report.
If the Balance Fwd/Aging report is printed at this time, the Ready To Print Aging report displays.