Creating or changing the Client Control Record
Use this option to update the Client Control Record for a client.
To create or change the Client Control Record:
-
Do one of the following:
 Create a new client record
- Complete the procedures in Managing client records.
- Complete the procedures in Creating or changing client fund distribution.
-
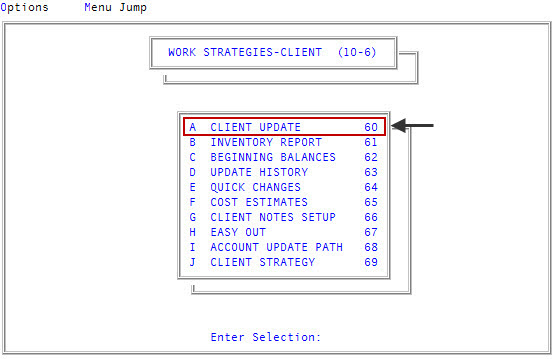
From the Master menu, navigate to Management Strategy > Client > Client Update (menu 10.6.60).

- Proceed to Step 4.
Change a client record
From the Master menu, navigate to Management Strategy > Client > Client Update (menu 10.6.60).
-
At the Enter Client # prompt, type the code your agency uses to identify this client, and press Enter.
For a list of the commands available in this field, see Using client # prompt options.
-
In the Cli Name field, type /C, and press Enter.
For a list of the commands available in this field, see Using client name field options.
-
Do the following to make entries in the appropriate Client Control fields:
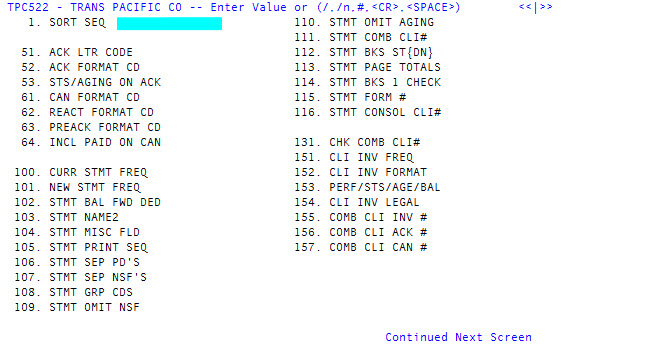 1. Sort Seq - Sort accounts on this client's statements and reports
Do one of the following, and press Enter:
- To sort by account name, type A (alphabetic).
- To sort by client reference number, type N (numeric).
- To sort by patient's name, type P (patient).
51. Ack Ltr Code - Send acknowledgments to this client
Do one of the following, and press Enter:
- To send an acknowledgment letter that details information about each account, type A.
- To send a list of acknowledged accounts, type L.
- To exempt this client from receiving any acknowledgments, type X.
52. Ack Format Cd - Enter the acknowledgment format to use for this client
Do one of the following:
- To send the agency default acknowledgment letter format, press Enter.
-
To send a specific acknowledgment letter format, type the acknowledgment format code, and press Enter.
Your agency can create acknowledgment formats in Menu 10.7.82 ‐ Acknowledgment Format. For more information, see Creating or changing acknowledgment letters/notices.
- To exempt the client from receiving any acknowledgments, type X, and press Enter.
53. Sts/Aging in Ack - Enter the reports to generate when sending acknowledgment letters
Do the following:
- To indicate the types of statistical reports to print after the printing of each acknowledgment, type U, and press Enter.
- In the Print Summary by Status field of the Summary By Status/Summary By Age window, to print this report with each acknowledgment for the client, type Y, and press Enter.
- In the Print Summary By Age of Account field of the Summary By Status/Summary By Age window, to print this report with each acknowledgment for the client, type Y, and press Enter.
-
In the Aging Categories field, type the number of aging categories (up to 9) to include in the Summary By Age of Account report, and press Enter.
Aging is based on the assignment date minus the client's last charge/last pay date.
-
In the Up To ___ Days fields, type the number of days in each row, in ascending order. Press Enter to move from one row to the next.
The Over___ Days field is automatically updated with the number entered in the Last Up To ___ Days field.
- At the Ok to File? (Y, N, /) prompt, do one of the following, and then press Enter:
- To save the changes, type Y.
- To discard the entries and exit the screen, type N.
- To make changes to the screen, type /.
When you save the screen, the Sts/Aging on Ack field displays S, A, or both depending on the options you selected.
61. Can Format Cd - Enter which cancellation letter format to use for this client
Do one of the following:
- To send the agency default cancellation letter, press Enter.
-
To send a specific cancellation letter, type the cancellation format code, and press Enter.
Your agency can create cancellation formats in Menu 10.7.83 ‐ Cancellation Format. For more information, see Creating or changing cancellation letters/notices.
- To exempt the client from receiving cancellation letters, type X, and press Enter.
62. React Format Cd - Enter which reactivation letter format to use for this client
Do the following:
- To send the agency default reactivation letter, press Enter.
-
To send a specific reactivation letter, type the reactivation format code, and press Enter.
Your agency can create reactivation formats to meet your specific needs in Menu 10.7.84 ‐ Reactivation Format. For more information, see Creating or changing reactivation letters/notices.
- To exempt the client from receiving reactivation letters, type X, and press Enter.
63. Preack Format Cd - Enter which pre‐acknowledgment letter format to use for this client
Do the following:
- To send the agency default pre‐acknowledgment letter, press Enter.
-
To send a specific pre‐acknowledgment format, type the pre‐acknowledgment format code, and press Enter.
Your agency can create pre‐acknowledgment formats in Menu 10.8.92 ‐ Pre‐Acknowledgment. For more information, see Creating or changing acknowledgment letters/notices.
- To exempt the client from receiving pre‐acknowledgment letters, type X, and press Enter.
64. Incl Paid on Can - Enter which accounts to include in this client's cancellation notices
- To use the agency default setting to determine whether or not paid accounts are included on the cancellation notice, press Enter.
- To exclude paid accounts from printing on the cancellation notice, type Y, and press Enter.
- To include paid accounts and print subtotals between cancellation types on the cancellation notice, type Y1, and press Enter.
-
To include paid accounts, print subtotals, and place a new page between each cancellation type on the cancellation notice, type Y2, and press Enter.
The cancellation types include: normal canceled accounts, accounts canceled after receiving a paid status code (example: SIF), and normal paid accounts.
100. Curr Stmt Freq - Enter how ofter to send statements to this client
Type one of the following options, and press Enter:
- W = Weekly
- B = Bi‐monthly (twice a month)
- M = Monthly
-
R = On request
After filing the client record, the statement frequency can be changed from weekly, monthly, or bi-monthly to on request at any time. To make any other changes, see 100. Curr Stmt Freq.
101. New Stmt Freq - Enter how ofter to send new statements to this client
Do one of the following, and press Enter:
- W = Weekly
- B = Bi‐monthly (twice a month)
- M = Monthly
-
R = On request
This change is not effective until after Month‐End. Whatever is in this field when Month‐End is run is copied to the 100. Curr Stmt Freq field, and this field is cleared.
- To change the statement frequency to on request immediately, press the Spacebar, and then press Enter.
102. Stmt Bal Fwd Ded - Include the balance forward in this client's statement
Do one of the following, and press Enter:
-
To show the true balance owing on statements and the Balance Forward report, type Y, or leave the field blank, and press Enter.
We recommend that you enter Y at this prompt unless you have a client with a very specific need.
- To keep the balance forward from showing on the client's statement, type N, and press Enter. For more information on the implications of not using this feature, see Using statement balance forward deduction.
103. Stmt Name 2 - Include the second account name in this client's statements
Type Y, and press Enter.
104. Stmt Misc Fld - Include misc field information in this client's statements
Type the Debtor or Fiscal field attribute number to include in the statement, and press Enter.
105. Stmt Print Seq - Configure the order of information that displays on each individual line of a statement
Do the following:
- To sort the statement information by the agency default (12345), leave the field blank, and press Enter.
- To sort by an order that you define, type the number of each type of information in the order it should display on the statement, and press Enter.
- 1 = Account name1
- 2 = Client account number
- 3 = Account name2
- 4 = Statement miscellaneous field
- 5 = Comment from Trans file
- 6 = Patient name (can be used instead of number 1)
If you entered Y in the 103. Stmt Name 2 field, the Account name2 field must be included. This requires you to use numbers 1, 2, 3, and 5 in any order. If you entered an attribute in the 104. Stmt Misc Fld field, you must use numbers 1, 2, 4, and 5 in any order.
106. Stmt Sept Pds - Print client and agency payments separately for this client's statement
Type Y, and press Enter.
107. Stmt Sep NSFs - Print NSF checks on a separate page for this client's statement
Type Y, and press Enter.
108. Stmt Grp Cds - Print group codes in a specific order in this client's statement
Type the statement group codes in the order they should display on the statement, and press Enter.
For more information, see Managing statement group codes.
This feature is similar to fields 106. Stmt Sept Pds and 107. Stmt Sep NSFs, both of which also create statement breaks. If you use statement group codes, they take precedence over the other two fields. For example, if a group code includes all attorney transaction codes and there is an NSF attorney transaction during the month, that NSF transaction code will display with the attorney group and not with the separated NSFs.
109. Stmt Omit NSF - Omit NSF reversals in this client's statement
Type Y, and press Enter.
NSF client payments display on the statement regardless of the entry in this field.
If you set up statement formats to display the remaining balance on the client statement, and you choose to omit the NSF reversals, the remaining balance may be incorrect.
110. Stmt Omit Aging - Omit aging information in this client's statement
Type Y, and press Enter.
111. Stmt Comb Cli# - Combine client statements
Do one of the following:
- To combine this client's statements with another client's statements, type the other client number, and press Enter.
- To view the combined clients for this field, type ?, and press Enter.
- To view all combined client fields, type ALL, and press Enter.
For more information, see Combining clients.
112. Stmt Bks St{Dn} - Enter how statements should subtotal in this client's statement
Type one of the following, and press Enter.
- S = Print a subtotal for each category and send one check for the total amount owed the client.
- T = Print a subtotal for each category and send a separate check for each category.
- SD = Print subtotals by account and show subtotals for each category in the account.
- TD = Print totals by account.
- SN = Print a subtotal for each category and continue printing on the same page.
- SDN = Print subtotals by account and continue printing on the same page.
114. Stmt Bks 1 Check - Print one check for this client rather than a separate check for each statement
Type Y, and press Enter.
When using this option, if the check numbers are set to print on the statements, then the same check number prints on all of the statements for the client when a check is due.
This field is used in conjunction with field 112. Stmt Bks St{Dn}.
115. Stmt Form # - Enter the statement form to use for this client's statements
Do one of the following:
- To use the agency default format, leave the field blank. For more information, see Setting up statements.
- To specify the format to use for the client's statement, type the statement format number, and press Enter.
116. Stmt Consol Cli # - Print combined statements from multiple logons of The Collector System
Contact your Finvi Support representative about how to proceed for your specific circumstances.
131. Chk Comb Cli # - Enter how to print checks for multiple clients
Do one of the following:
- To print one check for multiple clients (many branches belonging to the same client), type the client number to print on the check.
If statement breaks are used and checks are combined, use field 114. Stmt Bks 1 Check instead of this field.
- To view the combined clients for this field, type ?, and press Enter.
- To view all combined client fields, type ALL, and press Enter.
152. Cli Inv Format - Enter the customized client inventory format to use for this client
Do one of the following:
- To use the agency default format, leave the field blank.
- To use the customized client inventory format, type the number between 1 and 40 that represents the format, and press Enter.
153. Perf/Sts/Age/Bal - Enter the additional statistical reports to print after the Client Inventory report
Do the following:
- Type U, and press Enter.
- In the Performance Statistics/Summary By Status/Summary By Age/Summary By Balance screen, do the following:
- In the Print Performance Statistics field, to print this report after the Client Inventory report, type Y, and press Enter.
- In the Print Summary By Status field, to print this report after the Client Inventory report, type Y, and press Enter.
- In the Print Summary By Age of Account field, to print this report after the Client Inventory report, type Y, and press Enter.
- In the Print Summary By Balance field, to print this report after the Client Inventory report, type Y, and press Enter.
- In the Type field, do one of the following:
- To base the Summary By Balance report on the assigned amount, type A, and press Enter.
- To base the Summary By Balance report on the current balance, type B, and press Enter.
In the Aging Categories field, type the number of aging categories (up to 9) to include in the Summary By Age of Account report, and press Enter.
Aging is based on the assignment date minus the client's last charge/last pay date. The system automatically updates the Over __ Days field with the number entered in the Last Up To __ Days field.
This field is available only if you type Y in the Print Summary By Age of Account field.
-
In the Balance Categories field, type the number of balance categories (maximum of 5) to include in the Summary By Balance report, and press Enter.
This field is available only if you type Y in the Print Summary By Balance field.
-
In the Up To __ Dols fields, type the maximum dollar amount for each row in ascending order. Press Enter to move from one row to the next.
-
At the Ok to File? (Y, N, /) prompt, do one of the following, and press Enter:
- To save the changes, type Y.
- To discard the entries and exit the screen, type N.
-
To make changes to the screen, type /.
When you save the screen, the field displays letters corresponding to the reports you chose.
154. Cli Inv Legal - Include only those accounts with status codes beginning with L (for example: LEG, LSF, LJT) in the Client Inventory report
Type Y, and press Enter.
155. Comb Cli Inv # - Combine another client's information on this client's Client Inventory report
Do one of the following:
- To combine this client's information on another client's Client Inventory report, type the number of the other client, and press Enter.
- To view the combined clients for this field, type ?, and press Enter.
- To view all of the combined client fields, type ALL, and press Enter.
156. Comb Cli Ack # - Combine another client's acknowledgment information with this client's acknowledgments
Do one of the following:
- To combine this client's information on another client's acknowledgments, type the number of the other client, and press Enter.
- To view the combined clients for this field, type ?, and press Enter.
- To view all combined client fields, type ALL, and press Enter.
157. Comb Cli Can - Combine another client's cancellation notices with this client's cancellation notices
Do one of the following:
- To combine this client's information on another client's cancellation notices, type the number of the other client, and press Enter.
- To view the combined clients for this field, type ?, and press Enter.
- To view all combined client fields, type ALL, and press Enter.
When you press Enter in this field, the second Client Control Record screen displays.
201. Hist Freq - Enter how often the History report prints for this client
Type one of the following, and then press Enter:
- R = Request only (default)
- M = Monthly
- B = Bi‐monthly
- Q = Quarterly
- SA = Semi‐annually
- A = Annually
If History Frequency is not set when adding a new client, no history will be maintained for that client. Attempting to save changes to the Client Control record without a history frequency will display this message at the bottom of the screen:
No History Frequency - History will Not be Maintained. Change? (Y,CR=N)
Selecting Y will take users back to the 201. Hist Freq field to select a frequency.
Selecting N allows users to save changes without having a history frequency set for the client.202. Hist Comb Cli # - Combine another client's information on this client's History report
Do one of the following:
- To combine this client's information on another client's History report, type the number of the other client, and press Enter.
- To view the combined clients for this field, type ?, and press Enter.
- To view all combined client fields, type ALL, and press Enter.
203. Hist Comb Sep - Print the History report for combined clients
Do one of the following:
- To print the History report for combined clients, with a separate history for each client, type Y.
- To print the History report for combined clients only, type N.
204. Hist Mths Print - Enter the number of months to include in this client's History report
Do one of the following:
- To use the agency default (usually 12 months), leave the field blank, and press Enter.
- To specify the number of months to include on the History report, type the number, and press Enter.
205. Step Hist Print - Print the Stair‐Step History report in addition to the regular History report
If field 205 is set to N, there is no way to print the Stair-Step History report.
Type Y, and press Enter.
206. Step Mths Print - Enter the number of months to include in the Stair‐Step History report
Type the number of months, and press Enter.
This field is only applicable if you made an entry in field 205. Step Hist Print.
300. CR Bal Template - Assign a consumer balance template (determines which amounts to use for credit reporting)
- Do one of the following:
- To assign a consumer balance template, type the name, and press Enter.
- To select a consumer balance template from the list of templates, type ?, and press Enter or click Ok.
- Select a template, and press Enter or click Ok.
-
To update the template, type U, and press Enter.
- In the Select Fields to Exclude from Balance Reported window, select the field(s) to exclude from balance reporting, and press Enter or click Ok.
- In the Template Id window, do one of the following:
To save the changes to the template, select Template.
Selecting this option impacts all clients assigned to the template.
To save the changes only for the specific client, select Client.
- In the Enter Description window, type a description for the new template, and press Enter or click Ok.
301. CR Reporting - Enter when to send this client's accounts to a credit reporting agency
Any value other than N will result in credit reporting. If you leave the field empty (null), The Collector System treats it the same as entering Y.
Do one of the following:
- To report all of the accounts assigned to this client to a credit reporting agency, type Y, and press Enter.
- To exclude all the accounts assigned to this client from reporting to the credit reporting agencies, type N, and press Enter.
- To delay credit reporting for accounts assigned to this client, do one of the following:
- Type the number of days to delay from the assign date, and press Enter.
Type one or more credit report delay table code(s), separating each with a semicolon, and press Enter. For more information, see Configuring credit delay tables.
Each code must be for a unique date basis. For example, you can't enter two delay table codes that are both based on the assigned date.
Before your agency uses varying credit delay periods for different clients, it is important to verify the legality of such action in each state.
302. Collector # - Assign the client's account to collectors
Do one of the following:
- To use automatic assignment criteria to assign collectors, leave the field blank, and press Enter.
- To assign this client's accounts to a specific collector, type the collector number, and press Enter.
- To assign collectors by assignment code, type the code, and press Enter. For more information, see Menu 10.4.31 - Desk Assignments.
Any entry in this field is overridden if a collector number is entered in the Desk field of the Account record.
303. Initial Work Req - Enter when the agency must work this client's accounts after receiving them
Type the number of days, and press Enter.
304. Series Name - Assign the client's accounts to an Account Flow Manager (AFM) strategy
-
To use the agency's default AFM strategy, leave the field blank, and press Enter.
If you leave the field blank, the agency's default notice series is used for this client's accounts.
- To assign an existing AFM strategy to the client's accounts, type the name of the strategy, and press Enter.
- To create a new AFM strategy for this client's accounts, type G, and press Enter. The Account Flow Manager routine starts. For more information, see Menu 10.3.25 - Account Strategy.
- To assign a notice series to this client's accounts, type the name of the series, and press Enter.
311. Min Work Freq - Enter the maximum time that can pass between the time this client's accounts are worked
Type the of days between 1 and 99, and press Enter.
This is measured by the last date the Tickler was updated.
312. Min Work Cutoff - Enter the minimum work frequency that is in effect for this client's accounts
Type the number of days, and press Enter.
Note: When the minimum work frequency expires, the collector minimum work frequency takes effect. When the collector minimum work frequency expires, the agency minimum work frequency takes effect. When that expires, there is no minimum work requirement on the accounts. For more information, see Setting the minimum number of days to work an account again.
313. Client WIP Prio - Enter the priority level this client's accounts have when building WIP lists
Type a number between 1 and 99 (1 being highest priority), and press Enter.
Use this feature sparingly and only with clients that have a specific, short term business need. If it is used for all clients, other WIP priority criteria becomes meaningless.
314. Ltr Code Exempt - Restrict sending specific letters to this client's account
Do the following:
- Type U, and press Enter.
- In the Enter Letter Type Codes to Exclude field of the Letter Type Codes screen, type the codes of the letters to exclude for this client, and press Enter. Do not use spaces or semicolons (for example: CLX).
315. Leg Rec Exempt - Exclude this client's accounts from consideration for legal action
Type Y, and press Enter.
The client's accounts will not display on the Legal Recommendation report.
325. Score Rem Exempt - Exclude this client's accounts from assignment of removal scores
Type Y, and press Enter.
326. Bottom $ Limit - Enter the minimum account balance needed by this client's accounts to be eligible for a WIP
Type a dollar amount (without a dollar sign), and press Enter.
Accounts with a balance equal to or less than the amount you enter here are not included on a WIP, but they still receive notices.
The entry in this field overrides the agency minimum dollar amount.
351. ‐ 355. Spread Sheet Codes - Enter the spread sheet codes used for this client
In each of the five transaction type fields, do one of the following:
- Type a spread code, and press Enter.
- To use the standard default, leave the field blank, and press Enter.
Each field has a different default assigned to it. The default is shown in parenthesis at the end of each field name. For more information on these five fields, see Using spreadsheet codes.
371. Holdover Days - Enter the number of days between the time a shared payment is posted and the time it is eligible for this client's statement
Type the number of days, and press Enter.
The holdover period allows time for the payment to clear the bank. It is primarily used in cases where the client refuses to share NSF reversals. A different holdover period can be specified as you post each transaction.
372. Int Write‐off - Enter the maximum interest write off amount for this client
Type the maximum amount of interest that can be written off an account if the principal balance is less than or equal to zero, and press Enter.
401. Sls Agn Criteria - Enter the assignment criteria used to determine the salesperson's commissions and statistics for sales reports
Type the letter(s) of the assignment criteria, and press Enter.
- P = Principal or Assigned Amount
- I = Interest
- A = Attorney
- M = Miscellaneous
- C = Court
451. Cli Label Exempt - Omit this client when printing client labels
Type Y, and press Enter.
The omission of the client label does not apply when using a saved list.
501. Auto Pkt Exempt - Exempt this client's accounts from automatic packeting by the Matching report
Type Y, and press Enter.
502. Packet Category - Enter the standard packet category code to use to packet this client's accounts
Type the standard packet category code, and press Enter.
503. Dyn Pkt Ctg Loc - Enter the Debtor or Fiscal fields to use to place accounts in associated packets for this client
To place accounts in an associated packet based on specific data (such as by case number, invoice number, and so on), type the Debtor or Fiscal field attribute where the data is stored, and press Enter.
You can enter a single field or a combination of fields. Separate multiple fields with a semicolon (For example, D11;F409).
You can use either a standard packet category or a dynamic packet category to isolate accounts into associated packets ‐ not both. For more information, see Managing packets.
525. Forward Exempt - Exempt the client's account from forwarding
Type Y, and press Enter.
551. Req Patient Nm - Require a user to enter a patient name in the Account Update screen
Type Y, and press Enter.
601. State Tax Code - Enter this client's tax code if the client resides in a state that requires service tax payment on collected debts
Type the tax code, and press Enter.
For more information, see Menu 10.5.55 - Service Tax.
602. % of Tax to Pay - Enter the tax percentage this client pays for your agency's services
Do one of the following:
- If the client pays the service tax, press Enter. When statements print, the system determines the total commission owed to the agency, figures the service tax, and displays it on the statement. The system then adds the service tax to the amount owed to the agency.
- If the client does not pay the service tax, type 0, and press Enter. When statements print, the system determines the total commission owed to the agency, calculates the service tax, then deducts the tax from the commission amount for the tax report only. The statement displays only the commission owed to the agency.
- If the client pays a portion of the service tax, type the percentage of the tax the client is responsible for as a decimal (example: 25% = .25), and press Enter.
611. Script Agn Code - Enter the assignment code of the default script, if this client uses Intelliscript
Type the assignment code, and press Enter.
When you press Enter, the second Client Control Record screen displays.
621. Update Figure 5 - Enable Figure 5 management analysis software
Type Y, and press Enter.
By entering Y, Figure 5 statistics accumulate and download properly. Figure 5 is an add‐on feature your agency must purchase before you can enable it.
622. Check Overcost - Track this client's account costs
Do one of the following:
- To have the business class default take effect, leave the field blank. If there is no business class default, the agency default controls whether costs are tracked.
- To track cost figures for accounts assigned from this client, type Y, and press Enter.
623. Cost Rpt Exempt - Exempt individual accounts from printing on the Costing report
Type Y, and press Enter.
631. Credit Req Bat - Enter parameters on credit requests for this client's new accounts
Do the following:
- Type U, and press Enter.
- From the list of parameters, select an option, and press Enter or click Ok.
632. Cust CF Screen - Enter the customer collector screen to use for this client, if your agency uses custom collector screens
Type the custom collector screen code to use for this client, and press Enter.
633. Trust Acct - Assign a trust account to this client
Do the following:
- Type the client trust account ID (TAD), and press Enter.
- To view a list of existing trust account IDs, type ?, and press Enter.
634. Load Dupl Accounts - Whether to load duplicate accounts for this client into The Collector System when using the Data Flow Manager Import Utility
Do one of the following:
-
To allow duplicate account loading, type Y, and press Enter.
If you leave this field blank, The Collector System treats the setting as if it was Y.
- To prevent duplicate account loading, type N, and press Enter.
635. Assign$ SIF% - Enter the acceptable settled‐in‐full (SIF) percentage of the assigned amount when settling this client's accounts
Type a SIF percentage of the assigned amount acceptable in a settlement, as a whole numbers (example: 80 = 80%), and press Enter.
636. Total$ SIF% - Enter the acceptable SIF percentage of the total balance when settling this client's accounts
Type a SIF percentage of the total balance acceptable in a settlement, as a whole number (example: 80% = 80), and press Enter.
Make an entry in either field 635. Assign$ SIF% or field 636. Total$ SIF%, not both.
637. Coll Tips Code - Enter a code name to associate the client with a collector tip category description
Type a code name (up to 3 characters), and press Enter.
643. # Settle Payment - Enter the maximum number of payments allowed in a settlement plan to be complete
Type the number of payments, and press Enter.
644. Settlement Plan - Enter the settlement plan parameters for this client
- Type U, and press Enter.
- In the Max Days to Pay Settlement field of the Settlement Age/Settle % screen, type the maximum number of days allowed in the settlement, and press Enter. This can be up to 9999 days.
- In the Max Days Between Payments field, type the maximum number of days (up to 100) allowed between payments, and press Enter.
- In the Forgive Amount field, type the maximum amount the client allows your agency to forgive on a debt, and press Enter.
- In the Use Aging From Client field, do one of the following:
- To use the agency rule, type Agency, and press Enter.
- To copy the settlement rule from another client, type the client number, and press Enter.
-
In the Age (Days) field, type the maximum account age to qualify for a settlement, and press Enter.
The default for this field is X, which means any account with any date qualifies for a settlement.
-
In the Balance ($) field, type the maximum balance the account must have to qualify for a settlement, and press Enter.
The default for this field is X, which means any account with any balance qualifies for a settlement.
-
In the Settle % field, type the percentage the client is willing to settle for based on the age and balance of the account, and press Enter.
For example, if you enter 1%, users can settle the account for one percent of the total balance.
-
At the Ok to File? (Y, N, /) prompt, do one of the following, and press Enter:
-
To save the settlement rule, type Y.
-
To discard the rule and exit, type N.
-
To make changes to the rule, type /.
When you save the settlement rule, the field displays details of the settlement plan.
-
645. Override Yes/No - Allow someone with appropriate authorization to override the settlement rule
Type Y, and press Enter.
If a collector creates a plan that exceeds the agency's authorization level, they see a message. Depending on the setting in this field, they may not be able to continue in override mode without approval from a supervisor.
- At the OK to File? prompt, do one of the following:
- To save the Client Control Record, type Y, and press Enter.
- If you entered N in field 301. CR Reporting, at the Do you wish to cancel credit reporting on all previously reported active accounts? prompt, do one of the following:
- To cancel all previously reported active accounts, click Yes, and proceed to Step 2 of Canceling credit reporting for a specific client.
- To continue reporting previously reported accounts for the client, click No.
- If you entered N in field 301. CR Reporting, at the Do you wish to cancel credit reporting on all previously reported active accounts? prompt, do one of the following:
- To continue making changes to the Client Control Record, do one of the following, and press Enter:
- Type N.
- Type /.
- To save the Client Control Record, type Y, and press Enter.