Managing the Employee Collector window
The Employee Collector window is a customizable window that is assigned to your user login. Managers can access the window; however, other collectors cannot. The Employee Collector window provides access to information that is located in other areas of the system. For example, instead of exiting the Collector screen and navigating to the Data Entry menu, you can view and update these fields without ever leaving the Collector screen.
This section includes the following topics:
You can customize collector windows any way you like. You can add up to 448 Client, Account, and Fiscal fields, and list them in any order.
To provide optimal security for your agency, your user login and role profile determine if you can set up the collector window, and which fields you can view.
Before users can create a collector window, you must set the Allow Custom Window field to Y in the user's login profile. For more information, see Create users or change user settings.
To make it easier to configure additional Employee Collector windows for other users, you can copy the settings from one desk to another.
To create or change the Employee Collector window configuration:
- Go to the Collector screen.
- At the Enter Account# (?, /) prompt, type WU, and press Enter.
- At the Enter Your User Login prompt, type your user login, and press Enter or click Ok.
- In the CMD (?, /, #, I, CP) prompt in the Custom Window Setup screen, to insert a new window, type I, and press Enter.
-
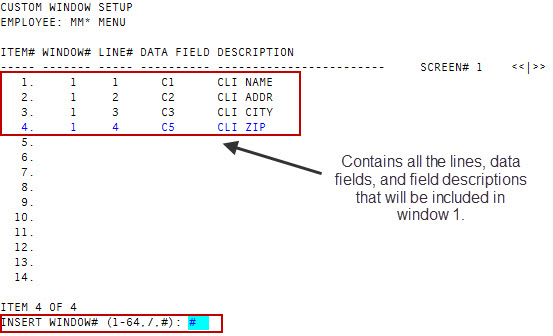
At the Insert Window# (1-64, /, #) prompt, to designate the screen number you are setting up, type a number from 1 to 64, and press Enter.
For example, type 1 to configure Employee Collector window 1, type 2 to configure Employee Collector window 2, and so on. You can configure up to 64 screens.
-
In the Line# (1-7, /, #) prompt, to indicate on which line the field displays in the Employee Collector window, type a number from 1 to 7, and press Enter.
For example, type 1 to add a field to line 1, type 2 to add a field to line 2, and so on.
- At the Data Field(?, /, #) prompt, do one of the following to enter the attribute numbers to display in the Collector window:
- To see a list of Client, Client2, Debtor, or Fiscal attribute numbers, type ?, and press Enter.
- In the Available Files window, select the file to display, and press Enter or click Ok.
- If you know the number of the file attribute to enter, type it, and press Enter.
- To see a list of Client, Client2, Debtor, or Fiscal attribute numbers, type ?, and press Enter.
- Select the field to display in the collector window, and press Enter or click Ok.
- To continue adding lines to the same window, follow Steps 5-8.
-
After you finish adding all the lines and fields for the window and are ready to save your changes, at the Insert Window# (1-64, /, #) prompt, type #, and press Enter.
- At the CMD (?, /, #, I, U, L, DEL, Item#, <CR>) prompt, do one of the following, and press Enter:
- To save your changes, type #.
- To return to making changes to the window, type /, and press Enter.
- At the OK to File? prompt, click Yes.
Copying another user's screen information can save time when it comes to setting up screens for multiple users.
To copy Employee Collector window configurations:
- Go to the Collector screen.
- At the Enter Account# (?, /) prompt, type WU, and press Enter.
- At the Enter Your User Login prompt, type your user login, and press Enter or click Ok.
-
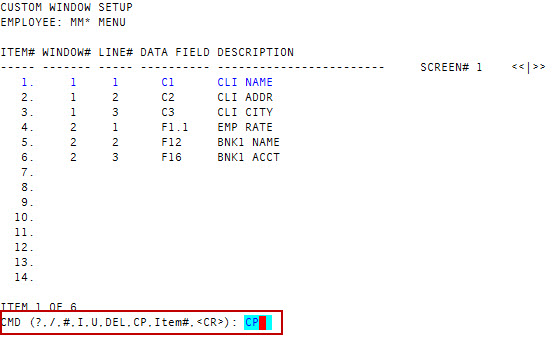
At the CMD (?, /, #, I, U, DEL, CP, Item#, <CR>) prompt in the
 Custom Window Setup screen, type CP, and press Enter.
 - If you are copying to a window with existing settings, at the The Copy operation will erase your existing settings, OK to proceed? prompt, click Yes.
- In the Copy from Employee Initial window, type the initials of the person to copy the collector window settings from, and press Enter.
- At the CMD (?, /, #, I, U, DEL, CP, Item#, <CR>) prompt, type #, and press Enter.
- At the OK to File? prompt, click Yes.
The system displays a message that the window is saved.
Use this option to update or delete screens and data fields for the Employee Collector window.
To change Employee Collector window configurations:
- Go to the Collector screen.
- At the Enter Account# (?, /) prompt, type WU, and press Enter.
- At the Enter Your User Login prompt, type your user login, and press Enter or click Ok.
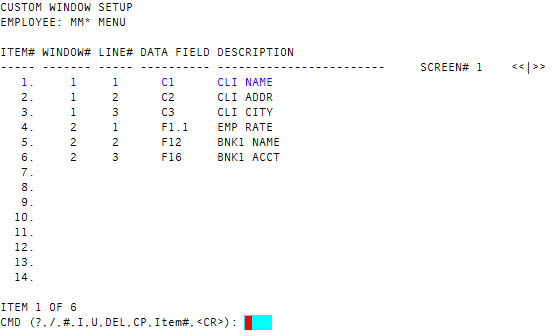
- At the CMD (?, /, #, I, U, DEL, CP, Item#, <CR>) prompt in the Custom Window Setup screen, do one of the following, and press Enter.
To insert a new window, type I.
For instructions on adding new windows, see Step 6 of Creating Employee Collector windows.
- To change a data field, click the field to change, and do the following:
- Type U.
- At the Data Field (?, /, #) prompt, type the field or type ? to choose from a list of fields.
To delete an item, click the field to delete and type DEL.
The system does not display a warning before deleting the line.
- At the CMD (?, /, #, I, U, DEL, CP, Item#, <CR>) prompt, type # to save your changes, and press Enter.
- At the OK to File? prompt, click Yes.
The system displays a message that your changes are saved.