Create users or change user settings
Follow these steps to create new users or change the settings for an existing user.
You can also give clients access to your system through the purchase of a client access logon. For more information about client access logons, contact Finvi Support.
For information about payment service or cloud associated user setup, see Associated user setup.
After you create or edit a user, you can mask the characters to help protect user privacy. For more information, see Masking passwords and users.
To create a user or change user settings:
- From the Master menu, navigate to Management Strategy > Agency > Passwords (menu 10.1.6).
- In the Enter Master Password window, type the master password, and press Enter or click Ok.
-
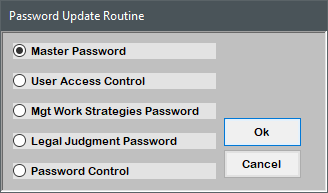
In the Password Update Routine window, select User Access Control, and press Enter or click Ok.
-
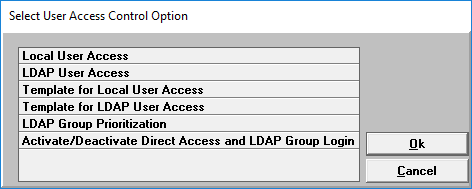
In the Select User Access Control Option window, select Local User Access, and press Enter or click Ok.
- In the Enter User Login window, do one of the following, and press Enter or click Ok:
- To create a new user, type the user name.
- To change user settings, do one of the following:
- If you know the user login to change, type it.
To choose from a list of users, type ?.
A list of users displays along with the employee initials, name, group codes, collector numbers, and whether or not the user has been disabled.
- In the User Login screen, at the Enter Option prompt, type U, and press Enter.
-
Enter the following information for the first screen of the Setup for login name screen:
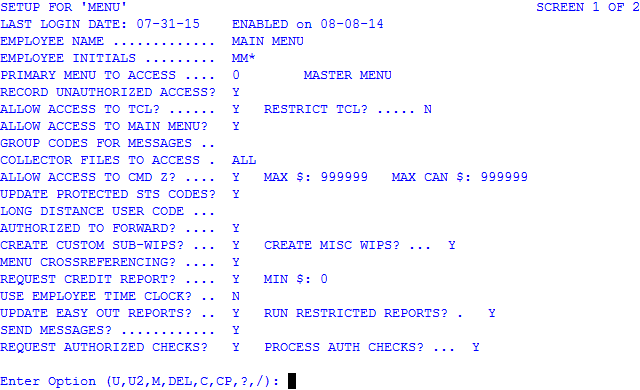
 Employee Name
Type the user's first and last name.
Do not include an apostrophe in the Employee Name field or the system displays the WIP list incorrectly.
Employee Initials
Type up to three letters as initials for the user.
Each user's messaging file is accessed by these initials. Two user logins can use the same initials if the names entered at the Employee Name prompt are exactly the same. This makes it possible for users to access their messages from other logons. You can reattach an old message file to a new user login by deleting the user login and setting up a new user login, giving it the same employee initials. The initials also display in the Worked by/Collector initials (WE/LS) section of the Collector notes.
Primary Menu To Access
To specify the menu that displays when the user logs on to The Collector System, do one of the following:
- If you know the menu number, type it.
- To choose from a list of menu numbers, type ?.
- In the Valid Menus window, select the menu, and press Enter or click Ok.
Setting this menu number does not prevent users from accessing other screens.
Record Unauthorized Access
Do one of the following, and press Enter:
- To log the user's unsuccessful attempts to access menus or routines to the Unauthorized Access report, type Y
- To not log unsuccessful attempts, type N.
Allow Access To TCL?
Do one of the following, and press Enter:
- To allow the user to access TCL, type Y.
- To restrict the user from accessing TCL, type N.
Use caution when granting TCL access to users. In most cases, agency managers need access, while collectors do not.
Restrict TCL?
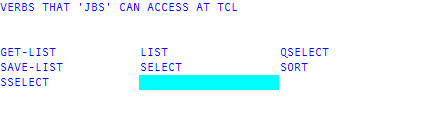
- To grant the user restricted TCL access to specified verbs and files, type Y.
- In the Verbs That User Initials Can Access At TCL screen, do one of the following:
- To add a word to the list, press Enter until you navigate to the open space after the last word on the list, and type the verb.
- To delete a verb from the list, press Enter until you navigate to the word to delete, and press the Spacebar.
- In the Files That User Initials Can Access At TCL screen, you control what files users can access. Do one of the following:
- To add a file to the list, type the name of the file, and press Enter.
- To delete a file from the list, press Enter until you navigate to the file to delete, and press the Spacebar.
- At the OK to File? prompt, do one of the following, and press Enter.
- To save your changes, type Y.
- To discard your changes, type N.
- To continue making changes, type /.
Allow Access To Main Menu?
Do one of the following, and press Enter:
- To give the user access to the Main menu, type Y, and press Enter.
- To restrict the user from accessing the Main menu, type N, and press Enter.
The menu that displays to the user is the one you selected in the Primary Menu To Access field. If you do not want users to have access to the Master menu, you also need to make sure that you do not set the Primary Menu To Access field to 0 Master Menu. Managers, posting clerks, and data entry staff are usually allowed access to the Master menu, while collectors and sales staff are not.
Group Codes For Messages
Type the message codes for the groups to which the user belongs, and press Enter.
A group consists of one alpha character and is defined by entering that letter at this prompt. For example, Group A could be collectors, Group B could be administrators, Group C could be weekend employees, and so on. A user can be in any number of groups. Group code X prevents the user from receiving messages addressed to all users (for example, you may want to use this with temporary employees). Users with group code X still receive messages addressed to their group or to their initials.
Collector Files To Access
Do one of the following:
- To specify which files the user can have access to, type the numbers of the Collector files, separated by semicolons, and press Enter.
- To give the user access to all the Collector files, type ALL, and press Enter.
- To remove any Collector files the user has access to, press the Spacebar once, and press Enter.
- To select files from a list of file names, type ?, and press Enter.
- In the Update Collector Files To Access window, select a file from the list, and press Enter or click Ok. You can select multiple files by pressing the CTRL key on your keyboard and using your mouse to click the file names.
Restricting access to a collector desk does not prevent the user from accessing and working accounts assigned to restricted desks. The restriction only prevents the user from working the regular WIP, time list, and scheduled WIP for a particular desk. The user can still access individual accounts on a desk by putting them on a non-restricted desk through debtor inquiry or by entering the account number. To prevent the user from accessing specific accounts or accounts assigned to specific desks, you may want to use a separate logon.
Allow Access To Cmd Z?
Do one of the following, and press Enter:
- To allow the user to use command Z to remove accounts from a collector's file list, type Y, and press Enter.
- To restrict the user from using command Z, type N, and press Enter.
Command Z is necessary for data entry staff or supervisors who use the Cancel & Return routine. For more information, see Menu 5.1 - Collector Screen. You can access command Z from the Support Review routine and from the Collector screen.
Max $
Type the maximum total account balance (not counting additional interest) that the user can remove from the WIP using command Z, and press Enter.
Do not type the dollar sign in this field. For example, if you type 200, a user can remove all accounts from the WIP that have a balance of $200 or less.
Max Can $
Type the maximum account balance the user can cancel back to the client, and press Enter.
Do not type the dollar sign in this field. For example, if you type 50, a user can cancel any accounts with a balance of $50 or less.
Update Protected STS Codes?
Do one of the following, and press Enter:
- To allow the user to change status codes that have been protected via the Status Codes To Protect From Update routine, type Y.
- To restrict the user from changing protected status codes from the Status Codes to Protect from Update routine, type N.
For more information, see Displaying status codes protected from update.
Long Distance User Code
Do one of the following, and press Enter:
- If your agency uses an autodialer, type a code that your autodialer can use to call long-distance numbers.
- If your agency does not use an autodialer, leave this field blank.
Authorized To Forward?
Do one of the following, and press Enter:
- To allow the user to forward accounts, type Y.
- To restrict the user from forwarding accounts, type N.
Create Custom Sub-WIPs
Do one of the following, and press Enter:
- To allow the user to create their own custom sub-WIPs, type Y.
- To restrict the user from creating their own custom sub-WIPs, type N.
Create Misc WIPs?
Do one of the following, and press Enter:
- To allow the user to create their own miscellaneous WIPs, type Y.
- To restrict the user from creating their own miscellaneous WIPs, type N.
Generally, you should not give collectors the ability to create miscellaneous WIPs since this allows them to pull accounts from other desks into their WIP.
Menu Crossreferencing?
Do one of the following, and press Enter:
- To allow the user to enter additional cross-referenced words to the menu inquiry function, type Y.
- To restrict the user from entering additional cross-referenced words, type N.
For more information, see Using menu jumps.
Request Credit Report?
Do one of the following, and press Enter:
- To allow the user to request credit reports, type Y.
- To restrict the user from requesting credit reports, type N.
Min $
Type the minimum dollar amount of an account for which the user can request a credit report, and press Enter.
Do not enter a dollar sign in this field.
If a summary of the packet displays in the Collector screen when you make the credit report request, The Collector System checks the packet balance against the minimum balance entered in the Min $ field. If a summary of the packet is not shown, the system checks the balance of the individual account against the minimum balance entered.
Use Employee Time Clock?
Do one of the following, and press Enter:
- To set up a time clock password for the user, type Y.
- To not use the Time Clock feature for the user, type N.
Emp #
The Collector System automatically assigns a number to the user. You must use this number when a supervisor or manager manually enters in or out times for the user, which may be necessary if a user forgets to check in or out.
Update Easy Out Reports?
Do one of the following, and press Enter:
- To allow the user to update Easy Out reports, type Y.
- To restrict the user from updating Easy Out reports, type N.
Run Restricted Reports?
Do one of the following, and press Enter:
- To allow the user to run restricted Easy Out reports, type Y.
- To restrict the user from running Easy Out reports, type N.
To restrict Easy Out reports, you must also set the Restrict Report field to Y for each report you want to restrict. For more information, see Restricting custom Easy Out report fields.
Send Messages?
Do one of the following, and press Enter:
- To allow the user to access The Collector System messaging program, type Y.
- To restrict the user from accessing The Collector System messaging program, type N.
Request Authorized Checks
Do one of the following, and press Enter:
- To allow the user to request the scheduling of authorized checks, type Y.
- To restrict the user from requesting the scheduling of authorized checks, type N.
Process Auth Checks?
Do one of the following, and press Enter:
- To allow the user to print authorized checks and reports, type Y.
- To restrict the user from printing authorized checks and reports, type N.
- At the User Login screen prompt at the bottom of the page, press Enter or type U2 to continue to the next page of fields.
-
Enter the following information for the second screen of the Setup for login name screen.
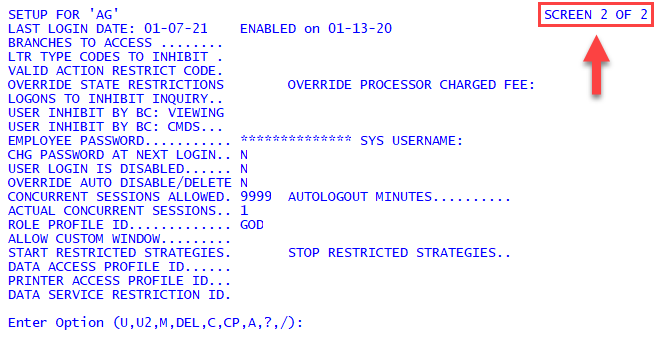 Branches to Access
Type the name of the branches the user is permitted to access, separating each with a semicolon, and press Enter.
You can only enter branch names that have already been entered into The Collector System.
Ltr Type Code To Inhibit
Type the codes for the letter types the user is not permitted to request, and press Enter.
Do not separate the codes. For example, to restrict the user from requesting type A letters and type B letters, type AB. To keep the user from requesting any letters, type ALL.
Valid Action Restrict Code
Type the code that allows the user to access a restricted action code, and press Enter.
Override State Restrictions
Do one of the following, and press Enter:
- To allow the user to override state restrictions so they can work an account for a closed state, type Y.
- To restrict the user from overriding state restrictions, type N.
Override Processor Charged Fee
Do one of the following, and press Enter:
- To allow the user to override the processor charged fee so the consumer is not charged this fee, type Y.
- To restrict the user from overriding the processor charged fee, type N.
Logons to Inhibit Inquiry
Type the logons to restrict so the user cannot view account information associated with those logons, and press Enter.
For example, an agency may create two separate system databases, one for legal (named ALPHALEGAL) and one for collections (named ALPHACOL). To prevent the collector from accessing information in the legal database, the agency enters ALPHALEGAL in the Logon to Inhibit Inquiry field.
This restriction applies to account inquiries only and not to client inquiries.
User Inhibit by BC: Viewing
Type the data fields to restrict for a business class, separating each with a semicolon, and press Enter.
The Collector System allows you to classify clients by business class (BC), which refers to the business or vertical market of the client (medical, legal, and so on). The business class information resides in the Client Update screen.
Using a business class classification provides an easier way for you to place viewing or command restrictions for a group of accounts. For example, if you do not want users to view the name and phone number fields in medical accounts, you type D2; D8 in the User Inhibit by BC: Viewing field to restrict access to the Debtor and the Debtor Phone number fields. You can use up to 999 characters in this field.
You can also use Fiscal codes to conceal any data, but an error prompt displays if you try to conceal data fields that cannot be restricted.
User Inhibit by BC: Cmds
Type the commands to restrict the user from using for a business class, and press Enter.
Employee Password
Type a password, and press Enter.
The Collector System requires the user to enter the password along with their login before logging on to the system. For more information, see Menu 10.1.6 - Passwords.
Sys Username
For more information, see Advanced authentication methods.
Do one of the following, and press Enter:
- To link a local system/domain user with the user, type the user.
- To not link a local system/domain user with the user, leave the field blank.
Chg Password At Next Login
Do one of the following, and press Enter:
- To require the user to change their password the next time they log on to the system, type Y.
- To not require the user to change their password the next time they log on, type N.
User Login is Disabled
Do one of the following, and press Enter:
- To disable the user from logging on to the system, type Y.
- To allow the user to log on to the system, type N.
If you type Y, you will disable the user from logging on to The Collector System. The Collector System automatically changes this field to Y when a user exceeds their failed log on attempts limit. The manager must set this back to N to allow a user to log on to The Collector System again.
Override Auto Disable/Delete
Do one of the following, and press Enter:
- To prevent The Collector System from automatically disabling or deleting the user's login, type Y.
- To allow The Collector System to automatically disable or delete the user's login, type N.
Most agencies use this feature sparingly because of security issues.
Concurrent Sessions Allowed
Type the number of different system sessions a user can have open at one time, and press Enter.
Use this field to reset the actual number of concurrent sessions for a user, after a session has been inadvertently disconnected or hung, by entering the appropriate number of sessions. In these situations, it is best to have the user log out of all sessions and enter a 0.
Consider entering the highest number this field can hold (9999) to prevent running out of sessions.
Autologout Minutes
Type the number of minutes a user can remain inactive in The Collector System before they are automatically logged out.
You can also configure the Autologout time at the agency level. For more information, see Menu 10.1.15 - Misc. Setup Routine.
Actual Concurrent Sessions
The Collector System displays the number of sessions the user currently has open.
Role Profile ID
Type the role profile ID for the user, and press Enter.
You need to set up role profiles before you can enter a role profile ID in this field. For more information, see, Creating and changing role profiles.
Allow Custom Window
Do one of the following, press Enter:
- To allow the user to create an employee collector window, type Y.
- To restrict the user from creating an employee collector window, type N.
In addition to controlling access to the window, you can use the Role Profile setup window to control which fields the user can see. To enhance security, you can mask certain fields such as client information or the customer's social security number.
For more information, see Creating and changing role profiles.
Start Restricted Strategies
Do one of the following, and press Enter:
- To allow the user to start restricted Account Flow Manager strategies, type Y.
- To restrict the user from starting restricted Account Flow Manager strategies, type N.
Stop Restricted Strategies
Do one of the following, and press Enter:
- To allow the user to stop restricted Account Flow Manager strategies, type Y.
- To restrict the user from stopping restricted Account Flow Manager strategies, type N.
Data Access Profile ID
You can only assign one data access profile to a user at a time. For more information, see Menu 10.1.70 - Data Profile Setup.
- To assign or change a data access profile, type the profile name to assign to this user login, and press Enter.
- To remove a data access profile, press the Spacebar and press Enter.
Printer Access Profile ID
Type the printer profile name to assign to this user, and press Enter. For more information, see Menu 10.1.72 - Printer Access Profiles.
Data Service Restriction ID
Type the data service restriction name to assign to this user, and press Enter. For more information, see Creating or changing data service profiles.
- At the Enter Option prompt, type M, and press Enter.
-
In the Setup for User ID (User Name) Master Menu window, do any of the following, and press Enter or click Ok:
Give access to all menus and their routines
Select Access All.
Deny access to all menus and their routines
Select Access None.
This option removes access to any previous menus. You can then give access to only the routines that the user needs. You might use this option for users who previously had access to many areas in the software but now plan to work part time and will have access to only one or two menus.
Select specific routines to access in each menu
- Each menu is displayed in a window in turn, starting with the Data Entry menu. Select the routines in each menu, and press Enter or click Ok to go to the next menu and its routines.
- You can select multiple routines by holding down the CTRL key and using your mouse to select the routines.
- To deny access to all routines for a specific menu, unselect any highlighted routines, and press Enter or click Ok.
- To go back to the window for a previous menu, click Cancel.
Allow access to a specific menu and its routines
- Select the menu name.
- Select each routine for which the user is to have access, and press Enter or click Ok. You can select multiple routines by holding down the CTRL key and using your mouse to select the routines.