Creating and changing role profiles
Before you assign role profiles, you should plan them in advance using the following as a guide:
- Set up authorization levels from greatest to least authority so overrides can be available to roles who will request it.
- Set up role profiles so that each role has equal to or greater authority than the role that precedes it.
To create or change a role profile:
- From the Master menu, navigate to Management Strategy > Agency > Role Profiling > Role Profiles (menu 10.1.22.98).
- In the Enter Master Password window, type the master password, and press Enter or click Ok.
-
In the Setup for Role ID window, type a name for the role profile, and press Enter or click Ok.
The name can include a combination of letters and numbers, but cannot contain more than five characters. In the Description field of the Role Profile screen, type a description for the role profile, and press Enter.
This is a required field and has a 20-character limit.
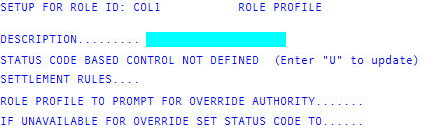
- In the Status Code Based Control Not Defined/Defined field, type U to define which fields and commands this role cannot view or update, and press Enter.
-
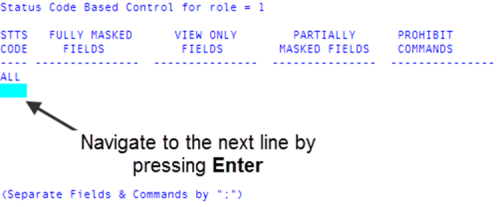
In the Stts Code field of the Status Code Based Control for Role = role name screen, do one of the following:
-
To prohibit fields and commands for all status codes, press Enter.
The default ALL displays on the first line. If you enter prohibited fields and commands on the ALL line, these restrictions apply to all the status codes.
- To prohibit fields and commands for a specific status code, press Enter to navigate to the first open Stts Code field on the next line, and type the status code of the Debtor and/or Fiscal fields, and press Enter.
-
-
In the Fully Masked Fields field, type the Debtor and/or Fiscal field to hide from this role, and press Enter.
You cannot hide the following Debtor fields.
Field Number
Field Name
Description
D7
Packet Nbr
Packet number to which the account belongs
D10
Dsk
Desk number to which the account is assigned
D12
Lst Chg
Date of the last change to the account
D13
Lst Pay
Date of the last payment to the account
D14
Dt-Assign
Date the account was assigned
D23
St Cd
Status code for the account
Using the DALL command masks all fields except for the following:
- Client Name
- Note LNS
- Desk Unit
- PKT Number
- ASN/AMT
- INT
- Total
- Debtor Number
- Notes
Users cannot update fully masked fields. Also, fields restricted at the user login level (menu 10.1.6) using business class restrictions happen before any role profile restrictions take effect.
- In the View Only Fields field, type the Debtor and/or Fiscal fields to prevent this role from updating, and press Enter.
-
In the Partially Masked Fields field, type the Debtor and/or Fiscal fields to partially hide information from this role, and press Enter.
The system masks all but the last four characters of the field. The masked characters display as asterisks.
You cannot update partially masked fields.
- In the Prohibited Collector Cmds field, type the collector commands you do not want the role to use, and press Enter.
- To add more status code controls, repeat Step 6-9.
- To exit the screen, type # in any field, and press Enter.
- At the Press <CR> prompt, do one of the following:
- To save your changes, press Enter.
- To continue making changes in the Status Code Based Control for Role = role name screen, type /, and press Enter.
- At the Allow Text Updates to CU*Documents prompt, do one of the following:
- To allow updating CU*Documents when doing a 5I command from the Collector Screen, type Y, and press Enter.
- To not allow updates to the text, type N, and press Enter.
-
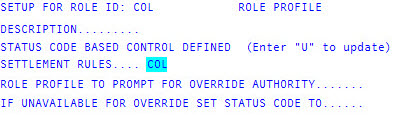
In the Settlement Rule field of the Role Profile screen, do one of the following, and press Enter:
- If you know the settlement rule code to assign to this role profile, type it.
- To choose from a list of settlement rules, type ?.
- In the Settlement-Rules List window, select the rule to use, and press Enter or click Ok.
You must first create settlement rules before you can enter them in this field. If you need to add a new settlement rule to the system, see Creating or changing agency settlement rules.
-
In the Role Profile to Prompt for Override Authority field, type the role profile ID that can approve a override request for this role, and press Enter.
A role that has the override authority can review accounts with a pending status using one of several Account Flow Manager strategies, including:
- Use of a miscellaneous WIP
- Creation of a support desk that holds all pending accounts
- Use of the manager review desk
- In the If Unavailable for Override Set Status Code To field, do one of the following to enter the status code that shows the account is pending due to an override request for a settlement:
Type the status code, and press Enter.
Use a settlement code you do not use in your normal work flow (such as STP for Settlement Pending or HLD for Hold) since this allows you to find these accounts more easily when creating a WIP or a report.
- To choose from a list of status codes, type ?, and press Enter.
- In the Status Codes window, select the code to use, and press Enter or click Ok.
- At the Allow PDF File Name and Location Modification prompt, do one of the following:
- To allow changes to the PDF file name and save destination, type Y, and press Enter.
- To not allow PDF file changes, type N, and press Enter.
- At the Available Text Templates prompt, do one of the following:
- Input a text template number, or multiple numbers separated by semi-colons, and press Enter.
- Type ? to see a list of available text templates.
- Select the templates to use.
- Press Enter when done.
To use a list of texting templates that differs from the list of templates available to all collectors (see Texting templates), do one of the following:
- At the Texting Override prompt, do one of the following:
- To override system rules which prevent a text from being sent, type Y, and press Enter.
- To not allow texting override, type N, and press Enter.
Users will be prompted for an override reason at the time a user overrides a texting restriction.
-
At the OK to File prompt, do one of the following, and press Enter:
- To save your changes, type Y.
- To discard your changes, type N.
- To continue making changes, type /.
After creating a role profile, you assign it to user logins. For more information, see Assigning role profiles to users.