Creating or changing letter/notice definitions
Configuring a letter/notice definition consists of setting the parameters of the letter/notice, including the type of letter/notice, form number, letter/notice restrictions, and other information, and then adding text to the letter/notice.
Because notices are system generated, you cannot include field prompts when creating the definition for a notice.
You can create the text for a letter/notice definition using CU·Documents, the text editor in The Collector System, or a generic word processor, including Microsoft Notepad or WordPad.
CU·Documents is an add-on product you can purchase separately to easily select merge fields imported from The Collector System into Microsoft Word. This gives you all of the benefits and ease-of-use of using Word tools and functions, while allowing you to enter information in the letter/notice from The Collector System without having to know or remember @codes.
To use a generic word processor, you must first specify the path name of the word processor in The Collector System, and then create the letter/notice definition using @codes.
To create or change a letter/notice definition:
- In the Master menu, navigate to Management Strategy > Correspondence > Letters/Notices (menu 10.7.80).
-
In the Letters/Notices Setup window, select Text and then press Enter or click Ok.
Do one of the following:
 Create a new letter/notice definition and text from scratch
- In the Letter Definition and Text window, select Update Definition and Text.
- In the Enter Text Name window, type a name for the new definition, and press Enter or click Ok.
- At the Add? prompt, do one of the following:
- To add the new definition, press Enter or click Yes.
- To exit the routine without adding a new definition, click No.
Create a new letter/notice definition and text by copying an existing definition and changing it
- In the Letter Definition and Text window, select Copy Definition and Text.
- In the Enter Text Name to Copy window, do one of the following, and press Enter or click Ok:
- Type the text ID of the definition to copy.
To choose from a list of text IDs, type ?.
- In the Valid Text Names window, select the definition, and press Enter or click Ok.
- At the Add? prompt, do one of the following:
- To add the new definition, press Enter or click Yes.
- To exit the routine without adding the new definition, click No.
Change a letter/notice definition and/or text
- In the Letter Definition and Text window, select Update Definition and Text.
- In the Enter Text Name window, do one of the following, and press Enter or click Ok.
- Type the text ID of the definition to change.
- To choose from a list of text IDs, type ?.
- In the Valid Text Names window, select the definition, and press Enter or click Ok.
- In the Definition name window, select one of the following, and press Enter or click Ok:
- To update the letter definition parameters, select Update Letter Definition.
- To update the letter text for the definition, select Update Letter Text (if it is not selected already). Proceed to Adding or editing letter text using CU·Documents.
- To update both the letter definition parameters and text, select Update Letter Definition and Text.
-
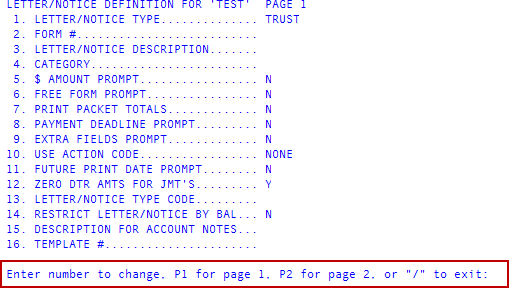
In the Letter/Notice Definition for letter/notice name screen, at the Enter number to change prompt, type the number of the field to change, and press Enter.
-
Use the following table to configure the fields in the letter/notice definition.
1. Letter/Notice Type
At the Letter Type... prompt, do one of the following, and press Enter.
To indicate the letter/notice is a Precollect letter/notice, type P.
- To indicate the letter/notice is a Trust letter/notice, type T.
- To indicate the letter/notice is a Forward letter/notice, type F.
- To indicate the letter/notice is a Client letter/notice, type C.
These letter/notice indicators tell The Collector System:
- Which Client file to access (Trust or Precollect)
- Which Account file to access (Trust or Precollect)
- How information in a "W" code displays (Trust or Forward). For more information, see Customizable @codes.
- Which special codes are available for that text type
Only Trust letters count against the number of contacts allowed by state legal restrictions.
2. Form #
When using CU·Documents to create the letter/notice, this field automatically changes to MSWORD after you change field 21 (MS Word Generation Flag field) to Y.
3. Letter/Notice Description
At the Letter Description prompt, type a description, and press Enter.
The description displays when you request a letter/notice. For more information, see Request or cancel individual letters/notices.
4. Category
At the Category prompt, type a single letter to serve as a category, and press Enter. For example, type C for collector letters.
The category option is useful for when a user requests a single letter. When a user types a question mark (?) at the Request Letter prompt, a list of the individual letters displays along with their corresponding categories and descriptions. For more information, see Request or cancel individual letters/notices.
5. $ Amount Prompt
At the Prompt for '$ Amount' to Include in Text? prompt, do one of the following, and press Enter:
-
To prompt for a dollar amount to be entered in a Trust letter/notice, type Y.
You must use the dollar amount prompt with special code @S30, Agreed-Upon Partial Payment. Also, you can only use this prompt in demand letters, not when creating a definition for a notice.
- To keep the dollar amount as is, type N.
6. Free Form Prompt
This field does not apply if you use CU·Documents to create letter/notice definitions.
7. Print Packet Totals
At the Check for 'Packet' And Use Total Amounts? prompt do one of the following, and press Enter.
-
To print packet totals on the letter/notice, type Y.
Wherever you use a dollar total code in a letter/notice, The Collector System prints a packet total. Wherever you use a client's name code, The Collector System prints the notation "Your Creditors" (to use some other message, contact your Finvi Support representative), unless the client names are all the same. If they are the same, The Collector System prints the client's name. Also, to include packet detail in the letter/notice, use one of the @Wxxyy special codes. For more information on special @codes. see Customizable @codes.
- To include individual account totals without packet information in the letter/notice, type N.
8. Payment Deadline Prompt
At the Prompt For 'Payment Deadline' To Appear In Text? prompt, do one of the following, and press Enter.
-
To prompt the user for a payment date to print on the letter/notice, type Y.
Use this feature with special code @S31 Payment Deadline (Pay by Date). For more information, see Special @codes. Also, you cannot use this prompt when creating a definition for a notice.
- To remove the prompt that asks the user whether or not to include a payment date in the letter/notice, type N.
9. Extra Fields Prompt
When information is not available through one of the special codes, the user can type it when they request an individual letter. The information displays in a specified extra field in the body of the individual letter.
You can enter up to 99 extra fields in a single letter. You cannot use this option when creating a definition for a notice.
At the Prompt For 'Extra Fields' to Appear In Text? prompt, do one of the following, and press Enter:
- To enter the number of extra fields to use, type Y.
- At the How Many Extra Fields prompt, type the number of extra fields to use, and press Enter.
- At the New Desc For Field1 prompt, type the new description for the first field, and press Enter. Repeat this for each extra field. Enter a description of the type of information to insert into this field (for example: Court Name or Judge Name). You can include up to 50 characters in each description.
You use extra fields with special codes @S35 to @S38 and @S38.5 to @S38.99. Fields @S38.1 to @S38.4 are not available. Be sure one of these codes prints in the letter text for every requested extra field. Enter the at sign (@), the special code symbol (S), the number 38, a decimal point (.), and the field number. For example, extra field 78 uses @S38.78 as its special code. For more information on using @codes, see Special @codes.
To exclude extra fields, type N.
10. Use Action Code
At the 'Action Code' To Use? prompt, do one of the following, and press Enter.
-
To execute an action code each time the user requests an individual letter from the Collector screen, type the action code to execute.
An action code can update the Tickler or prompt the user for information to enter in the Tickler. Also, you cannot use action codes when creating a definition for a notice.
- To turn off the action code, type NONE.
11. Future Print Date Prompt
At the Prompt For 'Future Print Date'? prompt, do one of the following, and press Enter.
-
To allow a user to specify when the letter prints, type Y.
For example, the user can request the letter while talking to a customer, but The Collector System does not print it until a few days before the date the payment is promised. When a user requests a letter with a future print date, the system writes a note to the account's note file that includes the future print date and the letter request information. You cannot use this option when creating a definition for a notice.
- To restrict the user from controlling when the letter prints, type N.
12. Zero DTR AMTS For JMT's
After you receive a judgment on an account, the pre-judgment balance is no longer important because you then collect on the judgment amount. When sending letters/notices, you can access the pre-judgment or judgment amounts.
At the Zero Dtr Amts For Jmt's? prompt, do one of the following, and press Enter.
-
To obtain pre-judgment amounts, type N.
If the account belongs to a packet and only part of the packet has received a judgment, you can obtain the entire pre-judgment packet amounts using this option.
- To set the amount in the account to zero, type Y.
Letters/notices will only print the judgment amount. If a packet has only some of the accounts on a judgment, the packet totals include only the non-judgment amount.
13. Letter/Notice Type Code
At the Enter Letter/Notice Type Code For Restricting Letters prompt, type a letter type code, and press Enter.
You can use letter type codes to restrict users from requesting letters/notices and sending letters to certain agencies' accounts. You can establish up to 26 letter types for restricting letters/notices. For more information, see Creating letter type codes.
14. Restrict Letter/Notice By Balance
At the Restrict Letter/Notice By Balance? prompt, do one of the following, and press Enter.
-
To use a dollar amount restriction on letters/notices, type Y.
-
At the Enter Minimum Balance In Whole Dollars prompt, type the minimum balance an account must have before a user can request a letter/notice.
Accounts with balances below this amount will not receive a letter. Do not enter a dollar sign ($), decimal point, or cents. You must enter amounts in whole dollars (for example: 25, 32, 58, and so on).
-
At the Enter Maximum Balance In Whole Dollars prompt, type the maximum balance an account can have to receive a letter/notice.
Accounts with balances greater than this amount will not receive a letter. The letter definition screen displays both the minimum and maximum amounts. If the Print Packet Totals field (field 7) is set to Y, The Collector System uses the packet balance owing when determining the minimum and maximum balance.
-
- To not restrict the dollar amount, type N.
15. Description for Account Notes
At the Description For Account Notes prompt, type a short description, and press Enter.
You can enter a short description for the letter/notice as a part of the account note, which is created each time a user requests or prints the letter/notice. The description should indicate the purpose of the letter, such as a garnishment, first notice, payment reminder, and so on. You can use a maximum of 20 characters for the description. If the current description is "None," this indicates that no special description is entered in the account note when a user requests or prints the letter. If a letter has a description for notes, and also has a future print date or is sent to an alternate address, the system may need to add this information to a second line. If so, it will be prefaced by (Cont).
16. Template #
When using CU·Documents, after you change field 21 to Y, The Collector System configures this field automatically when you create the letter/notice definition.
17. Days To Track Payments
At the Enter Days To Track Payments prompt, type the number of days The Collector System will track payments after a user sends a letter/notice, and press Enter.
You can track payments by letter or notice. Use this field only to track payments for demand letters. Use the Days To Track Last Payment field to track notices.
18. Number of Copies
At the Number of Copies prompt, do one of the following, and press Enter.
-
To specify the number of copies to print, type the number of copies.
This option only applies to demand letters, and the default setting is 1.
-
To print multiple copies of a multi-page document, type the number of copies in the letter/notice definition of the first letter.
If you flag the first letter/notice in the document set to print multiple copies, then all of the other letters/notices print multiple copies as well. If you set the first letter/notice to print a single copy, all of the other letters/notices print only a single copy, no matter how many copies each letter/notice is individually set to print. The Collector System writes only one note to the counter in the account that keeps track of the number of letters/notices sent; however, if you use the costing feature, each copy that prints will accumulate costs.
- To allow users to specify the number of copies or override the number of copies entered, type ? before the number. For example, if you usually print 2 copies of each letter/notice but you want to allow the user to override this number, type ?2.
19. Packet Limitation Code
At the Packet Limitation Code prompt, to include or exclude packet members based on the packet members' status codes, type a packet limitation code, and press Enter.
Only the members that have the status codes specified in the packet limitation code are included in or excluded from the letter/notice, depending on how the code is set up. For more information, see Packet limitation codes.
20. Postal Endorsement
At the Postal Endorsement prompt, do one of the following to specify a postal endorsement for a letter, and press Enter.
- To request a change of service, type 1.
- To request address service, type 2.
- To request forwarding service, type 3.
- To request return service, type 4.
This field is optional.
21. MS Word Generation Flag
This feature is best suited for on-demand letter generation, although functionality exists to print correspondence in limited batch mode.
This field is automatically set based on the form #. If the selected form is an MSWord form, the value is Y; otherwise the value is N.
22. MS Word Archive Flag
At the Archive Default? prompt, do one of the following, and press Enter.
-
To automatically save letters/notices to the default archive location, type Y.
The default archive setting is determined through the LETTER-ARCHIVE codes item. When you print letters in batch mode, this setting determines whether The Collector System automatically archives the documents. When users print letters/notices on-demand through the Collector screen, the system asks the users whether they want to archive the letter/notice. Users can override the default setting.
- To not archive the letters, type N.
23. MS Word Default Printer
At the Default Printer Path prompt, type the network path for the printer that you want as the default for the letters/notices that use this format, and press Enter. For example, type
\\PRINTSERVER\PRINTER_NAME.24. MS Word Print Duplex
At the Duplex Print This Correspondence? prompt, type Y to print the letter duplex, and press Enter; otherwise, press Enter.
26. Validation Letter
At the Identify as a validation letter? prompt, do one of the following, and press Enter.
- To identify the letter/notice as a validation letter, type Y.
- To not identify the letter/notice as a validation letter, type N.
- To exit the letter/notice definition screen, at the Enter number to change prompt, type /, and press Enter.
-
Do one of the following:
- If you use CU·Documents, Microsoft Word automatically starts. Proceed to Step 9.
- If you use The Collector System editor or a generic word processor, proceed to Step 8.
-
At the Current Word Processor Selected is path Do You Wish to Use a DOS/Windows Based Word Processor? prompt, do one of the following:
To use The Collector System editor
- Type N, and press Enter.
- At the Operate terminal in 132 column mode? prompt, to set the maximum columns that display on your screen, do one of the following:
To set the columns to 132, click Yes.
This option allows you to create and display letters/notices in size 16 font (pitch) condensed print. Select this if you use a form width that is greater than 75. When you close the document, your screen displays in the standard 80 column mode.
To set the columns to 80, click No.
If you enter more characters than the screen allows, a right arrow (>) displays next to the line number indicating the text continues. To view the information, move the cursor over with the right arrow key. When the cursor moves past the last character that displays, the screen moves five characters to the left until it reaches the 132-column limit. To return to the initial display, move the cursor back to the left margin.
-
To add text to the letter/notice, see one of the following topics: