Easy Out report headings
The Easy Out report Heading Setup screen allows you to set up special headings for the report and specify whether the report goes to the printer.
If you export an Easy Out report to DOS/NT, the report header lines and report totals do not print.
- Do one of the following:
- Complete Custom Easy Out reports.
- Complete Copy custom Easy Out reports.
- In the Enter Field Number prompt, type #, and press Enter.
-
In the first three fields of the Heading Setup screen, do one of the following:
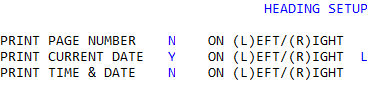
The fields Print Current Date and Print Time & Date are mutually exclusive.
- To print the information on the report header, type Y, and press Enter.
- In the adjacent (L)eft/(R)ight field, to set the information alignment, type R or L, and press Enter.
- To not print the information on the report header, type N, press Enter.
- To print the information on the report header, type Y, and press Enter.
-
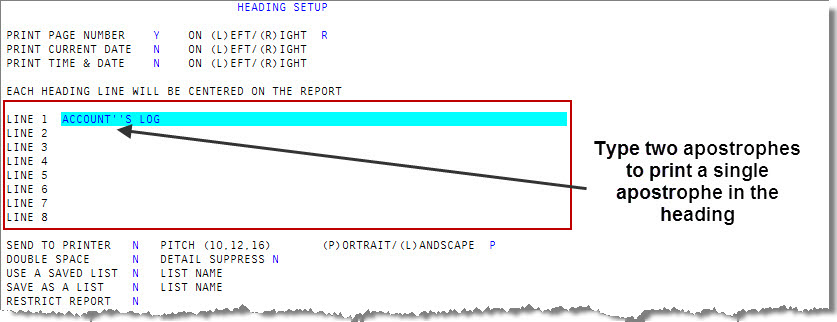
In fields Line 1 through Line 8, type up to eight lines of information to print on the report header, pressing Enter to advance from one line to the next.
Each line will be centered in the report.
Do not use any quotation marks, single (') or double ("), in heading lines. To print an apostrophe, type two consecutive apostrophes. For example, to print the heading Manager's report, type
Manager''s report.
-
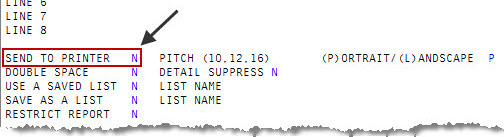
In the Send To Printer field, to send the report to the printer when it is run, type Y, press Enter, and complete the following sub-steps; otherwise, to display the report on the screen, type N, press Enter, and continue to the next step.

- In the Pitch field, type the font size (16 is the default), and press Enter.
- In the (P)ortrait/(L)andscape field, to print the report in landscape mode, type L, and press Enter.
- In the Double Space field, to double space the data in the report, type Y, and press Enter.
-
In the Detail Suppress field, to print only subtotal and total amounts in the report, type Y, and press Enter.
For example, if a report lists all clients and the amounts owed to each, and details are suppressed, the report displays the subtotal owed to each client and the grand total owed to all clients. However, it does not show the amount owed to each client by each of their accounts. -
In the Use A Saved List field, to use a saved list type Y, press Enter, and in the adjacent List Name field, do one of the following:
If you use a saved list for the account file, the list includes client number data, and if your system is set up for client keys, the system uses the saved list data instead of the client keys.
- Type a list name, and press Enter
- To have the system prompt the user for a saved list name when the report is generated, type ?, and press Enter.
-
In the Save As A List field, to save the report criteria type Y, press Enter, and in the adjacent List Name field, do one of the following:.
You can use the report criteria to create another report, for purging, or for transferring to another logon.
- Type a list name, and press Enter
- To have the system prompt the user for a saved list name when the report is generated, type ?, and press Enter.
-
In the Restrict Report field, to restrict the report so only those users with the proper permissions in their User Login profile may run the Easy Out report, type Y, and press Enter.
To complete the process of restricting an Easy Out report, you must also set the Run Restricted Reports? field to N in the User Login screen for each user you want to restrict. For more information, see Menu 10.1.6 - Passwords.
- At the OK to File? prompt, do one of the following, and press Enter:
- To save the report, type Y.
- If this is a new report format, at the Do You Wish to Save this Report for Future Use? prompt, type Y to save the report, or N to only use it this one time, and press Enter.
- At the Enter Report Description prompt, type a name for the report, and press Enter.
- At the Enter Menu to Save Under prompt, type the number of the menu 14 submenu, and press Enter.
- To discard the report format, or changes, and exit without saving, type N.
- To view the structure of the report, type D. For more information, see Custom Easy Out report structure and sorting summary.
- To delete the Easy Out report format, type DEL. For more information, see Deleting custom Easy Out reports.
- To make changes to the report format, type /.
- To save the report, type Y.