Creating or changing client fund distribution
The Client Distribution screen allows you to record information about how the assigned amounts and charges owed by accounts are distributed between the client and your agency. When you apply payments to these categories, the screen tells the system how to distribute them. These include the client's assigned amounts, miscellaneous amounts, commission rates, and other information necessary for posting.
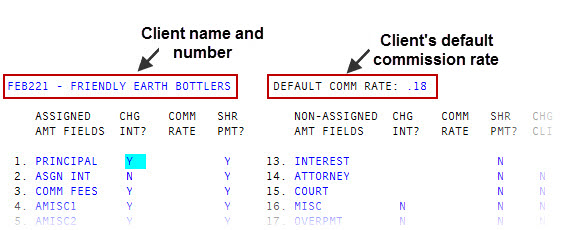
The client name and number display in the upper left corner of the screen. The default commission rate displays in the upper right corner.
To navigate this screen:
- The cursor moves left to right on each numbered line.
- You cannot enter a slash (/) to exit this screen. You must enter a pound sign (#) to exit.
- Press Enter to move between fields.
- Type /n to move to a specific field. For example, to move from field 1, Principal, to field 13, Interest, type /13, and press Enter.
- You can jump to any field on the screen by clicking the field with your mouse.
- The first 12 fields on the Client Distribution screen are the same fields that display in the distribution window of the Collector screen. These fields store information on amounts assigned by the client to the agency. Fields 13 to 25 store non-assigned charges, which are fees added by the agency to the account. Fields 1-3, 13-17, and 25 have pre-determined field names which cannot be changed. However, you can create field names for any of the Amisc or Misc fields by moving the cursor to the field and entering the name.
To create or change the client fund distribution:
If this is a new record, complete the procedure Creating or changing the Client Control Record, and then proceed to Step 4.
-
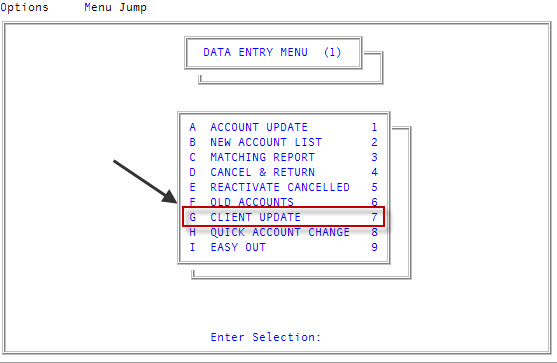
From the Master menu, navigate to
 Data Entry > Client Update (menu 1.7).
 You can also access this routine from Management Strategy > Client > Client Update (menu 10.6.60).
-
At the Enter Client # (?, /) prompt, type the code your agency uses to identify this client, and press Enter.
For a list of the commands available in this field, see Using client # prompt options.
-
In the Cli Name field, type /P to access the Client Distribution screen, and press Enter.
For a list of the commands available in this field, see Using client name field options.
- For each line on the Client Distribution screen, do the following:
- In the Chg Int? column, to charge interest, type Y, and press Enter.
- In the Comm Rate column, to charge a commission rate other than the default rate, type the rate as a decimal percentage (example 20% = .20) or enter a commission code, and press Enter.
- For amounts that go entirely to the agency (such as a fee), type 1.
- In the Shr Pmt? column, to share the payment, type Y, and press Enter.
-
In the Chg Cli column, to charge the client for adjustments to non-assigned amount fields, type Y, and press Enter.
The Chg Cli option is only available for non-assigned amounts, fields 13-25.
-
At the Auto Prompt for Assigned Amounts on Account Screen? prompt, to automatically display the Assigned Amount window when the cursor enters the Agn/Amt field in the Owing and Received section of the Account Update screen, type Y, and press Enter.
Use this option if your agency usually distributes assigned amounts for this client.
- Even if it you do not set the window to display automatically, you can still display the Assigned Amount window by entering D in the Agn/Amt field of the Account Update screen.
-
At theAuto Prompt for Non-Assigned Amounts on Account Screen? prompt, to automatically display the Non-Assigned Amount window of the Account Update screen, type Y, and press Enter.
Use this option if your agency usually distributes non-assigned amounts for this client.
- Even if you do not set the window to display automatically, you can still display the Non-Assigned Amount window by entering D in the Agn/Amt field of the Account Update screen.
- If you are creating a new record, the Client Control Record displays. For more information, see Creating or changing the Client Control Record.
- If you are updating an existing record, the system returns to the Cli Name prompt of the Client Update screen.