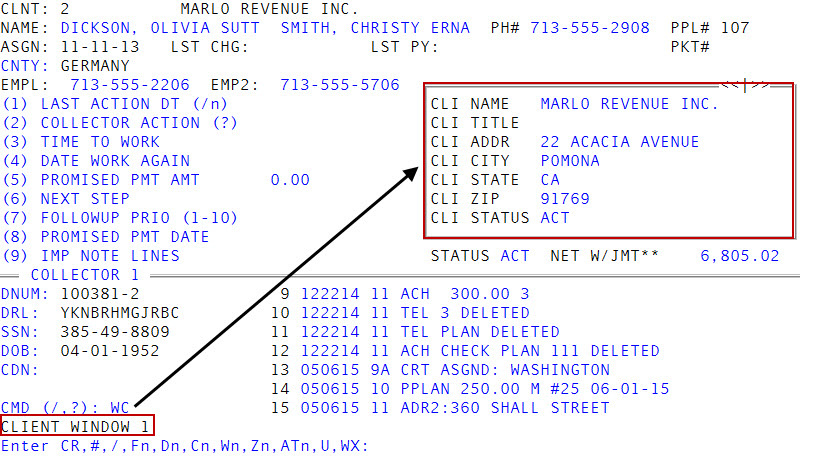
Displaying the Client windows
Use command WC or WCn to access the Client windows, which show you information about the client who assigned the account.
There are three Client windows, which include the following fields:
- C1 - Displays the name and address information for the client.
- C2 - Displays the phone number, contact name, commission rate, interest rate, business class, and notes for the client.
- C3- Displays the salesperson, effective date, last date accounts were assigned, fax number, and the email address for the client.
|
Field |
Description |
|
Cli Name |
The client's name. |
|
Cli Title |
The title for the client. Your agency may use this field as part of the address or may leave it blank. |
|
Cli Addr |
The client's address. |
|
Cli City |
The client's city. |
|
Cli State |
The client's state. |
|
Cli Zip |
The client's zip code. |
|
Client Status |
The client's status. |
|
Cli Phone |
The client's phone number. |
|
Cli Contact |
The name of the person to contact for the client. |
|
Cl Comm Rt |
The commission rate your agency charges the client. |
|
Cl Int Rt |
The interest rate your agency charges to the client's accounts. |
|
Bus Class |
The business class assigned to the client. |
|
Cli Note1 |
Any notes your agency entered regarding the client. |
|
Cli Note2 |
Any notes your agency entered regarding the client. |
|
Salesman |
The ID of the sales person responsible for the client. |
|
Eff Date |
The date the sales person was assigned to the client. |
|
Last Asgn |
The most recent date accounts were assigned by the client. |
|
Fax # |
The client's fax number. |
|
Email Addr |
The client's email address. |
To display the Client windows:
- Open an account in the Collector screen.
- At the CMD (/, ?) prompt, do one of the following, and press Enter.
- To open Client Window 1, type WC.
- To open a specific Client window, type WC and the number of the window to display. For example, type WC2 to display Client Window 2.
-
At the Enter CR, #, /, Fn, Dn, Cn, Wn, Zn, ATn, U, WX prompt, do one of the following:
 Go to the next window or return to the CMD prompt
In each window, press Enter.
Save your changes and return to the CMD prompt
Type #, and press Enter.
Go back to the previous window
In each window, type /, and press Enter.
Go to a Financial Profile window
Type F and the window number, and then press Enter. For more information, see Viewing and changing Financial Profile window information.
Go to an Account window
Type D and the window number, and then press Enter.
Go to a Client or Client2 window
Type C and the window number, and then press Enter. For more information, see Displaying the Client windows.
Go to a Employee Collector window
Type W, and the window number, and then press Enter. For more information, see Working with the Desk Collector and Employee Collector windows.
Go to a Desk Collector window
Type Z and the window number, and then press Enter. For more information, see Working with the Desk Collector and Employee Collector windows.
Go to a Contact Attempts window
Type AT and the window number, and then press Enter. For more information, see Displaying the Contact Attempts window.
To update a field in the Client, Account, or Financial Profile window
Type U, and press Enter. For more information, see Working with the Desk Collector and Employee Collector windows.
Return to the Collector screen
Type WX, and press Enter.