Adding a single payment to a SPA
Customers may want to make extra payments while still maintaining their SPA schedule. You can do this by adding a single payment in the Scheduled Payment Arrangement screen. This allows you to view and manage both scheduled and single payments for the account in one screen.
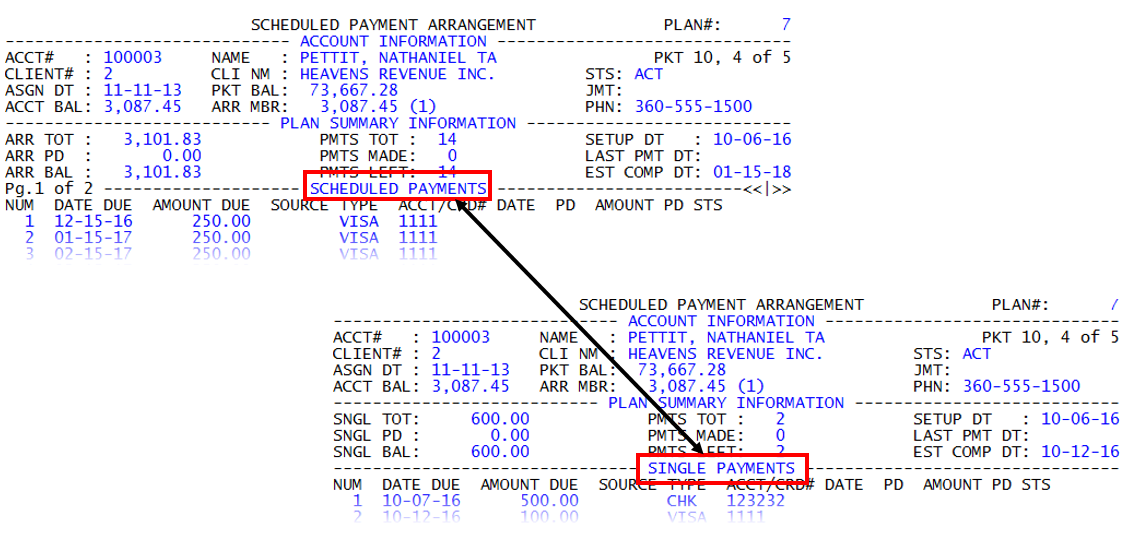
Schedule payments and single payments display in two separate areas at the bottom of the Scheduled Payment Arrangement screen. To get from one area of the screen to another, you use command V to toggle back and forth. The Collector System tells you what mode you are in by displaying the area title above the list of payments.
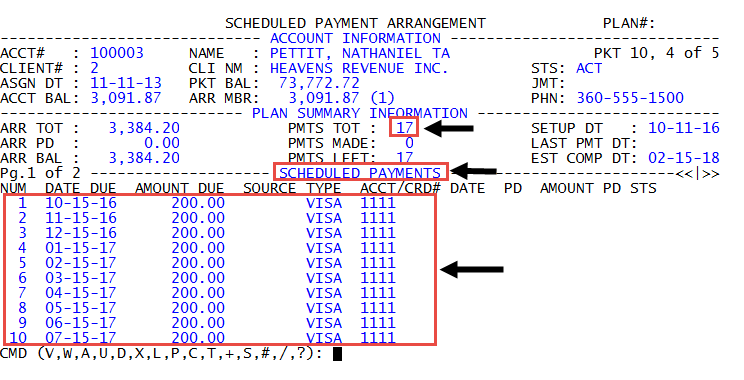
For example, a customer has a SPA that includes 17 scheduled payments of $200 per month until the account is paid in full, shown as follows.
The customer receives a bonus at work and wants to apply $500 to his account. After the agency receives and posts the $500 payment, the amount owed by the customer is reduced. The Collector System then automatically adjusts the SPA by reducing the final payment amount and/or reduces the number of payments. In the preceding example, the customer's final payment when the SPA was created was $184.20 due on 2/15/18, but because the customer made the $500 payment, the final payment will likely be December 2017 with a final payment amount of approximately $80-$90. The final amount is calculated based on the amount owed remaining and the interest charged by the agency.
When the collector types command V again to switch back to the Scheduled Payments mode, the term "(singles)" now displays in the upper left corner of the screen to let any user who views the SPA for this customer that single payments have also been made, shown as follows:

The Collector System does not send letters for single payments. You must generate them manually using command 5 or 5I.
To make a single payment for a SPA account:
- Open an account in the Collector screen.
- At the CMD prompt, type SPA, and press Enter.
-
At the CMD prompt, toggle to Single Payment mode by typing V, and pressing Enter. Each time you use this command,
 the title of the schedule area of the screen changes to let you know what mode you are in.
 -
At the CMD prompt, type A, and press Enter.
The commands listed in the CMD prompt vary depending on if packet members are included in the SPA or if you are in the Single Payments area of the Scheduled Payment Arrangement screen. For a list descriptions for the commands on this screen, see Scheduled Payment Arrangements (SPAs).
-
In the Payment Source Options window, do one of the following, and press Enter or click Ok
Use an existing payment source
Select from one of the listed payment sources, and press Enter or click Ok.
Not specify a payment source
If the customer is not sure what payment source they will use, select <No payment source>, and press Enter or click Ok.
You can also use this option if a customer will use multiple payments sources through the duration of the scheduled payment arrangement. For example, one month the customer may pay by check and another month they may use a credit card.
- In the Payment Amount field, type the amount to add as a scheduled payment, and press Enter.
- In the Due Date field, do one of the following, and press Enter:
- Type the date the payment is due.
- Type the number of days after the last scheduled payment that the new payment will be due. For example, if the final scheduled payment date is October 15th and the customer wants the payment due November 15th, then type 31 in the field.
- At the The payment is ready to be processed prompt, do one of the following:
- To add the payment, click Build or press Enter.
- To cancel adding the payment, click Cancel.