Adding or editing Fiscal fields
We recommend that you print or view the dictionary list before creating or changing any Fiscal fields. For more information, see Printing the Fiscal field dictionary.
If your agency uses CU·Documents to create letters and notices, you can also configure the Fiscal fields for use in CU·Documents letters and notices by using the @F code assigned to the field. For more information, see Configuring CU·Documents merge field codes.
The following applies when you create or update Fiscal fields:
- Fiscal fields are identified and updated by the number that displays on the Financial Profile screen, not the attribute number in the file.
- Only minor changes can be made to the first 14 Fiscal fields, which contain employer information. These fields are accessed by other programs.
- Only minor changes can be made to fields 36-41, which contain alternate payer information.
- Fields can be set up to receive just a zip code and print the city and state names automatically. To do this, enter X in the
- Place your fields into related groups, headed by labels and separated by other fields.
If you have multiple logins, keep the field definitions the same on each login, particularly if you transfer accounts.
When creating a Fiscal field to track account contacts, you select the type of contact the field applies to. By default, you can create fields for phone numbers and addresses as well as any other account contact types you create. For more information, see Menu 10.5.58 - Contact Codes.
You can also choose whether to display the new Fiscal field in the Personal Contacts screen. In some cases, you may not want to display this field. For example, you may want to create a Fiscal field so you can track bad phone numbers, but you may not want to show this information to the user.
The Collector System does not allow you to create Fiscal fields for international addresses.
The Collector System allows you to create categories for Fiscal fields. You can then assign one or more of these categories when adding or editing the Fiscal field. When in the Financial Profile screens or windows, users can then display Fiscal fields by category.
Fiscal field formulas
A formula consists of two attribute numbers (not field numbers) separated by an arithmetic symbol (+, -, *, /).
- The system processes formulas from left to right with no hierarchy assigned to the calculations (such as by adding parenthesis).
- The system rounds calculations to two decimal places (for example, 1.178965 is rounded to 1.18).
- Use D to indicate Account files and F for Financial files.
- To indicate multivalues, use decimal points.
For example, if you enter F64-F65, the value in Financial file attribute 65 is subtracted from the value in attribute 64. The system places the result in the Enter Formula field of the Financial Profile screen. If you enter D15-D61.2, the value in Account file attribute 61, multivalue 2, is subtracted from the value in Account file attribute 15. The system places the result in the Enter Formula field of the Financial Profile screen.
When you create a formula Fiscal field, you can also use it in Recall statements. The system automatically creates a dictionary item in the Financial and Account files when you create the field. This allows you to use it in Recall and Easy Out reports, letters, and notices.
To add or edit Fiscal fields:
-
From the Master menu, navigate to
 Management Strategy > Agency > Financial Screens (menu 10.1.9).
 - In the Fiscal Setup window, select Financial Screens Update, and press Enter or click Ok.
- In the Financial Screen Update window, select Update Financial Screens, and press Enter or click Ok.
-
In the Enter Field Number window, type the field number to use, or accept the default of the next available number, and press Enter or click Ok.
The field number is the number that displays on the Financial screen; it is not the attribute number.
- In the
- To keep the current data type, press Enter.
To designate a field type, input a
data type, and press Enter.
-
If you entered P, do one of the following:
For phones contact types
- In the Select Contact Type window, select Phones, and press Enter or click Ok.
- At the Include on Personal Contacts Screen? prompt, to add the new field, click Yes; otherwise, click No.
- At the Update on Personal Contact Screen only? prompt, to limit updating this field to just the PC screen, click Yes; otherwise, click No.
For address contact types
-
In the Select Contact Type window, select Address, and press Enter or click Ok.
This option does not support international addresses.
- In the Select Address Block for this field window, select the address information to include, and press Enter or click Ok.
- At the Include on Personal Contacts Screen? prompt, to add the new field, click Yes; otherwise, click No.
- At the Update on Personal Contacts Screen only? prompt, to limit updating this field to just the PC screen, click Yes; otherwise, click No.
For other account contact types (for example, emails, URLs, and so on)
- In the Select Contact Type window, select the contact type, and press Enter or click Ok.
- At the Include on Personal Contacts Screen? prompt, to add the new field, click Yes; otherwise, click No.
- At the Update on Personal Contacts Screen only? prompt, to limit updating this field to just the PC screen, click Yes; otherwise, click No.
-
In the Enter Description field, type the field name to display on the Financial screen, and press Enter.
You can enter a maximum of 10 characters for data types other than labels. Label descriptions can have a maximum of 35 characters. Use abbreviations if necessary. To enable the user to enter a zip code and have the city, state, and zip code print automatically, include the letters CSZ on this line. For more information, see Managing Account record notes.
- If you entered $F in the
-
In the Max Length for Input field, type the maximum number of characters that a user can input (listed in the table below) based on your entry in the
Data Type
Field Name
Max. Character Limit
D
Date
11
$
Dollar amount
15
N
Numeric data
25
X
Alphanumeric
If you leave the Max. Length for Input field blank, the user can enter an unlimited number of characters in the field. However, in the Financial Profile screens and windows, the field will only display the first 25 characters and a right arrow (>) to indicate that more information is available to view in this field.
Unlimited
L
Label
35
$F
Formula financial
10
M
Legal library
10
F0
Forward client #
12
F1
Forward client name
25
F2
Forward rate
5
F3
Forward date
8
F4
Forward acknowledgment date
8
P
Personal contacts
If you leave the Max. Length for Input field blank, the user can enter an unlimited number of characters in the field. However, in the Financial Profile screens and windows, the field will only display the first 25 characters and a right arrow (>) to indicate that more information is available to view in this field.
Unlimited
XF
Cross-reference name
25
XA
Cross-reference address
25
XD
Cross-reference data reference line
25
XR
Cross-reference client reference number
25
XS
Cross-reference social security number
25
XDP
Cross-reference data reference line phone
25
XRP
Cross-reference client reference number phone
25
-
In the Access Going Down (Y/N) field, type Y to allow a user to access the field when moving the cursor down the Financial screen, and press Enter.
If you type N, the cursor skips the field.
- In the Access Backing Up (Y/N) field, type Y to allow a user to access the field when moving the cursor up the Financial screen, and press Enter.
-
In the Create Note (Y/N) field, type Y to allow the system to create a note each time this field is updated.
When the system creates a note, it only contains the old information since the new information is stored in the field.
- If Y is entered at the Create Note prompt, an additional prompt will be displayed:
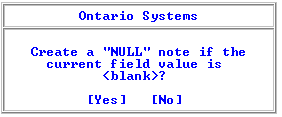
- If No is selected here, the value displayed on the Finanacial Screen Update screen is changed from Y to Y-NULL.
With the Y-NULL setting, if a blank field is updated, a note will not be made. But if a populated field is changed, a note containing the old value is created.
- If Y is entered at the Create Note prompt, an additional prompt will be displayed:
- In the Update Packet/JMT (Y, N, J) field, do one of the following, and press Enter:
- To duplicate the information in this field for all packet members, type Y.
To duplicate the information in the field for all judgment members, type J.
If you enter J, this field is designated as a field on the Legal Judgment Update screen.
- To prevent the system from duplicating information, type N.
-
If you entered M in the
- To allow this field to access Legal Library information in the Legal file, press Enter.
- To allow this field to access the Legal Library information in another file, contact your Finvi Support representative.
- Legal is the default file where Legal Library information is stored. You may use another file, but you must contact your Finvi Support representative to set it up for your agency.
This field also displays on the Legal Judgment Update screen.
- In the Enter Category field, do one of the following, and press Enter.
- If you know the Fiscal category to assign to this Fiscal field, type it, separating each with a comma.
- To choose from a list of Fiscal categories, type ?.
- In the Financial Field Categories window, select the categories to assign to this Fiscal field, and press Enter or click Ok.
-
In the Display on JMT Update Screen, to display non-judgment Fiscal fields on the Judgment Update screen, type Y, and press Enter.
Typing N prevents those fields that are used only to update the judgment from displaying on the screen.
-
In the Alert with Data (Y, N) field, to alert the user of relevant data that exists in the Financial fields, type Y, and press Enter.
To activate this feature, see Enabling or disabling Fiscal field alerts.
- In the ODBC Name field, do one of the following:
- To create an ODBC name, type a unique name (do not use spaces) to expose it to ODBC, and press Enter.
- To not expose the Fiscal field to ODBC, do not type a name, and press Enter.
-
In the Crt Fld # To Fiscal Fld (#, N) field, type the attribute number of the court fees to store results in this Fiscal field, and press Enter.
To see a list of Court file attribute numbers, see Court file attributes.
If you type an attribute number, the system automatically sets the Access Going Down and Access Backing Up fields to No. If you modify the Fiscal field and you do not want to include the Court file attribute number, first delete the attribute number in the Crt Fld # To Fiscal Fld (#, N) field and then change the Access Going Down and Access Backing Up fields to Yes.
- In the CU*Documents Field Name field, do one of the following:
- To use the default field name automatically entered from the Enter Description field, press Enter.
- To create a new merge field name, type it, and press Enter.
- In the CU*Documents Category (?) field, do one of the following:
- To use the default category that displays in the field, press Enter.
- To choose from a list of categories, type ?, and press Enter.
- In the CU*Documents Categories window, select a category, and press Enter or click Ok.
- In the CU*Documents Subcategory (?) field, do one of the following:
If the category you entered in the CU*Documents Category (?) field does not have a subcategory assigned to it, the system automatically skips the CU*Documents Subcategory (?) field.
- To use the default subcategory that displays in the field, press Enter.
- To choose from a list of subcategories, type ?.
- In the CU*Documents Subcategories window, select a subcategory, and press Enter or click Ok.
No subcategories are available if you select Financial File Codes in the CU*Documents Category (?) field.
- In the Enter Field Number window, do one of the following:
- To create another new field, type a field number, and press Enter.
- To complete the process, click Cancel.
-
At the Ok to file? prompt, click Yes.
The field parameters you created have been saved even though the system does not display a confirmation message.
- At the Create set of dictionary items for each desk? prompt, click Yes.
-
At the Print dictionary listing? prompt, do the following:
- To view or print a list of dictionary items, click Yes.
- To complete the process without viewing the dictionary items, click No.
At the same time this prompt displays, the system displays a message that it is building screen items, updating Fiscal fields, and creating dictionary items.
