Adding or moving accounts in packets
If an account displays on the Matching report, or you find an account that you know should be packeted with another account, you can manually combine the accounts into a packet from the Account Update screen.
From the Account Update screen, you can:
- Add accounts to new or existing packets
- Move accounts from one packet to another
- Add or change the packet category for an account
- Move the account from an associated packet back to its base packet
To add or move accounts in packets:
-
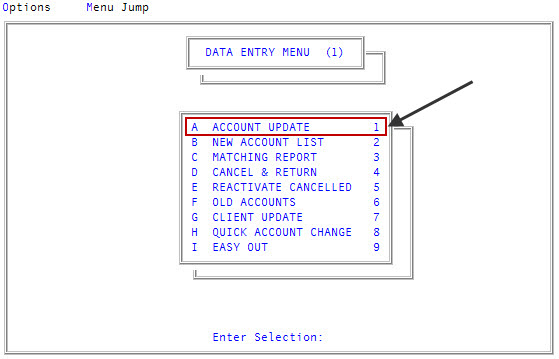
From the Master menu, navigate to
 Data Entry > Account Update (menu 1.1).
 -
If The Collector System is in a preliminary Month-End process, the Preliminary Month End in Progress. Use Old or New Month? prompt displays. Do one of the following:
- To create new packets from the old month, click Old.
- To create new packets from the new month, click New.
- To return to the Data Entry menu, click Cancel.
-
If the Batch Number to Update window displays, select one of the following, and press Enter or click Ok:
- Use Existing Batch
- New Batch Number
- Last Batch Number
- Go to Account Prompt
For more information, see Selecting batch options.
-
At the Enter Account # prompt, type the account number, and press Enter.
You may see an alert that a record is locked. This indicates that another user has the account open. The system displays a prompt with the user's initials. For a full list of the commands available at this prompt, see Working the Account# prompt options.
-
In the Name field, type /2 to jump to the second section of the Account Update screen, and press Enter.
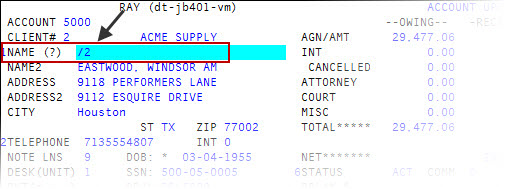
For a list of the commands available in this field, see Using Name prompt options.
- In the Telephone field, press Enter until your cursor reaches the Pkt(n +, -) field.
-
Do one of the following:
- To move the account to a new packet number assigned by The Collector System, type +, and press Enter.
- To move the account to a new packet number assigned by your agency, type the new packet to move the account to, and press Enter.
- To move the account to an existing packet, type the packet number, and press Enter.
- To add or change the packet category, type an asterisk (*) and the packet category code, and then press Enter. For example, 444*DIS.
-
To move the account from an associated packet back to the base packet, type the base packet number, and press Enter.
If a dynamic category exists, The Collector System restores it.
- At the Changes to "packet number"? prompt, press Enter or click Yes.
-
If the packet contains multiple accounts, at the Move All the Accounts in a Packet "number"? prompt, do one of the following:
Move all the accounts in the packet
- Click Yes.
- At the bottom of the screen, The Collector System lists each account in the packet and displays a message that the account is moved to the new or existing packet.
Move only the current account
- Click No.
- At the "Packet number" Deleted from Packet "number" prompt, press Enter or click OK.
- At the "Packet number" Added to Packet "number" prompt, press Enter or click OK.
Choose the accounts to move
- Click Select.
- At the Move to Packet "number" prompt, do the following for each account:
- To move the account, at the Move to Packet "number"? prompt, click Yes.
- At the "account number" Moved from Packet "number" to Packet Number "number" prompt, press Enter or click OK.
- To leave the account in its current packet, click No.
- To move the account, at the Move to Packet "number"? prompt, click Yes.
-
Do one of the following:
- To add or change more data, complete the fields of the Account Update screen, as explained in Working with Account records.
- To exit the Account Update screen, type # in any field, and press Enter.
-
At the OK to File? prompt, do one of the following:
- To save the account, press Enter.
- To return to the Account Update screen to continue making changes, type /, and press Enter.
- To set up a payment plan on this account, type PP, and press Enter. To set up the payment plan, see Setting up future (post-dated) ACH payments.
- To designate the account as the primary responsible party in a responsible party packet, type RP, and press Enter.