Menu 1.1 - Account Update
The Account Update screen is where you add new Account records and change existing Account records.
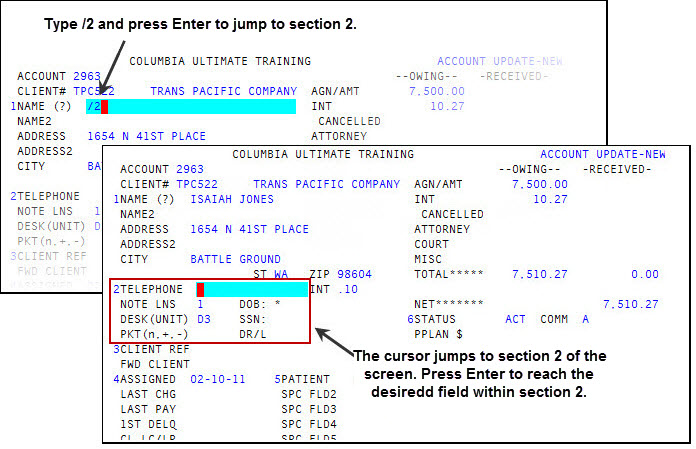
The Account Update screen has six sections for entering information. When changing account information, rather than advancing through every field on the screen, you can enter a shortcut in any field to access the section of the screen that holds the information you need to update. To do this, type a forward slash (/) and the number of the section to jump to. For example, type /2 to go to the Pkt field located in section 2 of the screen. This moves the cursor to the first field of section 2, Telephone. You then press Enter until you reach the Pkt field.
When you add a new account, your agency configures the fields where the cursor will stop as you navigate the screen. For more information, see Menu 10.6.68 - Account Update Path.
When you create an account, The Collector System updates the client's statistics and places the account in the new Account file. Accounts in the new Account file automatically receive notices, are included on acknowledgment lists, and in Month-End statistics.
If you are in preliminary Month-End, the system prompts you to add accounts to the old or new month. Preliminary Month-End allows you to close the old month's files but postpone running all the Month-End reports until a more convenient time. This prompt allows you to add accounts to the old month if your agency received them before preliminary Month-End runs; on the same day, you can add new accounts to the new month. If you select a new or old batch, either the batch prompt or the Account Update screen displays.
The areas of the Account Update screen includes the following areas:
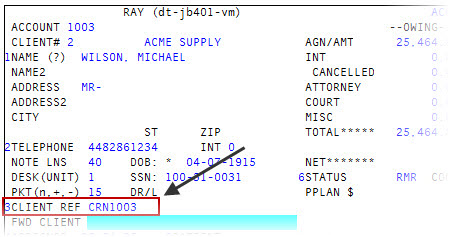
The Account Reference Line stores information the agency uses for Inquiry. It is commonly used to store the customer's drivers license number, but it can also store any other information (for example, the account's telephone number or a judgment number).
A client reference number is the number the client uses to identify the account. The number can be made up of any characters, but cannot be more than 25 characters long. If your client still uses the customer's social security number as their reference number, as a time-saving shortcut, you can enter SSN and The Collector System automatically copies the number from the social security number field.
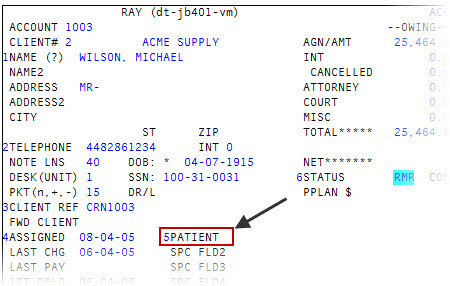
The Patient field is generally used for hospital, medical, or dental assignments. If changes are made to this field, a note is written preceded by the notation "NAMP" (Name Patient). If your agency requires that you enter information in this field, The Collector System automatically enters the account's name in this field when you press Enter. This requirement is set in the Client Control Record, field 551. Req Patient Nm. For more information, see Creating or changing the Client Control Record.
Patient names are cross-referenced in the Inquiry file and are, therefore, searchable. The Matching report checks the Patient field when matching accounts for packeting. For more information on matching, see Menu 1.3 - Matching report.
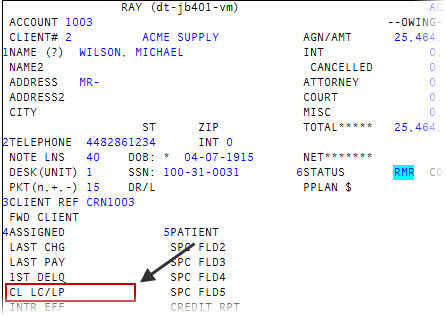
The Client Last Charge/Last Pay (CL LC/LP) field is updated by the system. It stores the date the client last charged the account or last received payment from the account before the account was assigned to your agency. The Collector System takes the information from the Last Charge or Last Pay fields when a new record is added to the system and enters it in this field.
You can update this field, but we recommend that you let The Collector System do it automatically. To access the Client Last Charge/Last Pay field, enter forward slashes (/) from the Patient field until your cursor is in this field.
The interest effective date is the date to which interest has been calculated and stored in the Account record. Anytime an account displays on the Account Update, Post, or Collector screens, The Collector System displays the interest owing as of the current date for display only. It does not update the interest amount owing that is stored in the Account record. This field is typically used in the following ways:
To add an interest effective date when a new Account record is added.
Each time a payment is posted, the payment date updates the interest effective date. The interest stored in the Account record is calculated up to the interest effective date.
When a new interest rate is entered in the Interest (Int) field, The Collector System prompts for the date on which the new interest rate becomes effective.
The interest effective date is not permanently stored on the Account Update screen. When a function updates interest, the date in the Intr Eff field changes. A permanent record of interest effective date changes is kept in the notes.

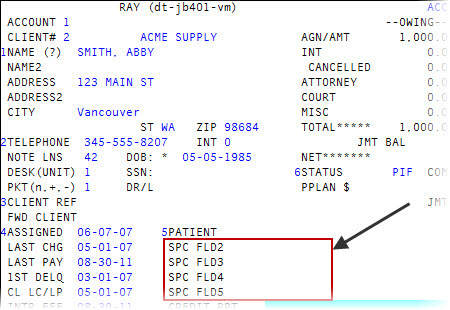
The Account Update screen has five, optional, special fields. These field can hold information useful to your agency. Examples of possible uses are storing insurance company information, a physician's name, a spouse or second payer's social security number, attorney information, and so on.
You can also setup the fields to verify that the information entered in them is appropriate for the kind of information the field is meant to store (for example, dates, dollar amounts, or numeric information). In addition, you can cross-reference the special fields for searching and include them on the Matching report. To set up these fields to check for specific information, contact your Finvi Support representative for assistance.
The Status field of the Account Update screen stores a code that tells The Collector System the status of the account. This is referred to as the status code. If you do not enter a status code in the field, The Collector System automatically populates it with ACT (active) or, if your agency uses a house desk, HSE (house account).
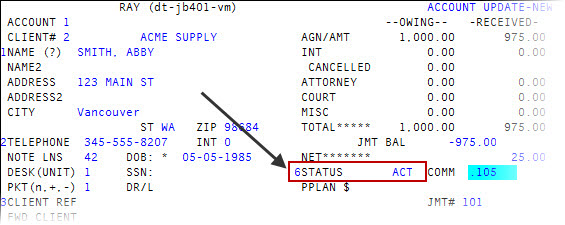
The Collector System comes with more than 35 standard status codes. Your agency can also create their own using the routines found in Changing the status code of an account.
Your agency can identify certain status codes as protected, to keep them from being changed. However, a user login setting can give an employee authorization to override the protected state of any status code. When an employee with override authorization changes a protected status code, The Collector System displays a prompt verifying that the user intended to make that change. A note is then written to the account.
The following is a list of The Collector System standard status codes:
|
Code |
Status |
Code |
Status |
|
ACT[ 1 ] |
Active |
LUN |
Court refuses judgment |
|
BAF |
Bankruptcy - will file claim |
NOR |
No response to efforts |
|
BAN |
Bankruptcy - no assets |
NRP |
Account is a minor - no responsible party |
|
CAN[ 1 ] |
Canceled by client request |
OCR |
Omit credit reporting |
|
CNR |
Canceled by agency - no response |
PAY |
Payment plan in effect |
|
DEC |
Deceased - no estate or beyond claim |
PBT |
Paid before turnover |
|
DEF |
Deceased - contacting estate |
PIF[ 1 ] |
Paid in full |
|
DIS |
Disputed |
RAI |
Refuses payment - pending suit |
|
DUP |
Duplicate listing |
RPS |
Refuses payment - checking assets |
|
FNA |
Forwarded, not acknowledged |
RSM |
Refuses to pay - amt too small for legal |
|
FWD[ 1 ] |
Acct has been forwarded |
SIF[ 1 ] |
Settled in full |
|
FPF[ 1 ] |
Forward paid in full |
SKN |
Skip - located at new address |
|
HSE[ 1 ] |
House account |
SKP |
Skip - tracing for location |
|
LBK |
Legal bankruptcy filed |
SSM |
Amount too small for legal |
|
LEG[ 1 ] |
Legal action taken |
STA |
Statute of limitations has expired |
|
LEX |
Legal execution on assets started |
SUS |
Suspended |
|
LPF[ 1 ] |
Legal paid in full |
TOE |
Turned over in error |
|
LSF |
Legal settled in full |
WEB |
Wage earner bankruptcy |
|
LSK |
Legal judgment concluded - hold |
WEL |
Account is on welfare |
|
[ 1 ] The Collector System relies on certain status codes for system functions. Do not modify or delete these status codes. |
|||
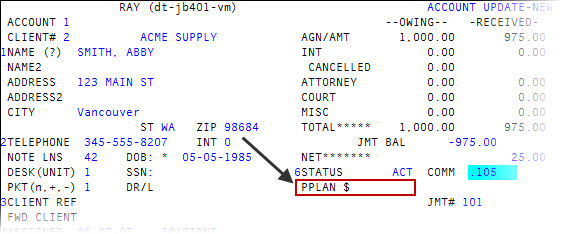
If an account is on a payment plan, the PPlan $ field of the Account Update screen displays the current amount due. For more information, see Using payment plans.
If the batch prompt automatically displays, the account number prompt displays after batch information is entered. When the batch prompt does not automatically display, the account number prompt displays as soon as the Account Update screen is accessed. In either case, a variety of additional options are available from the Enter Account# (?, /) prompt.
Enter a question mark (?) to display a list of options.
|
Option |
Use this option to... |
|
? |
Display a listing all of the options available at the Enter Account prompt. |
|
A |
Add a new account. |
|
@ |
Repaint a blank Account Update screen. |
|
= |
Find an account, using the account's name, social security number, data reference line number, client account number, or address. |
|
=a |
Find an account by entering an equal sign and the name or the first letter of the name. |
|
== |
Display the inquiry screen just closed. |
|
Fn |
View an account's Financial Profile screens. Enter F and the account number (example: F1367). |
|
L |
Bring up the last account worked. |
|
Ln |
Bring up the nth last account worked. |
|
L? |
View a list of the last 15 accounts worked. |
|
MSG |
Send or receive electronic messages. The account name and account number are displayed when accessing the message routine while on an Account record. For more information, see Using messaging. |
|
CA |
Use The Collector System calculator. |
|
B |
Allows you to assign a batch number to new assignments. Gives access to all the batch options accessible from the automatic batch prompt. |
|
IM |
Change the input mode. Bring up accounts by means other than the account number by changing the label of the Enter Account# (?,/) prompt to reflect any of the cross-reference files. |
|
(.) |
Create a list. Entering a period allows you to use Recall to build a list of accounts to be worked. This command only works if a Recall statement was used to build the list of accounts. |
|
(‑) |
Bring up the account previously displayed. This command only works if a Recall statement was used to build the list of accounts. |
|
.X |
Cancel the list. This also allows you to enter a new list. |
The Name prompt in the Account Update screen allows you to perform many different routines.
The following lists the commands available in the Name prompt:
|
Command |
Description |
|
/A |
View the assigned amount distribution. The assigned amount (Agn/Amt in the Owing and Received section of this screen) can consist of several different assignment parts. A window, which is superimposed over the Owing and Received section, is used to distribute the assignment into 12 categories. |
|
/CAN |
Cancel an account. For more information, see Menu 1.4 - Cancel & Return. |
|
/CA |
Open The Collector System calculator. For more information, see Using the calculator |
|
/CHG |
Change amount fields. If an error is made when entering owing and received amounts, use this command to return to those fields and make corrections. You can only use this command on the day an account is entered. You cannot change amounts if the account is packeted, on a payment plan, or on a judgment. If the interest effective date is the current date, and you change the assigned amount, a prompt displays giving you the option to recalculate interest. |
|
/CU |
Perform a client inquiry. Use this screen to view information about any account's client. For more information, see Running client inquiries. |
|
/CI |
Perform a client inquiry for the sales logon. You can perform a client inquiry for clients transferred from a sales logon and now reside as clients on the trust logon. When you select a client, the main client screen displays. You may print this screen, and you can display or add notes. For more information, see Running client inquiries. To use this feature, the user must be authorized to access Client Inquiry on the current logon. |
|
R |
Copy the name, address, phone, birth date, social security number, and desk number from the previous record. When entering the same account information several times consecutively (for hospital bills, etc.), enter R to repeat information from the last record filed. This command copies the name, address, city, state, ZIP, phone, date of birth, social security number, and desk number into the appropriate fields in this record. The cursor moves to the Desk field. |
|
RF |
Copy the name, address, phone, birth date, social security number, and Financial Profile record from the previous record. This option is an expansion of the R option. With it you repeat the personal data and also repeat the entire Financial Profile. |
|
/X |
Invoke a custom command. This command is reserved for custom use. |
|
/DI |
Create an account inquiry. Use this to do an inquiry on an incoming call and direct it to the appropriate collector without having to exit the account you are working on. For more information, see Running account inquiries. |
|
/DIn |
View the Account Inquiry screen. Enter /DI and one of the following to look up accounts matching certain attributes of the account currently displayed. 1 = Name 1.2 = Second Name 2 = Social Security information 3 = DRL (Data Reference Line) 3P = Phone 4 = Client Account Number 5 = Address For example, to look up all accounts with the same name as the current account, enter /DI1. If no accounts match the current one, the inquiry screen displays for the entry of other search data. For more information, see Running account inquiries. |
|
/DEL |
Delete an account on the same date it was created. If you need to delete an account after the day it was created, see Delete an account after the day it was created. |
|
F? |
View the Financial Categories window. Categories preceded by an asterisk have data in that category for the account. For more information, see Configuring Fiscal field categories. |
|
/F |
View the Financial Profile screen, or if account/financial relationships exist, go to a specific Financial screen number. For more information, see Viewing and changing Financial Profile window information. |
|
F/nn |
View the financial label number. This command displays a specific Financial Profile field without going through several screens. For example, to display Financial screen label 135, enter F/135. For more information, see Viewing and changing Financial Profile window information. |
|
F |
Go to the first field of the Financial Profile screen. For more information, see Viewing and changing Financial Profile window information. |
|
Fn |
View the Financial Profile screen. The variable specifies which of the 40 Financial screens to access. For example, to access Financial screen 5, enter F5. For more information, see Viewing and changing Financial Profile window information. |
|
/LJ |
View the Judgment window. |
|
/LJS |
View the Judgment Update screen. |
|
/n |
Go to label n. Type a forward slash (/) and any of the following numbers to go to the accompanying field label: 1=Name 2=Telephone 3=Client Ref 4=Assigned 5=Patient 6=Status |
|
# |
File the record. |
|
/MSG |
Send and view electronic messages. For more information, see Using messaging. |
|
/M |
View the Miscellaneous Amounts window. |
|
/MS |
View the Miscellaneous window. From this window, you can access information from credit reporting agencies. |
|
/MSn |
View the Miscellaneous window. To go right to a miscellaneous item from the Name prompt, enter MS and the item number (example: /MS4). An asterisk in the first column means that a report exists from that service for this account. To view the information, select that line. The information displays along with the following prompt: Press <CR> To Continue (LN,EX,DEL,P,W,/) |
|
/MSW |
Update the Miscellaneous screen. |
|
/MX |
Leave the Miscellaneous screen and return to the Name field of the Account Update screen. |
|
* |
View and add notes to the account. |
|
/P, /PA |
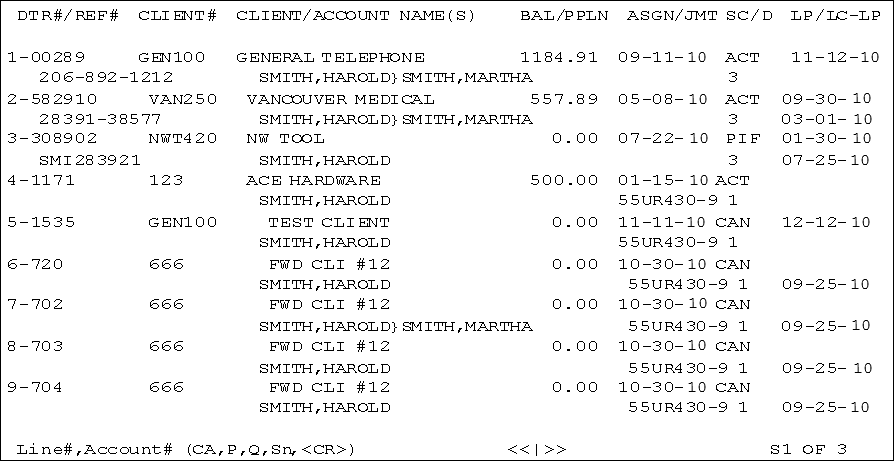
View the balance owing (Packet Display) and other important information about each account in a packet (/P) or all associated packets (/PA). This is an example of a Packet Display screen:
|
|
*PD |
View payment history of each day's posting for an entire packet. This information may also be printed. This display includes transaction codes and daily totals for charges, payments, and NSFs. Canceled transactions may be included, or they may be excluded. |
|
*PS |
View a summary of the payment history by day for an entire packet. This option also allows printing of this payment history. You may be prompted for cancellations. |
|
/PB |
View the employee phone book in a window, one name at a time. The window uses the same commands as the full-screen phone book. |
|
/ |
View the previous field. |
|
/PS |
View the previous status code, if it has been changed, and the date it was changed. You may also enter /PS from the Status field. |
|
/PG |
View the packet groups. |
|
/PD |
Print an individual account or include packet information. You can also include the financial record and notes. |
|
/ACT |
Reactivate a canceled account. |
|
/MG |
Access the scanned image routine if the terminal is set up for it. |
|
/SD |
View the description of the account's status code. |
|
/DS |
View a window containing all status codes and their descriptions. To search for a certain status code in the window, enter the first letter of the code, for example "P", or use your mouse to navigate to the applicable status code. |
Account batches help you to keep track of new accounts by client, by date, by business type, and other sorting criteria. The batch prompt can set to automatically display as soon as you enter the Account Update screen. If the automatic batch prompt is turned on, The Collector System generates a default batch number. The default batch number is an asterisk followed by the initials of the employee entering the data. For example, *MAB. For more information, see Selecting batch options.