Setting up future (post-dated) ACH payments
A future (post-dated) ACH transaction is one or more payments you schedule to be withdrawn from the customer's bank account on specific dates.
Before your agency can withdraw funds for any future (post-dated) ACH payments, federal and state laws require that you present the terms to the customer as to how and when the payments will be debited from their bank account. Whether you present the payment terms and receive authorization from the customer in writing or over the phone depends on your agency's processes. For more information, see Requesting and receiving customer authorization for future (post-dated) ACH payments.
To set up future (post-dated) ACH payments:
- Follow the instructions in Making immediate ACH payments
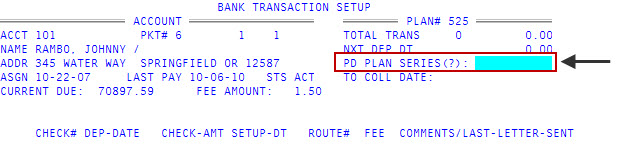
- In the Bank Transaction Setup screen, in the Enter PD Plan # window, type A, and press Enter or click Ok.
-
In the PD Plan Series field, do one of the following, and press Enter or click Ok:
- If you know the series name to send, type it.
- To choose from a list, type ?.
- At the Select PD Plan Series window, select a series, and press Enter or click Ok.
-
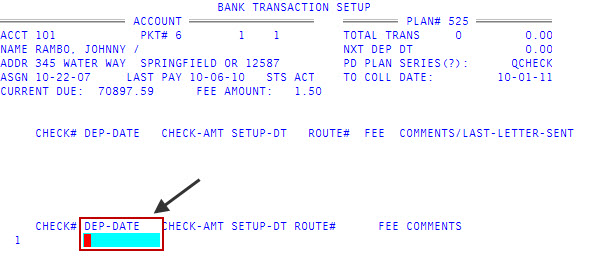
In the To Coll Date field, type the date the account will be removed from the plan and sent back to a desk for review, and press Enter.
This is an optional field.
- At the Add, Delete, or Change Checks? prompt, to add a payment, type A, and press Enter.
-
Dep-Date field, type the deposit date of the payment, and press Enter.
- In the Check-Amt field, type the payment amount, and press Enter.
- In the Setup-Dt field, the system automatically fills in this field. Press Enter.
- In the Route# field, the system automatically fills in this field. Press Enter.
-
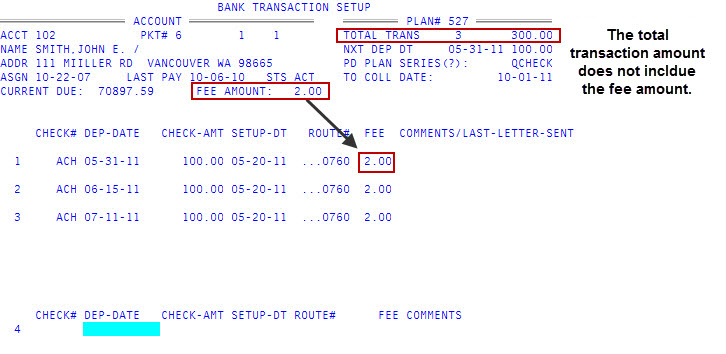
In the Fee column, the system automatically fills in this field from the Fee Amount field in the Account section of the screen. Press Enter.
The transaction fee you entered when creating the ACH payment applies to all of the post-dated checks you enter here. Also, please note that the Total Trans field does not include the fee totals. For more information, see Charging transaction fees.
- In the Comments field, you can optionally type a comment. Press Enter.
- Repeat the applicable steps of Making immediate ACH payments
- To exit the Bank Transaction Setup screen, in the Dep-Date field, type #, and press Enter.
- At the Add, Delete, or Change Checks? prompt, type #, and press Enter.
- In the Enter ACH Authorization Letter window, do one of the following, and press Enter or click Ok:
- If you know the letter name, type it.
- To choose from a list of letters, type ?.
- Select the letter to generate, and press Enter or click Ok.
- At the Ok to use letter name? prompt, do one of the following:
- To generate the letter, click Yes.
- To return to the Enter ACH Authorization Letter window without generating the letter, press Enter or click No.
-
At the OK to File? prompt, do one of the following:
- To save the changes to the plan, press Enter.
- To exit the Bank Transaction Setup screen without saving the changes, type N, and press Enter.
- At the Quit Unchanged, Add Acct, Delete Acct? prompt, press Enter.
- At the OK to Exit Plan without Filing prompt, type Y, and press Enter.
- To return to the Bank Transaction Setup screen to continue making changes, type /, and press Enter.
- A message displays that the plan is saved.