Assigning the creditor classification for a client
Before you update the client, you must create a miscellaneous field (unless you use the same creditor classification for all clients), to contain the correct creditor classification. For more information on how to create a miscellaneous field, see Creating or changing client miscellaneous fields.
After you create a miscellaneous field, you can update each client with the correct classification.
To assign the creditor classification for a client:
-
From the Master menu, navigate to
 Data Entry > Client Update (menu 1.7).
 -
In the Client Update screen, at the Enter Client # (?, /) prompt, type the client number, and press Enter.
For a list of the commands available in this field, see Using client # prompt options.
-
In the Client Update screen, in the Cli Name field, type /M.
For a list of the commands available in this field, see Using client name field options.
-
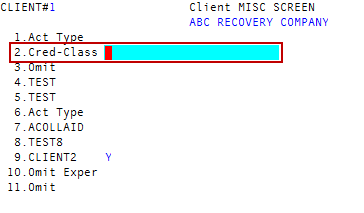
In the Client Misc screen, in the Cred-Class field, type one of the codes in the following table to classify the creditor, and press Enter.
To specify this kind of creditor:
Type this code:
Retail
01
Medical or healthcare
02
Oil company
03
Government
04
Personal services
05
Insurance
06
Educational
07
Banking
08
Rental or Leasing
09
Utility
10
Cable or Cellular
11
Financial
12
Credit Union
13
Automotive
14
Check Guarantee
15
- At the OK to File? (CR=Y, N, ?) prompt, do one of the following, and press Enter:
- To save, type Y.
- To exit the screen without saving, type N.
- To make changes, type /.
- To complete setting up your credit reporting agency, go to Step 9 in Adding or editing business credit reporting agencies.