Creating or changing post-dated check plans
Use this option to create a post-dated check plan for an unpacketed account.
To create a post-dated check plan:
-
From the Master menu, navigate to Trust Activity > Post (menu 4.1).

-
At the Run Strategy Forwarding Report prompt, do one of the following:
If your agency has set up a forwarding strategy in Account Flow Manager (see Menu 10.3 - Work Strategies), this prompt may display when you enter the Posting screen immediately after logging into the system. If you are not sure what option to choose, contact your manager.
Do one of the following:
- To run the report, click Yes. To complete the steps for this report, see Running the Strategy Forwarding report.
- To skip running the report, click No.
- If The Collector System is in a preliminary Month-End process, the Preliminary Month End in Progress. Use Old or New Month? prompt displays. Do one of the following:
- To create a post-dated check plan for an account in the old month, select Old.
- To create a post-dated check plan for an account in the new month, select New.
- To return to the Trust Activity menu, select Cancel.
- At the To Continue. Press <CR> prompt, press Enter.
-
If your agency has set up The Collector System for batch processing, the Batch Number to Update window displays. Do one of the following:
 Post a transaction to a new batch
- Select New Batch Number, and press Enter or click Ok.
- At the At the Your New Batch is number prompt, press Enter and click Ok.
Post a transaction to an existing batch
- Select Use Existing Batch, and press Enter or click Ok.
- In the Open Batches window, select the batch to post the account to, and press Enter or click Ok.
- In the Batch number was Last Update date window, click Ok.
Not post a transaction in a batch
- Select Go to Account Prompt, and press Enter or click Ok.
- Click Cancel.
-
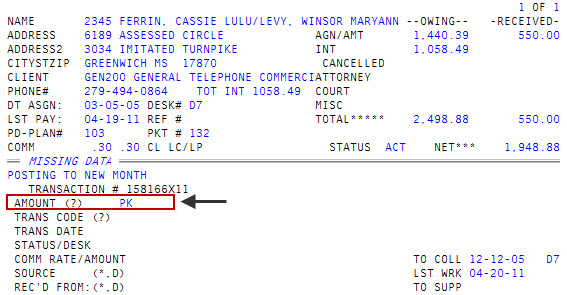
In the Posting screen, at the Enter Account# (?, /) prompt, type the account number, and press Enter.
You may see an alert that a record is locked. This indicates that another user has the account open. The system displays a prompt with the user's initials.
-
In the Amount (?) field, type PK, and press Enter.
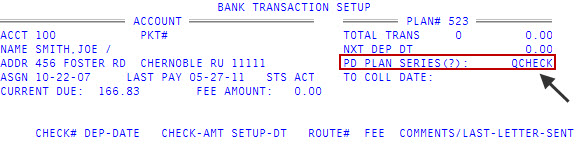
- In the Bank Transaction Setup screen, in the Enter PD Plan # (/, A) window, do one of the following, and press Enter or click Ok:
- To change an existing post-dated check plan, type the plan number.
- To create a new plan, type A.
- In the PD Plan Series(?) field, do one of the following:
- If you know the name of the series, type it, and press Enter.
- To choose from a list of series, type ?, and press Enter.
In the Select PD Plan Series window, select the plan, and press Enter or click Ok.
-
In the To Coll Date field, type the date to remove the account from the plan and send to the collector for review, and press Enter.
This is an optional field.
- At the Add, Delete, Or Change Checks? (A, Del, C, #, /) prompt, type A, and press Enter.
-
In the Check# field, type the check number, and press Enter.
To learn more about the information included on a check, see Managing post-dated checks.

-
In the Dep-Date field, type the date the check will be deposited, and press Enter.
Include the year on the first check you enter; thereafter you can omit it.
-
In the Check-Amt field, type the amount of the check, and press Enter.
As a shortcut, to repeat the amount of the last check entered, type R instead of the amount or just press Enter.
- In the Setup-DT field, the system automatically uses the current date as the date the plan was set up. Do one of the following:
- To accept the date displayed, press Enter.
- To use another date, type it, and press Enter.
-
In the Route# field, type the routing number for the bank, located on the bottom of the check, and press Enter.
To find the location of the routing number on a check, see Managing post-dated checks.
If your agency has uploaded bank data to The Collector System, the screen displays the bank name associated with the routing number. It is important to understand that even though the bank that is listed may not be the location of the payer's branch, this is the bank that will receive the transaction.
-
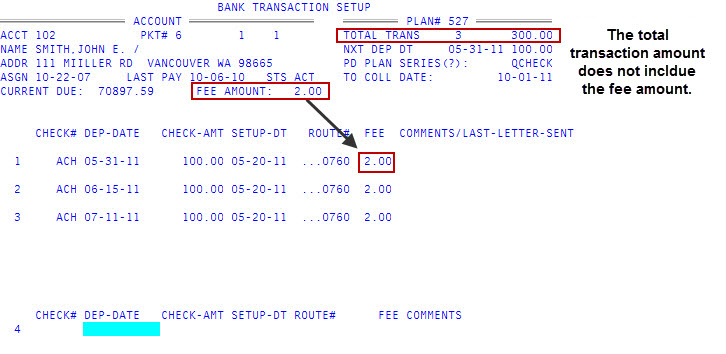
In the Fee column, the system automatically fills in this field from the Fee Amount field in the Account section of the screen.
The Collector System applies the transaction fee you entered when creating the ACH payment to all of the post-dated checks you enter here. Also, please note that the Total Trans field does not include the fee totals. For more information, see Charging transaction fees.
-
In the Comments field, type a short comment about the check, if needed.
As a shortcut, to repeat the comment of the last check entered, type R.
-
At the OK to update Plan with this Check prompt, do one of the following:
- To add the check to the plan, press Enter.
- To discard the entered information and start over, type N, and press Enter.
- To make modifications to the check information before filing it, type /, and press Enter.
- Enter as many checks as the account sent to your agency, starting from Step 10.
- For packeted accounts, do the following:
- At the Add Other Accounts from Packet? prompt, do one of the following:
- To add the account to the plan and display the next account in the packet, press Enter.
- If you do not want to add the account to the plan, type N, and press Enter.
At the OK to Add Account number prompt, do one of the following:
This prompt displays for each account in the packet.
- To add this next account to the plan, press Enter.
- If you do not want to add this next account to the plan, type N, and press Enter.
At the Accounts/Checks have been update - Continue prompt, press Enter.
If the other packeted accounts are on notices, the system displays a message for each account that prior notices have been stopped. The system then displays a message that the plan is saved.
- At the Add Other Accounts from Packet? prompt, do one of the following:
- To save the plan, in any field, type #, and press Enter.
-
At the Add, Delete, or Change Checks? prompt, type #, and press Enter.
A message displays that the post-dated check plan is saved.