Viewing and changing Financial Profile screen information
The Financial Profile screen can include the standard fields that are included with the system, or your agency can create their own customized fields. If the fields in your Financial Profile screens differ from those shown in the examples used in this section, you have customized fields.
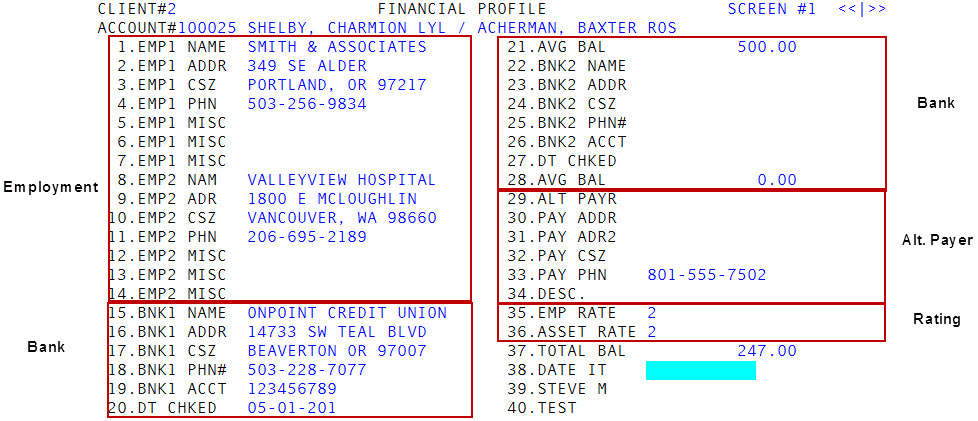
The Financial Profile screens have an unlimited number of fields available to store information. Each screen displays 40 fields. These fields can do many sophisticated functions, such as performing calculations on data entered, screening for certain types of information, and checking for valid data. In addition to the standard Financial screen fields, you can create your own customized fields. While your agency can customize most of these fields, The following is an example of the first Financial Profile screen. This screen contains four main categories: employment, ratings (employment and asset), bank or saving accounts, and alternate payer.
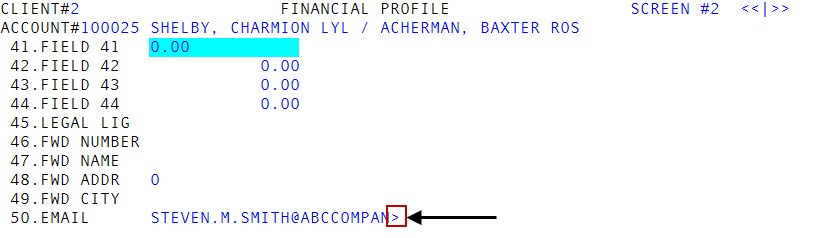
Some of the fields may have restrictions as to the number of characters you can enter while some fields allow an unlimited number of characters. The character limit is determined by your agency. If there is more information in a field than what displays in the screen, the field displays a right arrow (>), as seen in the following examples. When you navigate to the field, you can use your right arrow key to scroll through the field to view all of the information.
Example 1: Financial Profile screen
Example 2: Financial Profile window in the Collector screen
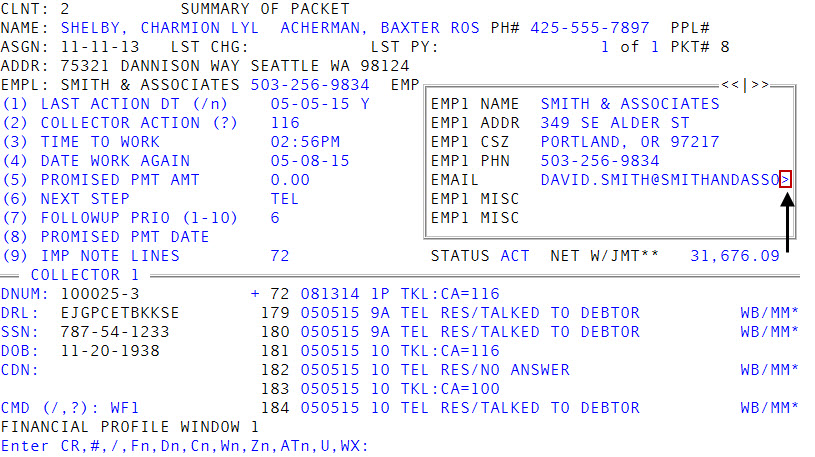
You can also view and make changes to these same fields without leaving the Collector screen by using the Financial Profile windows. For more information, see Viewing and changing Financial Profile window information.
Your agency may have created custom fields that are not included in the following table.
|
Field |
Description |
|
Employment |
Fields 1-14 show information about the account's employment. If the customer has a second job, or if the customer is married and the spouse is employed, that information is shown in the EMP 2 fields. |
|
Emp Name |
The name of the employer. |
|
Emp Addr |
The address of the employer. If the address is outside the United States, type /IA to enter an international address. For more information, see Adding or editing an Account record. |
|
Emp CSZ |
The employer's city, state, and zip code. |
|
Emp Phn |
The employer's telephone number. |
|
Emp Misc |
Miscellaneous data about employment. |
|
Emp Rate |
A judgment about the quality of employment, used in calculating the WIP and legal recommendation criteria. Assign a number from 1 to 4 according to Employment Rating. |
|
Asset Rt |
A judgment of the value of assets, used in calculating the legal recommendation criteria. Assign a number from 1 to 4 according to Asset Rating. |
|
Miscellaneous Information |
Fields 17-21. |
|
Banking |
Fields 22-35 contain information about the customer's bank accounts. |
|
Bank Name |
The name of the bank, credit union, or savings institution. |
|
Bank Addr |
The bank's street address. If the address is outside the United States, type /IA to enter an international address. For more information, see Adding or editing an Account record. |
|
Bank CSZ |
The bank's city, state, and zip code. |
|
Bank Phn# |
The bank's telephone number. |
|
Bank Acct |
The customer's bank account number. |
|
Dt Chked |
The date the bank information was verified. |
|
Avg Bal |
The average balance in this bank account. |
|
Alt Payr |
The name of the alternate payer, if any. |
|
Pay Addr |
The alternate payer's address. If the address is outside the United States, type /IA to enter an international address. For more information, see Adding or editing an Account record. |
|
Pay Adr2 |
A alternate payer's second address. Could be a post office box number. This field also accepts the entry of /IA to add an international address. For more information, see Adding or editing an Account record. |
|
Pay CSZ |
The alternate payer's city, state, and zip code. This field also accepts the entry of /IA to add an international address. For more information, see Adding or editing an Account record. |
|
Pay Phn |
The alternate payer's residence phone number. Press Enter to display the second Financial screen. |
|
Desc |
A description of the relationship of the alternate payer to the main customer. |
|
Fwd Cli # |
The forward client number (if applicable). You can forward accounts by updating this field. For more information, see Forwarding accounts to other agencies. |
|
Fwd Cli Nm |
The forward client's name. |
|
Fwd Rate |
The commission rate charged by the forward client. |
|
Fwd Date |
The date the account was forwarded. |
|
Fwd Ak Dt |
The date an acknowledgment was received from the forward agency. |
|
Miscellaneous |
The Collector screen allows you to create an unlimited number of Fiscal fields that your agency can customize to store information. Each Financial Profile screen displays 40 fields. Certain fields in the Financial Profile screens are used as labels only, which you cannot update. The Collector System highlights these fields and does not number them. |
|
Rating |
Employment Meaning |
Assets Meaning |
|
1 |
High Income |
High Value |
|
2 |
Medium Income |
Medium Value |
|
3 |
Low Income |
Low Value |
|
4 |
Unemployed |
No Assets |
To view and change Financial Profile screen information:
- Open an account in the Collector screen.
-
At the CMD prompt, type one of the following:
 Go to the first screen of the Financial Profile screen
Type F, and press Enter.
View only the Fiscal fields for a specific Fiscal field category in the Financial Profile screen
Type F and the category name, and press Enter. For example, FBANK.
Select from a list of Fiscal field categories to display in the Financial Profile screen
- Type F?, and press Enter.
- At the Enter Category (/, Q) prompt, do one of the following:
- Type the category name, and press Enter.
- To navigate to the next window, press Enter.
- To navigate to the previous window, type /.
- To exit the window, type Q, and press Enter.
- Navigate to and make your edits to the appropriate fields.
- Type your changes, and press Enter.
If the account is packeted, you will be prompted on how you wish to update the other packet members.
Apply the changes to all of the members of the packetType Y, and press Enter.
Apply the changes to only this accountPress Enter, or type N and press Enter.
Select the accounts to apply the changes to- Type S, and press Enter.
- The Ok To Update prompt displays for each member of the packet. To update the packet member, type Y, and press Enter; otherwise, press Enter, or type N and press Enter. Repeat for each member of the packet.
- To save your changes, in any field type #, and press Enter.
- At the OK to File? prompt, do one of the following:
- To save your changes and exit the Financial Profile screen, type Y and press Enter, or press Enter.
- To discard your changes and exit the Financial Profile screen, type N, and press Enter.
- To return to the Financial Profile screen, type /.