Forwarding accounts to other agencies
When a customer moves out of the area served by your agency, you can forward the account to a collection agency in the area where the customer now resides so it can continue to be worked. You can also forward an account to an attorney's office for legal action. Before you can forward accounts, you must set up the forwarding feature. For more information, see Creating and changing forward agency records. The Collector System also refers to forward agencies as forward clients. These terms can be used interchangeably and you may see this term used in some of the menus.
You send an account to a forward agency by updating the Forward Cli # field in the Financial Profile screen.
You can either specify the agency by entering the forward agency number or you can use the automatic client selection option, which uses the following methods to determine what forward agency to recommend:
- By city code - In The Collector System, every zip code in the United States is set up as a separate city code. Each city code can contain a forward client number assigned to a forward agency, which the system can use when customers move to this area. If a forward client number is present in the city code, that number appears as the recommended forward client.
- By county - If multiple forward agencies exist within the account's three‑digit zip code prefix, the system displays a county listing from which you can select a forward agency.
- By state - If no forward agency is found by zip code or county, the system searches for all forward agencies in the same state as the customer. If only one agency exists in that state, that number is used. If more than one agency exists, the system compares the first three digits of the account's zip code with that of the forwarding agencies in that state. If only one match is found, that number is used. Otherwise, if there are multiple agencies, you type D to display them.
As a part of the forwarding procedure, the system automatically completes the following tasks:
- Sending a letter to a forward agency you are assigning the account to. You must first set up the letter text as detailed in Menu 10.7.80 - Letters/Notices, and then you must set up the letter code in Menu 10.2.24 - Forwarding Controls. If you allow free-form comments, the system prompts the person forwarding the account to enter a maximum of seven lines of additional comments to add to the letter. The user is prompted for this information after they forward the account.
- Entering a forward desk number in the Account record, if your agency has specified one in Forwarding accounts to other agencies. The system enters that desk number in the Account record.
- Entering the forward agency name in the Fwd Client field in the Account Update screen.
- Adding the predetermined amount for forwarding to the cost-to-date information in the Account record when you forward the account. Your agency can determine the cost of various collection activities. As each action takes place in an account, the dollar amount assigned to that action is stored in the Account record.
- Creating notes that indicate the following:
- The date the account was forwarded.
- The old status and desk numbers before the account was forwarded.
- If a forward letter was requested.
- Adding the notation FWD in the Collector Action (?) field in the Tickler, indicating forwarding the account was the last collector's action.
- Entering a date in the Date Work Again field in the Tickler, to check for an acknowledgment from the forwarding agency, you can enter a date to work the account again in the Date Work Again field in the Tickler. The Date Work Again field for forwarded accounts is set up in the Forwarding Controls routine For more information, see Configuring forward controls.
When you forward an account from a support desk, the account remains in the support Tickler unless a forward desk exists.
If there is a forward desk, an account forwarded by a support desk is removed from the support desk's Tickler and reassigned to the forward desk (command SB is unnecessary). Forward desks are set up along with other forward controls, as described in Configuring forward controls.
This section includes the following topics:
Use this option to send accounts in a packet to another agency to be collected. You can send all the accounts in the packet or specify which accounts to forward.
The forward agency fields used in the Financial Profile screen may be named differently than those referenced in these instructions, depending on how your agency has configured them.
In cases where some packet members have already been forwarded to the forward agency, the system forwards only the additional packet members and leaves previously forwarded packet members in the system.
To forward packeted accounts to another agency:
-
From the Master menu, navigate to
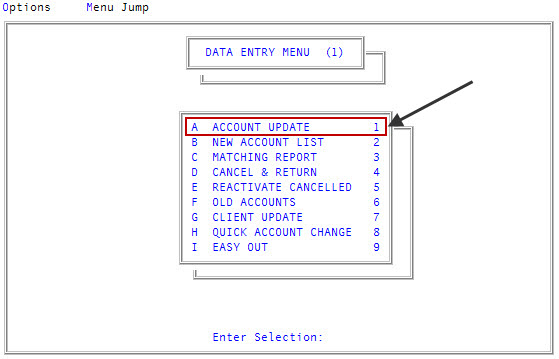
 Data Entry > Account Update (menu 1.1).
 - If The Collector System is in a preliminary Month-End process, the Preliminary Month End in Progress. Use Old or New Month? prompt displays. Do one of the following:
- To record activities the old month, click Old.
- To record activities the new month, click New.
- To return to the Data Entry menu, click Cancel.
- If the Batch Number to Update window displays, select one of the following, and press Enter or click Ok:
- Use Existing Batch
- New Batch Number
- Last Batch Number
Go to Account Prompt
For more information, see Selecting batch options.
-
At the Enter Account # prompt, type the account number, and press Enter.
You may see an alert that a record is locked. This indicates that another user has the account open. The system displays a prompt with the user's initials. For a full list of the commands available at this prompt, see Working with Account records.
- In the account address fields, enter the out‑of‑area address (if it is not entered already) for each account in the packet to forward. For instructions for entering information in the address fields, see Working with Account records.
-
In the Name field, type F to open the Financial Profile screen, and press Enter.
For a list of the commands available in this field, see Using Name prompt options.
- In the Fwd Cli # field, do one of the following to assign the packeted account(s) to a forward agency, and press Enter:
- If you know the forward agency number, type it. Proceed to Step 10.
- To allow the system to select the forward agency for you, type ?.
- If there is only one agency available to forward the account(s) to, proceed to Step 8.
- If there is more than one agency available to choose from, the Available Forward Clientswindow displays. Proceed to Step 9.
-
At the Use Forward Client "agency number" (Y, N, D, O) prompt, do one of the following, and press Enter:
- To use the recommended forward agency, type Y. Proceed to Step 10.
- To return to the Fwd Cli # field, type N.
- Type D.
- At the prompt that displays the default forward agency's address, city, state, and zip code, press Enter.
- At the prompt that displays the default forward agency's name, phone number, and name of the contact, press Enter.
- At the Use Forward Client #"client number" (Y, N, O) prompt, do one of the following, and press Enter:
- To use the forward agency listed in the prompt, type Y. Proceed to Step 10.
- To return the Fwd Cli # field, type N.
- To use another forward agency number, type O (not zero).
- To use another forward agency number, type O (not zero).
- At the Enter Forward Client # or 'D' to Display Another State prompt, do one of the following, and press Enter:
- If you know the forward agency number, type it.
 Choose from a list of agencies.
- Type D.
- In the Enter State Abbreviation to Display (CR="state abbreviation", /) prompt, do one of the following:
To use the default state abbreviation displayed in the prompt, press Enter.
The default is the state the account is located in. The system displays all forward agencies for that state and any note lines that have been entered for the forward agency.
To designate a different state, type the two-letter state abbreviation, and press Enter.
All the forward agencies for that state display.
At the Enter Forward Client # or 'D' to Display Another State prompt of the Available Forward Clients screen, type the forward agency number displayed to the left of the agency name, and press Enter.
- At the Account Commission Rate Is "rate amount" Fwd Rate is "rate amount". Enter New Rate or <CR> to Accept prompt, do one of the following:
To enter a new rate, type the rate amount, and press Enter.
Type the percentage as a decimal. For example, type 45% as .45.)
- To use the current rate, press Enter.
- At the Enter Status Code, or Press <CR> for "status code" prompt, do one of the following:
- To use a new status code, type it, and press Enter.
- To use the current status code, press Enter.
- At the Do You Wish To Forward All Packet Members? (Y, N, CR=Select) prompt, do one of the following
To send all the packet members to the forward agency, type Y, and press Enter. Proceed to Step 14.
The Collector System displays a message that forwarding is complete.
To forward only this account, type N, and press Enter. Proceed to Step 14.
The Collector System displays a message that forwarding is complete.
- To forward select packet members, press Enter.
- At the Dtr: "Account number" Cli:"client number" Sts: "status code" OK To Forward (Y/CR=N) prompt, do one of the following for each packeted account, and press Enter:
- To forward the account, type Y.
- To keep the account at your agency, type N.
-
Set "number" - This letter allows you to make additional comments prompt, type up to seven lines of additional comments for each set, and press Enter.

You can use a maximum of two sets of comments in a letter. You are prompted for the free-form information only if the letter requires it.
The system displays a message that forwarding is complete.
- In the Financial Profile screen, type # in any field to save the changes, and press Enter.
- At the OK to File? (CR=Y, N, /) prompt, do one of the following:
- To save any changes, press Enter.
- To discard your changes and return to the Account Update screen, type N, and press Enter.
- To continue making changes in the Financial Profile screen, type /, and press Enter.
- To save the changes to the account, in the Account Update screen, type # in any field, and press Enter.
- At the OK To File? prompt, do one of the following:
- To save your changes, press Enter.
- To exit and discard your changes, type N, and press Enter.
- To continue making changes to the Account Updatescreen, type /, and press Enter.
If your agency has configured the forwarding fields to automatically create a note in the account when those fields are updated, then the system creates a note for each forwarding field that was updated in each account.
Use this option to view the forwarded agency information assigned to an account.
The forward agency fields used in the Financial Profile screen may be named differently than those referenced in these instructions, depending on how your agency has configured them.
To view forward agency information for a forwarded account:
-
From the Master menu, navigate to
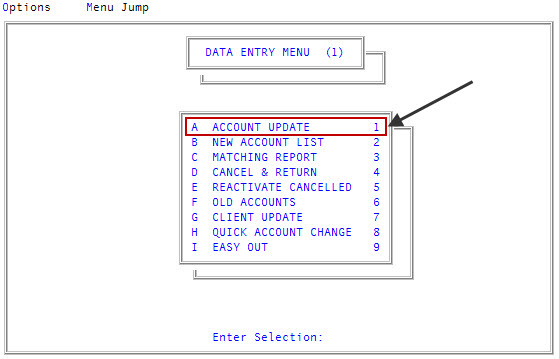
 Data Entry > Account Update (menu 1.1).
 - If The Collector System is in a preliminary Month-End process, the Preliminary Month End in Progress. Use Old or New Month? prompt displays. Do one of the following:
- To forward from the old month, click Old.
- To forward from the new month, click New.
- To return to the Data Entry menu, click Cancel.
- If the Batch Number to Update window displays, select one of the following, and press Enter or click Ok:
- Use Existing Batch
- New Batch Number
- Last Batch Number
Go to Account Prompt
For more information, see Selecting batch options.
-
At the Enter Account # prompt, type the account number, and press Enter.
You may see an alert that a record is locked. This indicates that another user has the account open. The system displays a prompt with the user's initials. For a full list of the commands available at this prompt, see Working the Account# prompt options.
-
In the Name field of the Account Update screen, to open the Financial Profile screen, type F and press Enter.
For a list of the commands available in this field, see Using Name prompt options.
-
In the Fwd Cli # field, type D, and press Enter.
At the bottom of the screen, the system displays the forward agency's street address, city, state, and zip code information.
-
To display the second line, press Enter.
At the bottom of the screen, the system displays the forward agency's name, phone number, and contact name.
- To exit the Financial Profile screen, type # in any field, and press Enter.
- At the OK to File? prompt, do one of the following:
- To save any changes, press Enter.
- To discard your changes and return to the Account Update screen, type N, and press Enter.
- To continue making changes in the Financial Profile screen, type /, and press Enter.
- In the Account Update screen, type # in any field to save the changes to the account, and press Enter.
- At the OK To File? prompt, do one of the following:
- To save your changes, press Enter.
- To exit and discard your changes, type N, and press Enter.
- To continue making changes to the Account Update screen, type /, and press Enter.
Use this option to change the information for the forward agency currently assigned to the account or to forward the account to a different agency.
The forward agency fields used in the Financial Profile screen may be named differently than those referenced in these instructions, depending on how your agency has configured them.
To change forward information:
- From the Master menu, navigate to
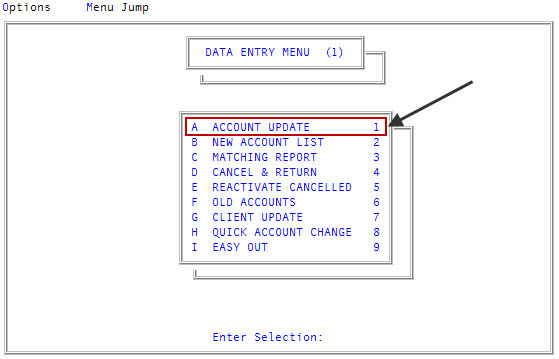
 Data Entry > Account Update (menu 1.1).
- If The Collector System is in a preliminary Month-End process, the Preliminary Month End in Progress. Use Old or New Month? prompt displays. Do one of the following:
- To record activities in the old month, click Old.
- To record activities in the new month, click New.
- To return to the Data Entry menu, click Cancel.
- If the Batch Number to Update window displays, select one of the following, and press Enter or click Ok:
- Use Existing Batch
- New Batch Number
- Last Batch Number
Go to Account Prompt
For more information, see Selecting batch options.
-
At the Enter Account # prompt, type the account number, and press Enter.
You may see an alert that a record is locked. This indicates that another user has the account open. The system displays a prompt with the user's initials. For a full list of the commands available at this prompt, see Working the Account# prompt options.
-
In the Name field of the Account Update screen, to open the Financial Profile screen, type F and press Enter.
For a list of the commands available in this field, see Using Name prompt options.
- In theFwd Cli # field, do one of the following:
To forward the account to another forward agency, do one of the following, and press Enter:
- If you know the number of the forward agency, type it.
- To choose from a list of forward agencies, type ?.
- To change the rate, forward date, or the forward acknowledgment date for the agency currently assigned to the account, press Enter. Proceed to Step 9.
- At the Forwarded To Client "number", Change Forward Client? (Y, CR=N) prompt, do one of the following:
- To change the forward agency, type Y, and press Enter. If you typed the client number for the new forward agency in Step 6, proceed to Step 9.
- Complete Steps 9-12 of Forwarding accounts to other agencies.
- In the Fwd Rate field, type the rate to charge the forward agency, and press Enter.
- In the Fwd Date field, type date the account was forwarded to the agency, and press Enter.
- In the Fwd Ack Dt field, this field is used to record the date the forward agency acknowledged they received the accounts. If you have not received an acknowledgment from the forward agency yet, leave the field blank, and press Enter. If you changed the forward account, the system displays a message that forwarding is complete.
- In the Financial Profile screen, to save the changes, type # in any field and press Enter.
- At the OK to File? (CR=Y, N, /) prompt, do one of the following:
- To save any changes, press Enter.
- To discard your changes and return to the Account Update screen, type N, and press Enter.
- To continue making changes in the Financial Profile screen, type /, and press Enter.
- In the Account Update screen, to save the changes to the account, type # in any field and press Enter.
- At the OK To File? prompt, do one of the following:
- To save your changes, press Enter.
- To exit and discard your changes, type N, and press Enter.
- To continue making changes to the Account Update screen, type /, and press Enter.
If your agency has configured the forwarding fields to automatically create a note in the account when those fields are updated, then the system creates a note for each forwarding field that was removed with the information that was in the field.
After the forwarding agency received the accounts, you should record the date the agency acknowledges the accounts were received.
To record the acknowledgment date from a forwarding agency:
-
From the Master menu, navigate to
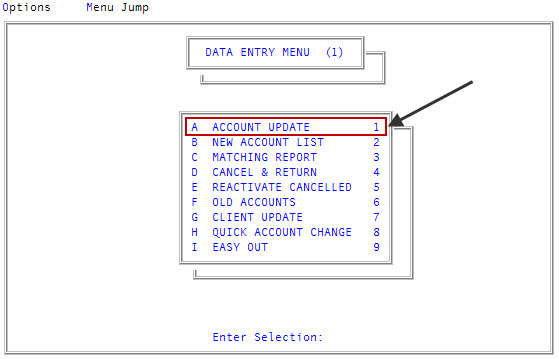
 Data Entry > Account Update (menu 1.1).
 - If The Collector System is in a preliminary Month-End process, the Preliminary Month End in Progress. Use Old or New Month? prompt displays. Do one of the following:
- To record activities in the old month, click Old.
- To record activities in the new month, click New.
- To return to the Data Entry menu, click Cancel.
- If the Batch Number to Update window displays, select one of the following, and press Enter or click Ok:
- Use Existing Batch
- New Batch Number
- Last Batch Number
Go to Account Prompt
For more information, see Selecting batch options.
-
At the Enter Account # prompt, type the account number, and press Enter.
You may see an alert that a record is locked. This indicates that another user has the account open. The system displays a prompt with the user's initials. For a full list of the commands available at this prompt, see Working the Account# prompt options.
-
In the Fwd Ack Dt field, after the forwarding agency acknowledges they have received the accounts, type the acknowledgment date, and press Enter.
If you changed the forward account, the system displays a message that forwarding is complete.
- In the Financial Profilescreen, type # in any field to save the changes, and press Enter.
- At the OK to File? (CR=Y, N, /) prompt, do one of the following:
- To save any changes, press Enter.
- To discard your changes and return to the Account Updatescreen, type N, and press Enter.
- To continue making changes in the Financial Profile screen, type /, and press Enter.
- In the Account Update screen, type # in any field to save the changes to the account, and press Enter.
- At the OK To File? prompt, do one of the following:
- To save your changes, press Enter.
- To exit and discard your changes, type N, and press Enter.
- To continue making changes to the Account Updatescreen, type /, and press Enter.


