Adding or editing an Account record
Use this option to add or edit the information for an account.
To add or edit an account record:
-
From the Main menu, navigate to Data Entry > Account Update (menu 1.1).
- If The Collector System is in a preliminary Month-End process, the Preliminary Month End in Progress. Use Old or New Month? prompt displays. Do one of the following:
- To create or change an account from the old month, click Old.
- To create or change an account from the new month, click New.
- To return to the Data Entry menu, click Cancel.
- If the Batch Number to Update window displays, select one of the following, and press Enter or click Ok:
- Use Existing Batch
- New Batch Number
- Last Batch Number
Go to Account Prompt
For more information, see Selecting batch options.
-
At the Enter Account # prompt, do one of the following:
For a full list of the commands available at this prompt, see Working the Account# prompt options.
 Add a new account
- Do one of the following, and press Enter:
- To assign a new account number by The Collector System, type A.
- To enter a new account number assigned by your agency, type the number.
- At the "Account number" is Not on File - Is This a New Record (CR=Y, N) prompt, press Enter.
We recommend that you let The Collector System assign a number to the new account.
Edit an account
Type the account number, and press Enter.
Search for an account
- Type =, and press Enter.
- Proceed with Step 1 of Running account inquiries.
Search for a specific account by customer name
- Type = and the customer's name, and then press Enter.
- In Line#, Account# 'Q' = prompt of the Inquiry screen, type the line number for the account to display, and press Enter.
View the Financial screen for an account
Type F and the account number, and then press Enter.
View messages or the phone book
Type MSG, and press Enter. For more information, see Using messaging.
Open the calculator
- Type CA, and press Enter.
- For more information, see Using the calculator.
Add or edit an account in a batch
- Type B, and press Enter.
- Proceed with the instructions in Selecting batch options.
Change the input prompt to accept information other than account numbers
- Type IM, and press Enter.
- Proceed with Step 2 of Changing the input mode for the Account Update screen.
Open the next account in a Recall list of accounts
Type a period (.), and press Enter.
Clear the current Recall list of accounts
- Type a period (.) and an X, and then press Enter.
- At the OK to Clear Current List (CR=Y, N) prompt, press Enter.
Create a Recall list of accounts to be worked
- Type two periods (..), and press Enter.
- If you are creating a new list, proceed with Step 5 of Creating and executing a new list.
Open the previous account in a Recall list of accounts
Type a dash (-), and press Enter.
Open the last account worked
Type L, and press Enter.
Open one of the last 15 accounts worked
Type L and a number between 2 and 15, and then press Enter.
The number represents the account's order in the list of 15, starting with the most recent account opened. For example, to open the account that was opened nine accounts before the most recent account, type L9.
Open a list of the last 15 accounts worked
- Type L?, and press Enter.
- In the Last Worked window, select the account to open, and press Enter or click Ok.
Start the Client/Server shell
Type SH, and press Enter.
This routine starts a new NT program shell that runs in a separate window. You can run any program in this window. This setting only applies if you are connected using client/server connection, not Telnet.
Exit the screen
Type /, and press Enter.
- Do one of the following, and press Enter:
-
Add or edit information in the Account Record screen. The following lists detail
the fields on the screen and how to add or edit the information: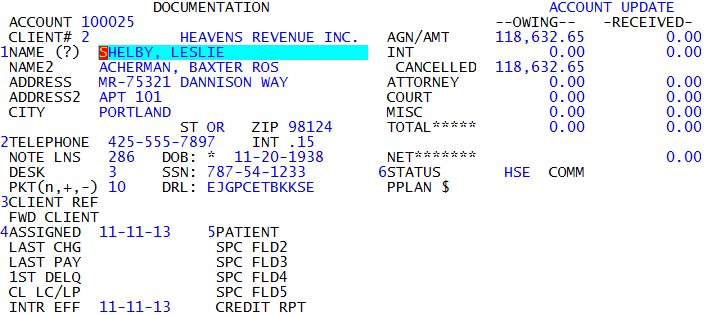
If the account is part of a packet and you edit a field, The Collector System may prompt you to select which packet members to apply th change to. For more information, see Updating packet member information.
-
At the OK to File? prompt, do one of the following:
- To save the information on the screen, press Enter.
- To discard the information on the screen and exit without saving, type N, and press Enter.
- To make changes to the screen, type /, and press Enter.
- To place the account on a payment plan, type PP, and press Enter. For more information, see Using payment plans.