Creating and changing client records
While some fields of the Client Update screen are optional, you must enter a value in the Remit Code field before you can save the record. You, however, cannot enter a value in the Date Last Assigned field. The Collector System automatically updates this field with the last date new business was received from the client.
In the Cli Name field, if you forget to type / before a command, a warning message displays asking you to confirm that you want to change the client's name.
There is no automatic numbering system for clients. For clarity, we suggest you include part of the client's name in the client number. For example, for General Telephone, you could use GEN100. You can make the client number alphabetic, numeric, or a combination and can be up to 10 characters long. It cannot contain asterisks, dashes, or spaces.
To create or change a client record:
-
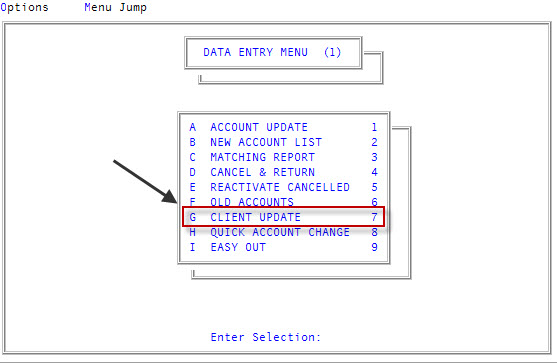
From the Master menu, navigate to
 Data Entry > Client Update (menu 1.7).
 You can also access this routine from Management Strategy > Client > Client Update (menu 10.6.60).
- At the Enter Client # (?,/) prompt, do one of the following, and press Enter:
- To add a new client, type the new client number.
To edit an existing client, type the client number.
For a list of the commands available in this field, see Using client # prompt options.
- If you entered a new client number, at the New Client Record? (CR=Y, N) prompt, type Y,and press Enter.
- In the Cli Name field, do one of the following:
To add a new client, type the name of the client exactly to display it on acknowledgments and statements, and press Enter.
To save time, you can copy an existing client record to add a new client. For more information, see Copying client records to add new clients.
To edit a client record, make any updates to the client name, and press Enter.
For a list of the commands available in this field, see Using client name field options.
- In the Title field, do one of the following, and press Enter:
- Type a title for the client.
- Type an address.
Leave the field blank.
This field is a placeholder for any information you would like to print directly below the client's name on statements. For example, for John Jones, M.D., you could enter "Anesthesiologist".
You can enter a maximum of 31 characters in this field.
- In the Address field, type the client's street address, and press Enter.
-
In the Address2 field, type a second address for the client, and press Enter.
This could be a post office box or an alternate address for the client.
- In the City field, do one of the following:
- Type the client's city name, and press Enter.
Type a city code, and press Enter. Proceed to Step 11.
City codes are set up by your agency as shortcuts for entering city, state, and zip code information. For more information, see Menu 10.5.52 - City.
- In the St field, type the two character abbreviation of the client's state, and press Enter.
- In the Zip field, type the client's zip code, and press Enter.
- In the Phone field, type the telephone number, including area code, and press Enter.
- In the Fax field, type the client's fax number, including area code, and press Enter.
-
In the Contact field, type the name of a person you can contact at the client's office, and press Enter.
This is usually a person who handles the client's finances, such as a clerk or bookkeeper.
- In the C-Phone field, type the direct telephone number for the contact, including area code, and press Enter.
- In the C-Title field, type the title of the contact, and press Enter.
- In the C-Email field, type the contact's e-mail address, and press Enter.
-
In the Sort Field, to change the order in which this client is sorted on your agency reports, type the name as you would like it to display, and press Enter.
By default, the system sorts client records alphabetically by first letter for agency reports. If your client is James T. Wesley, the record will be grouped under "J". To have the record display under "W", enter Wesley, James T. in this field. You can also use this field to sort by branch names. For example, if you are collecting for a company with branches in Portland, OR and Dallas, TX, type "Dallas - 'company name'" in this field for the Dallas clients and type "Portland - 'company name'" in this field for the Portland clients.
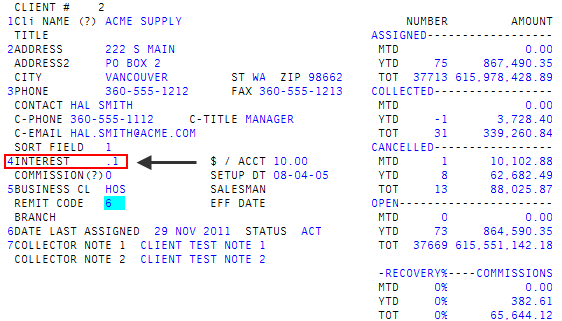
- In the Interest field, type the annual interest rate this client charges, as a decimal (for example, 12% = .12), and press Enter.
-
In the $/Acct field, type the amount your agency charges the client for each account, and press Enter.
This field only displays when setting up clients on logons that allow accounts to be transferred out.
- In the Commission field, do one of the following:
- Use a fixed percentage rate
Type the percentage rate, and press Enter.
You can enter the rate as a decimal (for example, 20% = .20) or a fraction (for example, 20% = 1/5).
- Use a variable commission rate
- To use a variable commission rate, type a commission code, and press Enter.
- To view the details of the commission code you entered, type ?, and press Enter
Select Display Commission Code Table or type /C, and press Enter to view the same information.
The
details of the commission code display.Commission codes are represented by a letter (A, B, C, and so on.). For more information see Menu 10.5.51 - Commission.
- Override the default commission rate
The rate you enter in the Commission field becomes the default commission rate the system uses if there is no alternate commission information in the account's Commission Update screen, the account's Comm field, or the Client Distribution Setup screen. You can over the default commission rate for specific amount fields by doing the following:
- Type ?, and press Enter.
- Select Access Distribution Setup Screen, and press Enter or click Ok.
- Then, follow the instructions for Creating or changing client fund distribution.

- In the Business Cl field, do one of the following, and press Enter:
Type the business class code.
Examples include, medical services, dentists, utilities, and retail stores. Your agency establishes codes for each business class. For more information, see Menu 10.5.50 - Status, Action, Business.
- To see a list of existing business classes, type ?.
- Select a code from the list, and press Enter.
- In the Salesman field, type the identification number of the salesperson responsible for this client, and press Enter.
-
In the Eff Date field, type the date (MM-DD-YY) the salesman was assigned to the client, and press Enter.
Enter the date in MM-DD-YY format.
-
In the
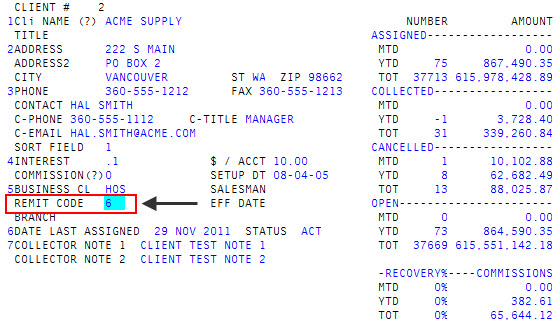
Remit Code field, type a remit code, and press Enter.This field is required. Each client record must have a remit code before statements can be run. For more information, see Menu 10.1.13 - Trans/Sprd/Remit Codes.
-
In the Branch field, type the branch/logon ID for this client, and press Enter.
This field displays only if your agency has branches set up on your system.
-
In the Status Code field, type the status of this client within your agency, and press Enter. For example, you could enter ACT for an active client or INA for an inactive client.
The client status codes have no relationship to the account status codes. Many agencies do not use this field at all.
-
In the Collector Note 1 field, type any information the collector should know about this client, and press Enter.
The note can be a maximum of 25 characters.
-
In the Collector Note 2 field, type any information the collector should know about this client, and press Enter.
The note can be a maximum of 25 characters.
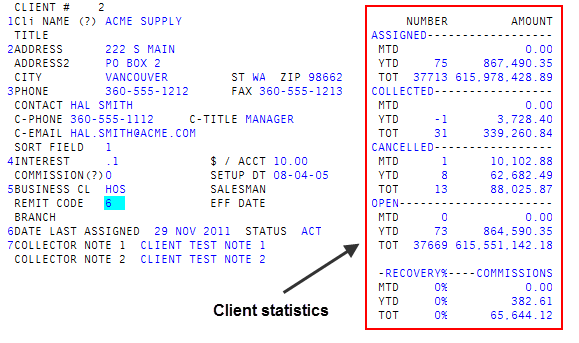
- In the Assigned section of the screen, The Collector System displays the following:
- Number column - The number of accounts assigned in each period.
Account column - The dollar amount assigned during each period.
The Collector System automatically calculates, enters, and updates the fields in the Client Statistics section. You cannot edit these fields directly.
- In the Collected section, the system displays the following information:
- Number column - The number of accounts paid in full from the accounts assigned in the period.
- Amount column - The paid-in-full amount collected from the accounts assigned in the period.
- In the Canceled section, the system displays the following information:
- Number column - The number of accounts canceled from the accounts assigned in the period.
- Amount column - The canceled amount from the accounts assigned in the period.
- In the Open section, the system displays the following information:
- Number column - The number of accounts assigned in the period remaining open for collection. This is derived by subtracting the number of cancellations that pertain to accounts from the period and the number of paid-in-full accounts for the period from the number of accounts assigned during that period.
- Amount column - The dollar amount of accounts remaining open for collection. This is derived by subtracting the amount canceled from accounts that pertain to each period and the amount of collections from accounts that pertain to that period from the amount assigned during that period.
- In the Recovery% section, the system displays the percentage of assigned amounts recovered. This is derived by dividing the amount collected on accounts assigned in each period by the amount assigned in each period minus the amount canceled in each period.
- In the Commissions section, the system displays the dollar amounts of the commissions earned.
- At the OK to File? prompt, do one of the following, and press Enter:
- To save the client record, type Y.
- If you are creating a new record, the Client Distribution Setup screen displays. Proceed to Creating or changing client fund distribution.
- If you are changing an existing record, a message displays that the record was saved, and the system returns to the Enter Client # (?, /) prompt.
- To discard the changes to the client record, type N.
- To make changes to the screen, type /.
- To save the client record, type Y.