Schedule processes
Before you schedule any processes, make sure Process Scheduler is running and optionally edit Process Scheduler settings. If you need to manage an existing scheduled process, see Manage scheduled processes.
Process Scheduler treats processes and schedules as separate items. So the first time you create an ACH reports process, you can reuse it with different schedules. Conversely, if you create a schedule that works well for several processes (for example, Monday through Friday at 11pm) you can assign the schedule to multiple processes. To create or edit schedule profiles, see Schedule profiles.
- From the Master menu, navigate to Utility > Process Scheduler (menu 9.28).
- In the Process Scheduler window, select Configure Processes, and press Enter or click Ok.
-
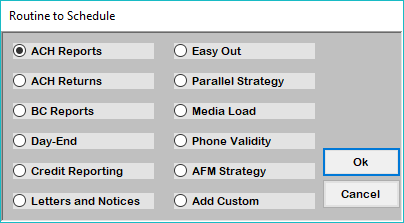
In the Routine to Schedule window, select a process to schedule, and press Enter or click Ok.
Your Routine to Schedule window may display additional options if you previously created any custom processes.
- If you have previously configured a process of the selected type, in the selection window, do one of the following; otherwise skip to the next step:
- To edit the details of an existing process, select the process, and press Enter or click Ok.
- To create a new process, select Add New, and press Enter or click Ok.
- In the Enter Start Date window, type the scheduled process start date, and press Enter or click Ok.
- In the Enter Start Time window, type the scheduled process start time, and press Enter or click Ok.
- In the Enter Expiration Date (Optional) window, do one of the following:
- To have the scheduled process expire, type the expiration date, and press Enter or click Ok.
- To have the scheduled process not expire, leave the window blank, and press Enter or click Ok.
-
Depending on the selected process, enter the necessary information.
 ACH Reports
Certain fields shown in the configuration screen are read-only.
-
In the Select ACH Report window, do one of the following:
If there are no existing processes of this type, the selection window does not display. Skip to the next step.
- To use an existing process, select the process, and press Enter or click Ok.
- To create a new process, select Add New, and press Enter or click Ok.
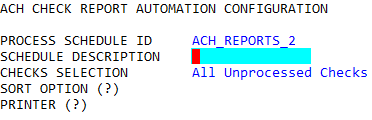
- In the ACH Check Report Automation Configuration screen, in the Schedule Description field, type a description, and press Enter.
- In the Sort Option field, type ?, and press Enter.
-
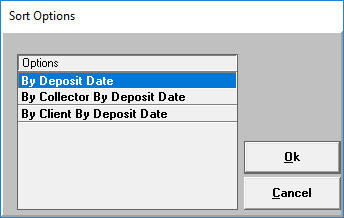
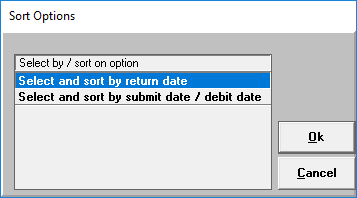
In the Sort Options window, select a sorting method, and press Enter or click Ok.
- In the Printer field, type ?, and press Enter.
- In the Select Printer to Use window, select a printer, and press Enter or click Ok.
- At the OK to File? prompt, do one of the following:
- To file the process, type Y, and press Enter.
- To not file the process, type N, and press Enter.
- To go back and edit the fields, type /, and press Enter.
ACH Returns
Certain fields shown in the configuration screen are read-only.
-
In the Select ACH Return window, do one of the following:
If there are no existing processes of this type, the selection window does not display. Skip to the next step.
- To use an existing process, select the process, and press Enter or click Ok.
- To create a new process, select Add New, and press Enter or click Ok.
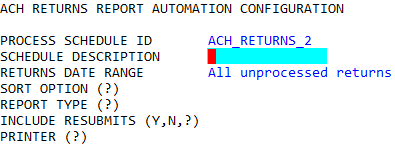
- In the ACH Returns Report Automation Configuration screen, in the Schedule Description field, type a description, and press Enter.
- In the Sort Option field, type ?, and press Enter.
-
In the Sort Options window, select a sorting method, and press Enter or click Ok.
- In the Report Type field, type ?, and press Enter.
-
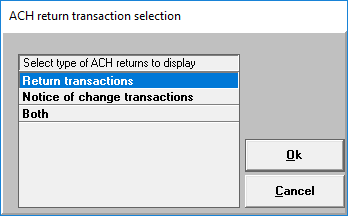
In the ACH return transaction selection window, select the ACH return types to display, and press Enter or click Ok.
- In the Include Resubmits field, do one of the following:
- To include resubmitted transactions on the report, type Y, and press Enter.
- To not include resubmitted transactions on the report, type N, and press Enter.
- For additional information on resubmits, type ?, and press Enter.
- In the Ontario Systems window, click Yes or No.
- In the Printer field, type ?, and press Enter.
- In the Select Printer to Use window, select a printer, and press Enter or click Ok.
- At the OK to File? prompt, do one of the following:
- To file the process, type Y, and press Enter.
- To not file the process, type N, and press Enter.
- To go back and edit the fields, type /, and press Enter.
BC Reports
Certain fields shown in the configuration screen are read-only.
-
In the Select BC Report window, do one of the following:
If there are no existing processes of this type, the selection window does not display. Skip to the next step.
- To use an existing process, select the process, and press Enter or click Ok.
- To create a new process, select Add New, and press Enter or click Ok.
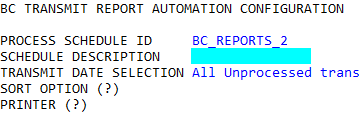
- In the BC Transmit Report Automation Configuration screen, in the Schedule Description field, type a description, and press Enter.
- In the Sort Option field, type ?, and press Enter.
-
In the Sort Options window, select a sorting method, and press Enter or click Ok.
- In the Printer field, type ?, and press Enter.
- In the Select Printer to Use window, select a printer, and press Enter or click Ok.
- At the OK to File? prompt, do one of the following:
- To file the process, type Y, and press Enter.
- To not file the process, type N, and press Enter.
- To go back and edit the fields, type /, and press Enter.
Day-End
- To run the matching report during day end, in the Scheduled Day-End window, click Yes; otherwise click No.
- In the Select Printer to Use window, select a printer, and press Enter or click Ok.
Credit Reporting
-
In the Select Reporting Option window, select the type of credit reporting.
For more information, see Generating consumer files or refer to The Collector System Credit Reporting Update 2016 documentation.
- In the Select Printer to Use window, select a printer, and press Enter or click Ok.
Letters and Notices
-
In the Schedule Letters/Notices window, do one of the following:
- To use an existing process, select the process, and press Enter or click Ok.
- To create a new process, select Add New, and press Enter or click Ok.
- In the Select Generation Option window, select whether to generate letter, notices, or both, and press Enter or click Ok.
- In the Enter Forms to Generate window, do one of the following:
- To generate a specific form, do one of the following:
- Type the form name(s) separated by semicolon, and press Enter or click Ok.
- To select forms from a list, type ?, and press Enter or click Ok.
- In the Select Forms to Generate window, select one or more forms, and press Enter or click Ok.
- To generate all forms, type ALL, and press Enter or click Ok.
- To generate a specific form, do one of the following:
-
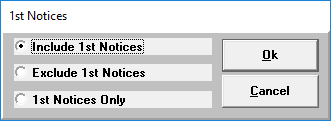
In the 1st Notices window, select how to handle first notices, and press Enter or click Ok.
- In the Send all forms to hold files? window, select Yes or No.
Easy Out
In the Select Easy Out Report window, do one of the following:
-
To use an existing process, select the process, and press Enter or click Ok.
The Collector System only displays easy out reports that create a list or are sent to a printer.
- In the Select Printer to Use window, select a printer, and press Enter or click Ok.
- To create a new process, select Add New, and press Enter or click Ok.
Select the Easy Out report for the process, and press Enter or click Ok.
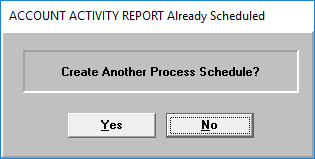
The Collector System displays a confirmation window if a scheduled process for the selected report already exists. Select Yes or No, as necessary.
- In the Process Description window, type a description, and press Enter or click Ok.
Parallel Strategy
If any process indicators exist, in the Parallel Strategy Process Indicator window, select a process indicator; otherwise continue to the next step to set up a schedule.
To assign the schedule to a specific parallel strategy, see Parallel strategy process indicators.
Media Load

- In the Configure Media Assignment Scheduled Process screen, in the Client ID field, type a client ID, and press Enter.
- In the DFM or Load Program Name field, type DFM or a program name, and press Enter.
- In the Override Assign Date Handling field, do one of the following, and press Enter:
- To load the assign date from the data, leave the field empty.
- To use today's date as the assign date, type @DATE.
- To use a date before today as the assign date, type @DATE-n (i.e. @DATE-2 for two days before today).
- In the Load Options field, do one of the following, and press Enter:
- To add new trust accounts, type NEW.
- To update existing trust accounts, type UPDATE.
- To add and update trust accounts,, type NEW/UPDATE.
- In the Source Server Directory Path field, type the path and file name for the data file, and press Enter.
- In the Source Server Directory Path field, type the path for source data file, and press Enter.
- In the Enter Filename window, type the filename.
- Optionally, in the Archive Server Directory Path field, type the path and file name for the archive data file, and press Enter.
- In the Enter Filename window, type the filename.
- At the OK to File Changes? prompt, do one of the following, and press Enter.:
- To file the process, type Y.
- To not file the process, type N.
- To delete the process, type D.
- To go back and edit the fields, type /.
Phone Validity
Processing the Phone Validity files can take a non-trivial amount of time. Finvi recommends monitoring this process during the first run or viewing the log to observe the amount of time needed before using Process Scheduler to run Phone Validity.
In the Maximum Duration in Minutes window, type the maximum number of minutes, and press Enter or click Ok.
Setting a maximum duration protects against hung processes. After the allotted time has expired, Process Scheduler ends potentially hung processes.
AFM Strategy
In the Maximum Duration in Minutes window, type the maximum number of minutes, and press Enter or click Ok.
The maximum duration protects against hung processes. After the allotted time has expired, Process Scheduler kills potentially hung processes.
Add Custom
In the Enter Executable window, type the custom program name, and press Enter or click Ok.
-
-
In the Select Schedule to Use window, do one of the following:
If there are no existing schedules, the selection window does not display. Skip to the following sub-steps for creating a new schedule.
- To use an existing schedule, select the schedule, and press Enter or click Ok.
- To have the process only execute once, select <Run Once>.
- To create a new schedule, select <Add New>, and press Enter or click Ok.
- In the Schedule ID window, type a unique ID for the schedule, and press Enter or click Ok.
- In the Schedule Description window, type a description for the schedule, and press Enter or click Ok.
In the Frequency Options window, select a frequency.
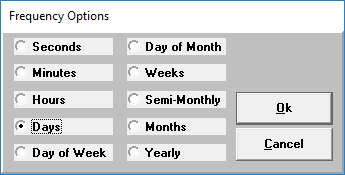
Certain processes have limited frequency options. For a comprehensive list, see Frequency options.
SecondsIn the Number of seconds field, type the number of seconds between process execution, and press Enter.
MinutesIn the Number of minutes field, type the number of minutes between process execution, and press Enter.
HoursIn the Number of hours field, type the number of hours between process execution, and press Enter.
DaysIn the Number of days field, type the number of days between process execution, and press Enter.
Day of WeekRules
- Enter days of the week as numbers 1 through 7, where 1=Monday.
- Separate a sequence using a semicolon (;).
- Use a hyphen (-) for a range.
Examples
For Monday through Wednesday, type 1-3.
For Monday, Wednesday, and Friday, type 1;3;5.
In the Day(s) of the week field, type the days of the week for process execution, and press Enter.
Day of MonthRules
- Enter days of the month as numbers.
- For the last day of the month, type L.
For days from the last day of the month, type L-n.
Example: For the fifth from the last day of the month, type L-5.
- Separate a sequence using a semicolon (;).
- Use a hyphen (-) for a range.
For first, second, third day of the week for the month, type Place/Day of week.
Examples: First Friday, 1/5. Third Thursday, 3/4.
In the Day(s) or range of days field, type the days or range of days of the month for process execution, and press Enter.
WeeksIn the Number of weeks field, type the number of weeks between process execution, and press Enter.
Semi-MonthlyNo additional input is required.
MonthsIn the Number of months field, type the number of months between process execution, and press Enter.
YearlyNo additional input is required.
- At the OK to File? prompt, do one of the following:
- To file the process, type Y, and press Enter.
- To not file the process, type N, and press Enter.
- To delete the process, type DEL, and press Enter.