Posting transactions using spread codes
When you first navigate to the Spread Code field from Trust Activity > Post (menu 4.1), a default spread code may automatically display depending on how your agency's system is set up. When the spread code from the previous transaction is used, the notation "(Assumed)" displays to the right of the spread code.

The default spread code may depend on the account's status code. If this is set up, the notation "Paid Client" or "Paid Agency" displays to the right of the code. To change the displayed code to the other, enter a comma (,). The posting note reflects that the payment could be by a secondary but the status code change is the old status code of the primary RP.
If you enter a forward-type code, the system prompts for the forward amount and percentage. When you enter several transactions, rounding errors can occur, but the system resolves these error when the you post the final transaction for the spread code.
For more information, see Assigning transaction/spread codes to status codes.
If you are using the Packet Posting module, see the Packet Posting User's Guide for more information on posting across accounts within a packet. You can download the guide from the RevQ Client Center website.
To post transactions using spread codes:
-
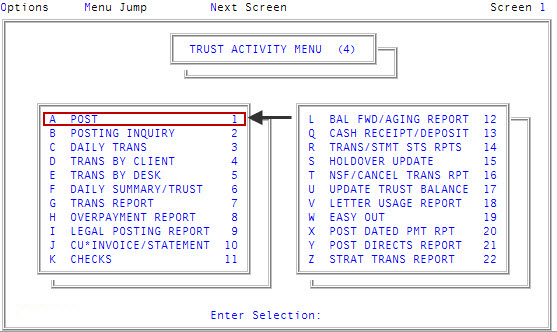
From the Master menu, navigate to Trust Activity > Post (menu 4.1).
-
If your agency has set up a forwarding strategy in Account Flow Manager (see Menu 10.3 - Work Strategies), the Run Strategy Forwarding Report prompt may display when you enter the Posting screen immediately after logging into the system. If you are not sure what option to choose, contact your manager.
Do one of the following:
- To run the report, click Yes. To complete the steps for this report, see Running the Strategy Forwarding report.
- To skip running the report, click No.
- If The Collector System is in a preliminary Month-End process, the following prompt displays: Preliminary Month End in Progress. Use Old or New Month? At this prompt, select one of the following:
- To post transactions in the old month, select Old.
- To post transactions in the new month, select New.
- To return to the Trust Activity menu, select Cancel.
- At the To Continue. Press <CR> prompt, press Enter.
-
If your agency has set up The Collector System for batch processing, the Batch Number to Update window displays. Do one of the following:
 Post a transaction to a new batch
- Select New Batch Number, and press Enter or click Ok.
- At the At the Your New Batch is "number" prompt, press Enter and click Ok.
Post a transaction to an existing batch
- Select Use Existing Batch, and press Enter or click Ok.
- In the Open Batches window, select the batch to post the account to, and press Enter or click Ok.
- In the Batch "number" was Last Update "date" window, click Ok.
Not post a transaction in a batch
- Select Go to Account Prompt, and press Enter or click Ok.
- Click Cancel.
-
In the Posting screen, at the Enter Account# (?, /) prompt, type the account number, and press Enter.
You may see an alert that a record is locked. This indicates that another user has the account open. The system displays a prompt with the user's initials.
-
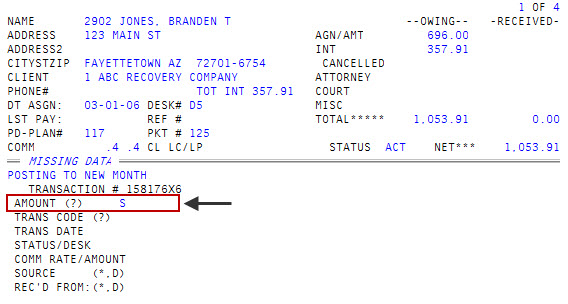
In the Amount (?) field, type S, and press Enter.
-
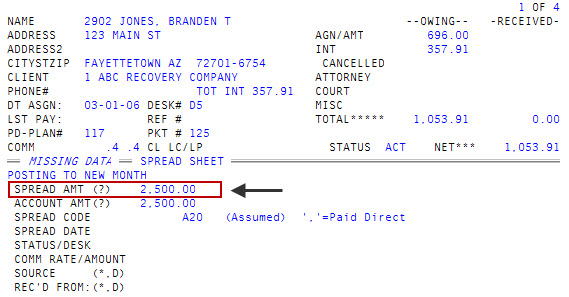
In the Spread Amt (?) field of the Spread Sheet area at the bottom of the screen, do the following:
- Type the total amount of the payment, and press Enter.
- To use an option, do one of the following:
Type an option code, and press Enter.
For a list of options and descriptions, see Using options in the Account Amt field or Spread Amt field.
- To choose from a list of options, type ?, and press Enter. In the Help window, select an option, and press Enter or click Ok.
For more information, see Entering posting amounts in Amount fields.
-
In the Account Amt (?) field, do one of the following:
Not post to a packeted account
Press Enter to accept the default amount automatically entered by the system from the Spread Amt (?) field.
Post to a packeted account
Continue to the next step.
Use an option in this field
Do one of the following:
-
Type an option code, and press Enter.
For a list of options and descriptions, see Using options in the Account Amt field or Spread Amt field.
- To choose from a list of options, type ?, and press Enter.
- In the Help window, select an option, and press Enter or click Ok.
For more information, see Entering posting amounts in Amount fields.
-
-
In the Spread Code field, do one of the following:
- Type the spread code for this posting, and press Enter.
- To use the default spread code displayed from the last transaction, press Enter.
For more information, see Using spreadsheet posting.
-
In the Spread Date field, do one of the following:
- Type the transaction date in MM-DD-YY format, and press Enter.
- To use the default date (displayed from the last transaction), press Enter.
For more information, see Entering dates in the Trans Date or Spread Date fields.
-
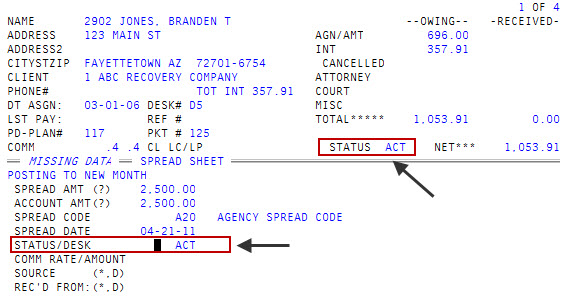
In the Status/Desk field, do one of the following, and press Enter:
If changing a desk number, make sure to do it before changing or accepting the current status code.
Temporarily or permanently change a desk number
Do one of the following:
- If a commission is to be split between two collectors, or if desk assignments were changed and a commission earned by the collector formerly assigned to the desk needs to be posted, enter a temporary desk change by typing T, a period (.), and the temporary desk number. For example, T.1. The message Temp Desk# For This Transaction Only displays.
- To permanently change the desk number, type D, a period (.), and the new desk number. For example, D.3. The message Desk# Updated displays.
Change the status code
Do one of the following:
- Type a new status code, and press Enter.
- To use the current status code, press Enter.
The new status code displays in the Status field on the top half of the screen.
The Comm Rate/Amount field is not accessible in spreadsheet posting because spreadsheet commission rates are determined by the Client Distribution screen.
- If there is a holdover period, the Holdovr prompt displays. For instructions on how to use this prompt, see Posting transactions for agencies using holdover periods.
-
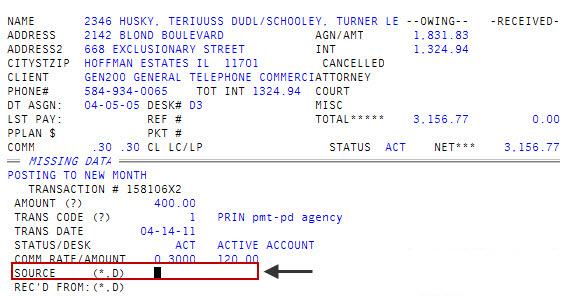
In the Source (*, D) field, do one or all of the following:
Enter the manner in which the payment was made
Type the payment method (such as check, MasterCard, Visa, cash, and so on), and press Enter.
Enter a statement comment
- Type an asterisk (*), and press Enter.
- In the Comment field at the bottom of the screen, type a comment, and press Enter. For more information, see Entering transaction comments.
Enter deposit information
- Type D, and press Enter.
- Proceed to Steps 15-16.
-
In the Rec'd From (*, D) field, do one or all of the following:
Enter the name or relationship to the account of the person making the payment
- Type the name, and press Enter.
- To cross-reference the name in this field, type XF, a colon (:) and a space before the name. For example, XF: SMITH, WILLIAM. This allows the account to be located through Inquiry using this name. The XF is removed from the payment transaction comment.
Enter alternate payer information
- Type AP, and press Enter.
- In the Enter Alternate Payer Name window, type the name (last name and then first name), and press Enter or click Ok.
- In the Enter Alternate Payer Address window, type the street address, and press Enter or click Ok.
- In the Enter Alternate Payer City window, type the city, and press Enter or click Ok.
- In the Enter Alternate Payer State window, type the state initial, and press Enter or click Ok.
- In the Enter Alternate Payer Zip Code window, type the zip code, and press Enter or click Ok.
Enter a statement comment
- Type an asterisk (*), and press Enter.
- In the Comment field at the bottom of the screen, type a comment, and press Enter. For more information, see Entering transaction comments.
Add additional deposit information
- Type D, and press Enter.
- Use the instructions in Steps 12-13.
-
In the Check Amount window, do one of the following:
Enter a check
If you received a check for the amount displayed in the window, press Enter or click Ok.
Enter a check with a different amount
If you received a check for a different amount, type the amount (do not use a dollar sign), and press Enter or click Ok.
Enter cash
- Type 0, and press Enter or click Ok.
- In the Currency Amount window, type the amount of paper money received (do not use a dollar sign), and press Enter or click Ok.
- In the Coin Amount window, type the amount coin money received (do not use a dollar sign), and press Enter or click Ok.
- In the Bank Number window, do one of the following:
For checks, type the bank routing number located at the bottom of the check, and press Enter or click Ok.
If your agency has uploaded bank data to The Collector System, the screen displays the bank name associated with the routing number. It is important to understand that even though the bank that is listed may not be the location of the payer's branch, this is the bank that will receive the transaction.
- For cash, to keep track of the written receipt number used for cash transactions, type /, and the receipt number, and then press Enter or click Ok.
-
At the OK to file? (CR=Y, N, . , A, M, CA, /) prompt, do one of the following:
File the transaction
Press Enter.
A message displays that the transaction is saved.
Exit the screen without filing the transaction
Type N, and press Enter.
Display the account balance
Type a period (.), and press Enter.
Instead of showing the Owing and Received columns in the upper right-hand corner of the screen, entering a period displays Owing and Balance. To go back to showing Owing and Received, type a period again, and press Enter.
Display the Assigned Amounts window
Type A, and press Enter.
The Owing and Received columns in the upper right-hand corner of the screen are replaced by the Assigned Amounts window. For more information, see Viewing distribution windows.
Display the Miscellaneous Amounts window
Type M, and press Enter.
The Owing and Received columns in the upper right-hand corner of the screen are replaced by the Miscellaneous Amounts window. For more information, see Viewing distribution windows.
Use the calculator
Type CA, and press Enter.
For more information, see Using the calculator.
Continue making changes to the transaction screen
Type /, and press Enter.
If you try to file a transaction with a date prior to the last Month-End, The Collector System displays the prompt Transaction Date Is Prior To The Last Close Ok (CR=Y/N). This message displays to make sure you do not inadvertently post an adjustment to a previous month's transaction in the current month's transaction record.